Quantcast
Channel: Node.js – SitePoint
Viewing all 225 articles
Browse latest View live

A Beginner’s Guide to Feathers.js

$
0
0
A Beginner's Guide to Feathers

In this article, you’ll learn how to build a RESTful API Server in Node.js using Feathers.

An API server, also known as an Application Server, is a program that provides data to front-end applications. It also handles business logic in the back end and provides restricted access to an organization's database. It doesn't just prevent unauthorized persons from accessing the data; it can also restrict logged-in users from accessing or altering data if they don't have permission to do so.

Every application you build will need to provide a service to its end users. For that, your application will need data to process. You can use remote APIs to create a new service. For most applications, though, you’ll need to manage your own data store. A popular option is to use online data storage services such as Firebase. This way, you don't have to deal with the nitty gritty details of running a distributed database server. However, your project needs may require the use of a full-fledged, in-house database management system such as MongoDB or Oracle. For your front-end application to access the data stored in the database, you’ll need a server application that sits between the database and the front-end application.
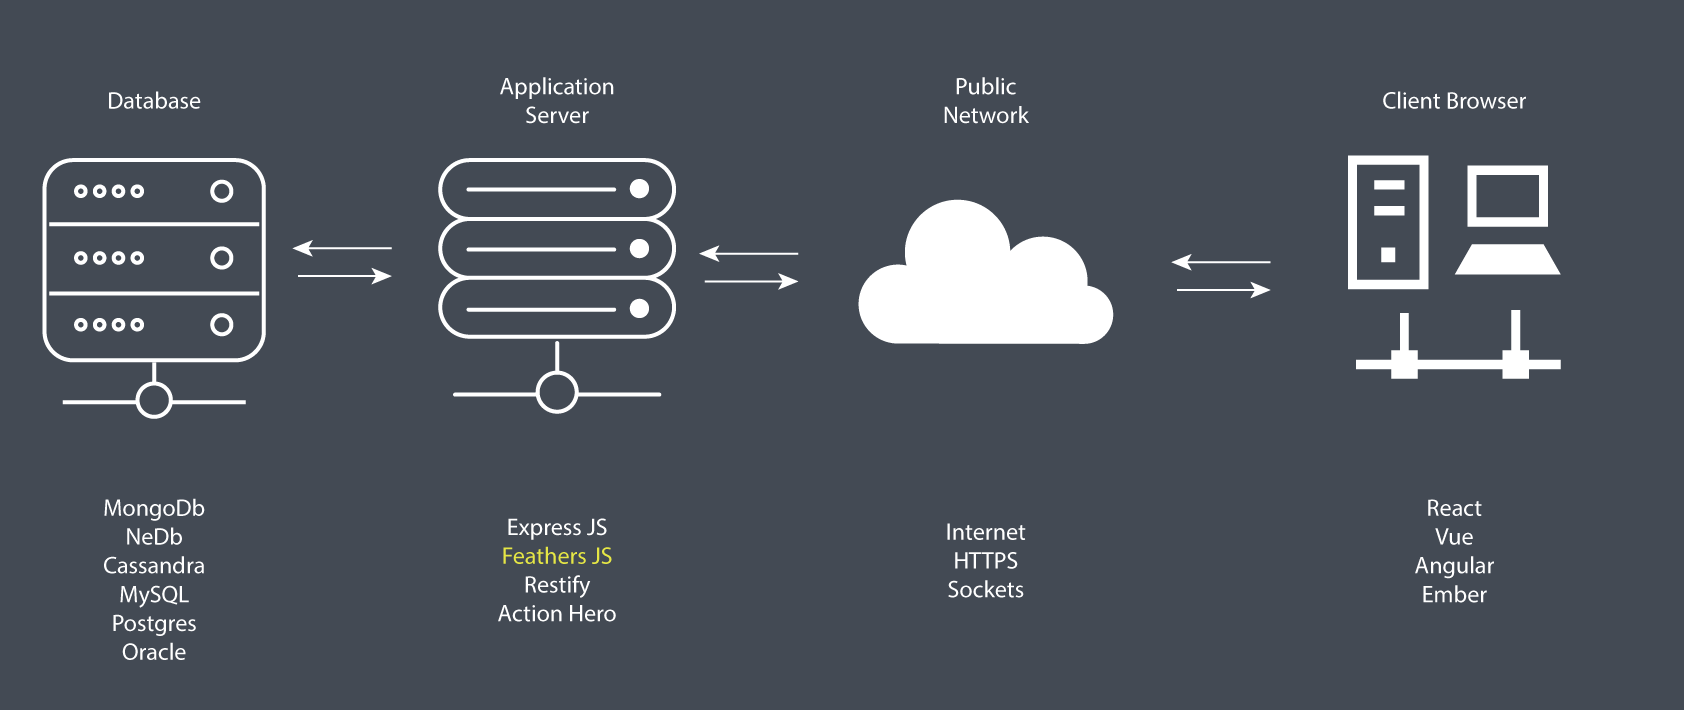
architecture

As illustrated in the diagram above, the work of an application server is to access data from a database using SQL or NoSQL commands and convert into a format that front-end applications (client browser) can understand — such as JSON. In addition, the application server can use various security protocols — such as HTTPS encryption and token authorization — to ensure that communication between the database and the client application is safe and secure. One main advantage of using such an architecture is that you can deploy applications that target different platforms — desktop, mobile, web, and so on — using the same application server. It’s also very easy to scale your application horizontally in order to serve more users efficiently with fast response times.

We’re going to build a simple API server and demonstrate the various features that Feathers provides.

Prerequisites

Before you begin following this tutorial, you’ll need to have a good foundation in the following topics:

Feathers is built on top of Express, a minimalist web framework for Node.js. If you’ve completed the tutorials demonstrated in the links, you’ll realize that it's quite tiring building RESTful APIs using just Express. With Feathers, most of the repetitive work is already done for you. You only need to focus on configuring and customizing code. Let's dive into the code and learn how this web framework works.

Project Creation

To get started with Feathers, you’ll need to install its command line application globally:

npm install -g @feathersjs/cli

Next, create a new API project using the commands below:

mkdir contacts-api
cd contacts-api
feathers generate app

Below are the options I chose. Feel free to choose any testing framework. Unfortunately, testing is beyond the focus of this article, so it won't be covered here. Personally, I like simplicity, and that’s why I went with Jest.
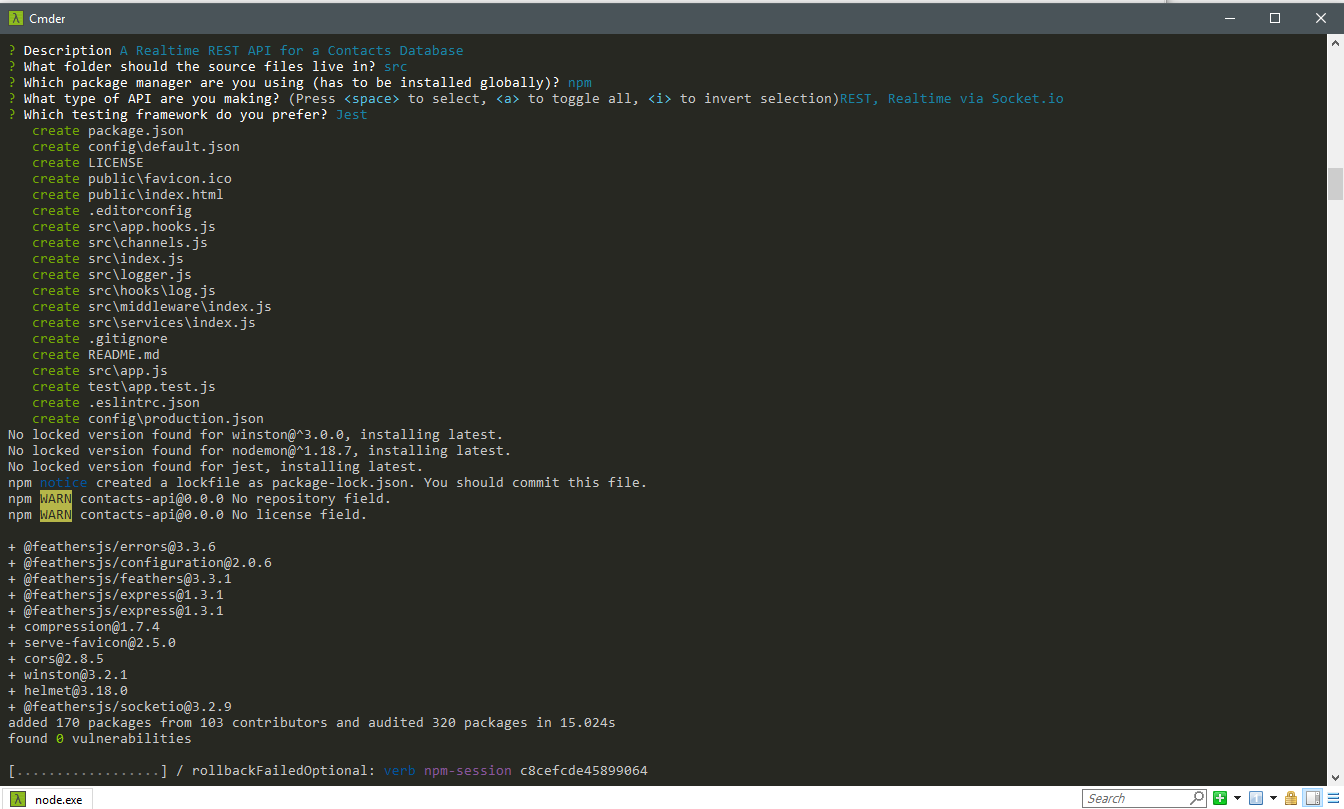
Creating a Feathers app in the command line

Once the installation is complete, you can open you favorite code editor to look at the project files.
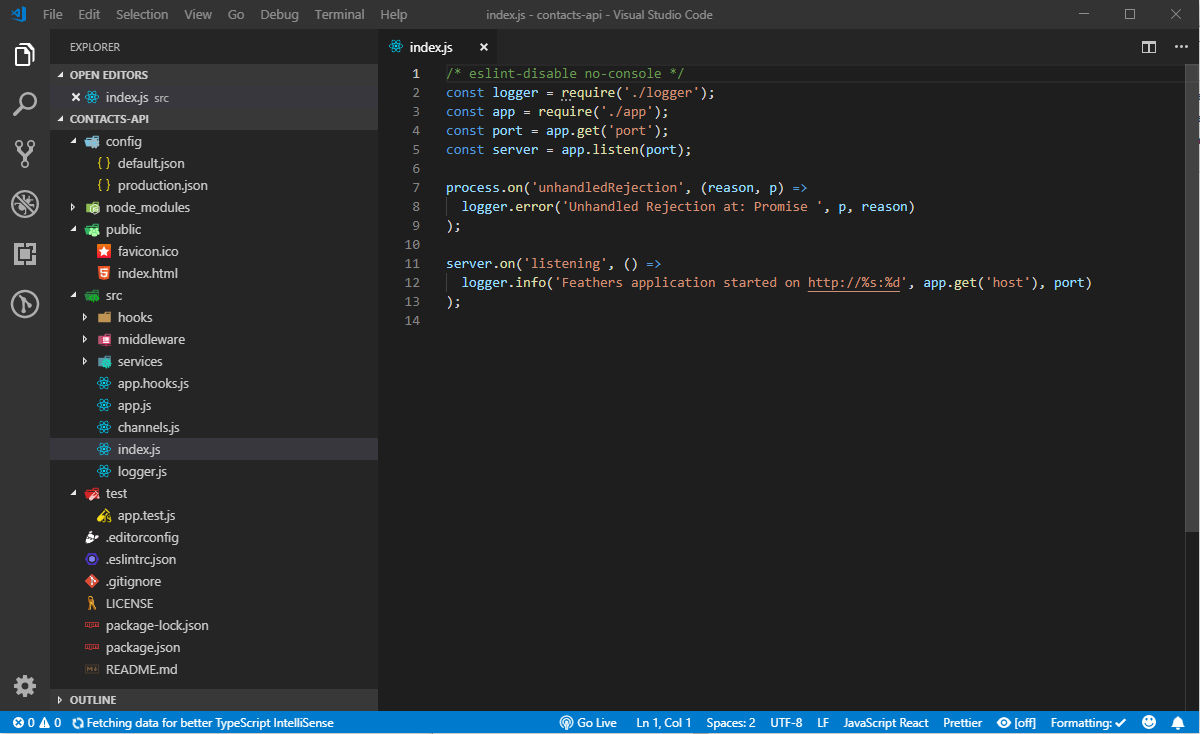
Project structure, as seen in a code editor

If you’ve completed the Express tutorials I listed in the prerequisites section, you shouldn't be intimidated by the generated code. Here's a brief summary that describes the folders and files.
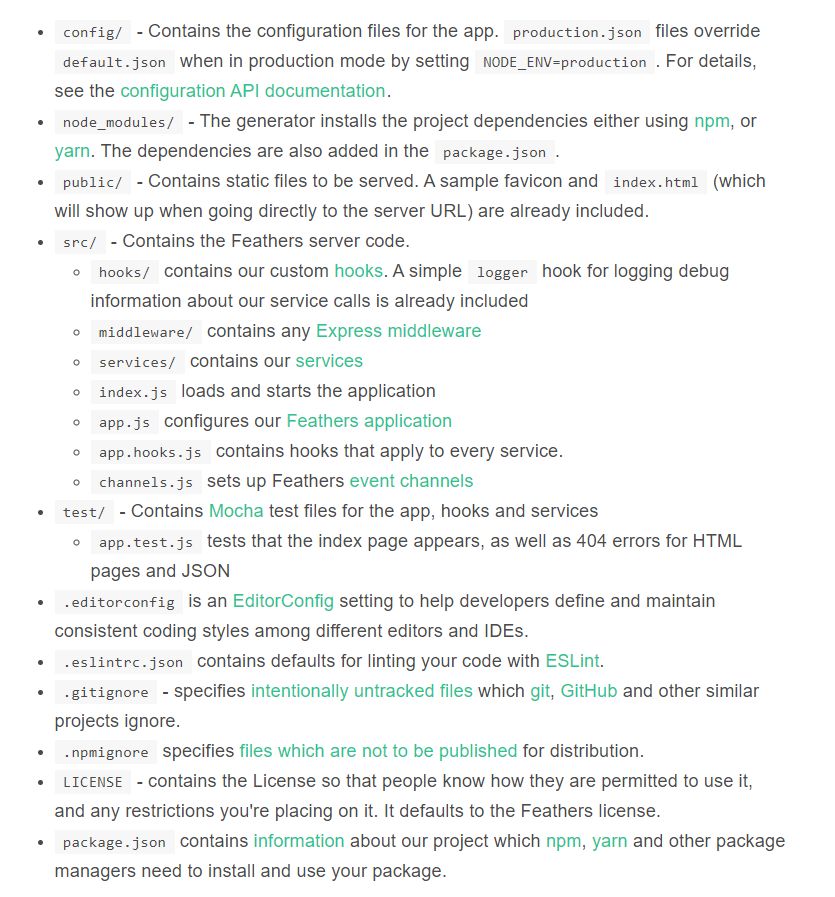
The created files

Don't be too concerned with what each file does right now. You’ll come to understand how they work in the course in this tutorial. For now, let's confirm that the tests are working.

Linting

To ensure our project is compliant with the defined ESLint rules, just run the command npm test. If you’re on a Unix or Linux platform, this should run fine. If you’re on Windows, there are few things you need to adjust for the tests to run successfully.

First, go to package.json and look at the scripts section. Change the test line to this:

"scripts": {
  "test": "npm run eslint && SET NODE_ENV= npm run jest",
},

Next, if you’ve installed Prettier in Visual Studio Code, you'll need to change the single quote setting to true in the Workspace settings tab:

{
  "prettier.singleQuote": true
}

Finally, make sure that, when you create or edit any file, the line ending is LF. If you’re using Visual Studio Code or a similar editor, you can check the current line ending style at the status bar. If it says CRLF, change to LF. Making those changes will help you pass the lint tests. Unfortunately, to make the tests pass will require a bit more work, which won't be covered here.

Let's look at how we can generate a CRUD RESTful interface.

Generate Service

Building a Restful CRUD API interface in Express requires a bit of work. In Feathers, all you have to do is execute a single command, answer a few questions and have the code generated for you:

$ feathers generate service
? What kind of service is it? NeDB
? What is the name of the service? contacts
? Which path should the service be registered on? /contacts
? What is the database connection string? nedb://../data
    force config\default.json
   create src\services\contacts\contacts.service.js
    force src\services\index.js
   create src\models\contacts.model.js
   create src\services\contacts\contacts.hooks.js
   create test\services\contacts.test.js

We’ll be using NeDB database for this tutorial. Feathers does support both SQL databases such as MySQL and NoSQL databases such as MongoDB. However, installing a database system — whether on your machine or on a cloud server — requires a certain amount of time configuring it. NeDB, on the other hand, is an in-memory database that’s 100% JavaScript and supports a subset of MongoDB API. There’s no configuration needed; you just install it. It's a great database for prototyping and testing new applications. This is what we’ll use in this tutorial.

Let's briefly look at some of the files that have been generated using this command:

  • services/contacts/contact.service.js. This is a Feathers service that provides the CRUD API endpoints for /contacts. Pretty small, isn't it? This is because Feathers does the heavy lifting for us. It saves us from writing boilerplate CRUD code.

  • services/contacts/contact.hooks.js. This is where we customize how the CRUD logic behaves. We have the before section, where we can check or change data before Feathers reads or writes to the database. We also have an after section, where we can check or change the results from the database before it’s sent to the client application. We can do things like restricting access, data validation, performing join operations and calculating values for additional fields or columns.

  • models/contacts.model.js. This where we define a model and attach it to a database table. This is also where we define a schema which can be used to validate fields when a new record is inserted or updated. Unfortunately, NeDB doesn’t support schemas. However, I've provided an example of a model that’s connected to MongoDB, which supports the schema feature via the mongoose adapter:

"use strict";

const mongoose = require("mongoose");
const Schema = mongoose.Schema;
require("mongoose-type-email");

const contactsSchema = new Schema({
  name: {
    first: { type: String, required: [true, "First Name is required"] },
    last: { type: String, required: false }
  },
  email: {
    type: mongoose.SchemaTypes.Email,
    required: [true, "Email is required"]
  },
  phone: {
    type: String,
    required: [true, "Phone is required"],
    validate: {
      validator: function(v) {
        return /^\+(?:[0-9] ?){6,14}[0-9]$/.test(v);
      },
      message: "{VALUE} is not a valid international phone number!"
    }
  },
  createdAt: { type: Date, default: Date.now },
  updatedAt: { type: Date, default: Date.now }
});

const contactsModel = mongoose.model("contacts", contactsSchema);

module.exports = contactsModel;

Despite the limitations of using NeDB, it’s still a great database for prototyping. Most NoSQL databases will allow you to submit data using any structure without having to define a schema first. It’s wiser to implement a schema once the project requirements have been realized. With a schema in place, Feathers will perform field validation for you using the rules you’ve defined. You'll need a production-ready database such as MongoDB to be able to define a schema. Do note the configuration for the development database is defined at config/default.json:

"nedb": "../data"

This is where database credentials are provided. We also have another config file called config/production.json. This is the production database configuration that’s used when you deploy your Feathers app. It's important to use a separate database during development. Otherwise, you run the risk of deleting or corrupting business operational data on the production database.

Now that we have our CRUD service for contacts set up, it's time to take it for a spin. You can start the Feather server using the command npm start. Do note that this server doesn’t support hot reloading. So you'll need to restart it every time you make a change to the code. In order to interact with our Feathers app, we’ll need an API browser tool such as Postman or Insomnia. I'll be using Insomnia in this tutorial, but you can follow along easily with Postman or any other tool.

Create a new GET request (press Ctrl + N) and give it the title “List Contacts”. In the URL section, enter http://localhost:3030/contacts. When you hit the Send button, you should have the following view:
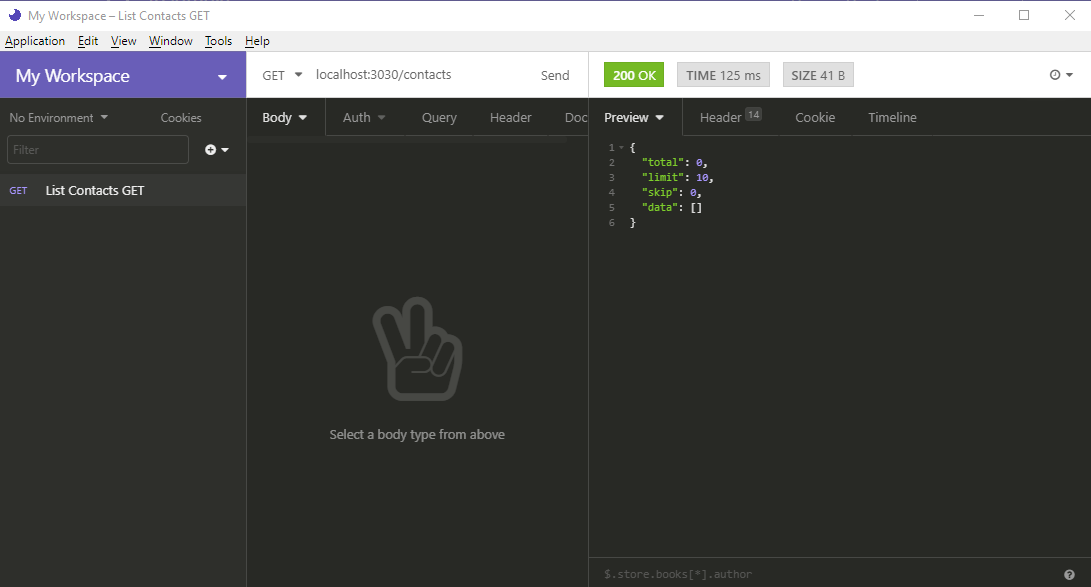
Listing contact requests: the view in your code editor after hitting the Send button

Nothing! Our database is currently empty, so we need to create some new contacts. Create a new request called Create Contact. Fill in the rest of the fields as shown below:
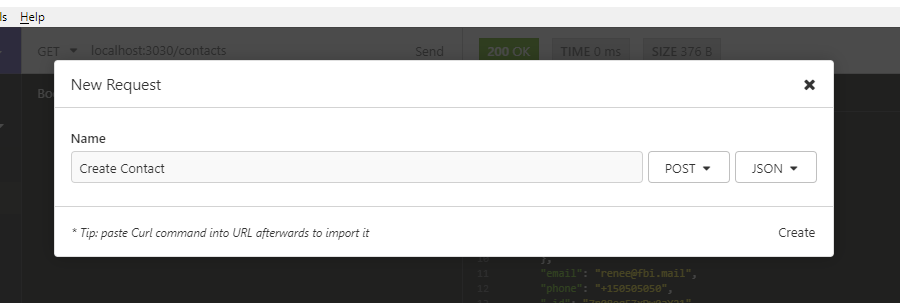
Form for creating the new contact

In case you forgot to change the METHOD to POST in the above form, you can do so later. Change the method to POST and change the Body tab to JSON. Copy the following data in the JSON tab:

{
  "name": {
    "first": "Jack",
    "last": "Bauer"
  },
  "email": "jack@ctu.mail",
  "phone": "+1234567"
}

When you hit the Send button, you should get the following response. Notice that an _id has been generated for your new contact.
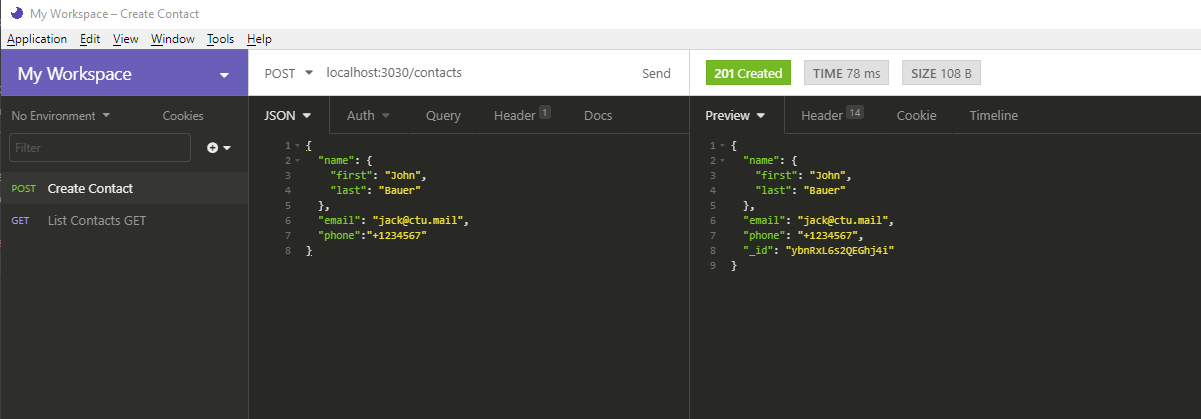
Response with new ID

Go back to List Contacts and hit the Send button again. You should get the following result:

{
  "total": 1,
  "limit": 10,
  "skip": 0,
  "data": [
    {
      "name": {
        "first": "Jack",
        "last": "Bauer"
      },
      "email": "jack@ctu.mail",
      "phone": "+1234567",
      "_id": "ybnRxL6s2QEGhj4i"
    }
  ]
}

Go back to Create Contact and post a couple of new records:

{
  "name": {
    "first": "Chloe",
    "last": "O'Brian"
  },
  "email": "chloe@ctu.mail",
  "phone": "+1987654"
}
{
  "name": {
    "first": "Renee",
    "last": "Walker"
  },
  "email": "renee@fbi.mail",
  "phone": "+150505050"
}

Let's now perform an update. For this, we won't use the UPDATE HTTP method. This method will completely overwrite a record. What we want to do is just overwrite a single field, not the the whole record. For that, we’ll use PATCH. Create a new request, Update Contact as illustrated below:

Updating a contact

In the URL field, put http://localhost:3030/contacts/{_id}. Replace {_id} with the ID of the first record. Place the following data into the JSON tab:

{
  "email": "jack.bauer@gmail.com"
}

Hit the Send button. You should get the following result:

08-Patch-Jack-Email

Notice how the the rest of the fields remain intact. Next, we’re going to delete a record. This one is easy. Just create a new DELETE request and name it Delete Contact. In the URL field, use the format http://localhost:3030/contacts/{_id}. Just like before, replace {_id} with the ID of the record you want to delete. Hitting Send will delete that record for you. You can confirm by running the List Contact request again.

We've just verified that all CRUD operations are running okay. In the next section, we’ll learn how to set up authentication.

The post A Beginner’s Guide to Feathers.js appeared first on SitePoint.


How to Redesign Unsplash Using Styled Components

$
0
0
Redesigning Unsplash Using Styled Components

Writing future-proof CSS is hard. Conflicting classnames, specificity issues, and so on, come up when you have to write and maintain thousands of lines of CSS. To get rid of the aforementioned issues, Styled Components was created.

Styled Components makes it easy to write your CSS in JS and makes sure there are no conflicting classnames or specificity issues with multiple other benefits. This makes writing CSS a joy.

In this tutorial, we’ll explore what CSS in JS is, the pros and cons of styled-components, and finally, we’ll redesign Unsplash using Styled Components. After completing this tutorial, you should be able to quickly get up and running with Styled Components.

Note: Styled Components was specifically built with React in mind, so you have to be using React to use Styled Components.

Prerequisites

For this tutorial, you need a basic knowledge of React.

Throughout the course of this tutorial we’ll be using yarn. If you don’t have yarn already installed, then install it from here.

To make sure we’re on the same page, these are the versions used in this tutorial:

  • Node 12.6.0
  • npx 6.4.1
  • yarn 1.17.3

Evolution of CSS

Before CSS-in-JS was created, the most common way to style web apps was to write CSS in a separate file and link it from the HTML.

But this caused trouble in big teams. Everyone has their own way of writing CSS. This caused specificity issues and led to everyone using !important.

Then came Sass. Sass is an extension of CSS that allows us to use things like variables, nested rules, inline imports and more. It also helps to keep things organized and allows us to create stylesheets faster.

Even though Sass might be thought of as an improvement over CSS, it arguably causes more harm than good without certain systems put in place.

Later, BEM came in. BEM is a methodology that lets us reduce specificity issues by making us write unique classnames. BEM does solve the specificity problem, but it makes the HTML more verbose. Classnames can become unnecessarily long, and it's hard to come up with unique classnames when you have a huge web app.

After that, CSS Modules were born. CSS Modules solved what neither Sass nor BEM could — the problem of unique classnames — by tooling rather than relying on the name given by a developer, which in turn solved specificity issues. CSS Modules gained a huge popularity in the React ecosystem, paving the way for projects like glamor.

The only problem with all these new solutions was that developers were made to learn new syntaxes. What if we could write CSS exactly how we write it in a .css file but in JS? And thus styled-components came into existence.

Styled Components uses Template Literals, an ES6 feature. Template literals are string literals allowing embedded expressions. They allow for multi-line strings and string interpolation features with them.

The main selling point of Styled Components is that it allows us to write exact CSS in JS.

Styled Components has a lot of benefits. Some of the pros and cons of Styled Components are listed below.

Pros

There are lots of advantages to using Styled Components.

  1. Injecting Critical CSS into the DOM

    Styled Components only injects critical CSS on the page. This means users only download CSS needed for that particular page and nothing else. This loads the web page faster.

  2. Smaller CSS bundle per page

    As it only injects styles that are used in the components on the page, bundle size is considerably smaller. You only load the CSS you need, instead of excessive stylesheets, normalizers, responsiveness, etc.

  3. Automatic Vendor Prefixing

    Styled Components allows you to write your CSS and it automatically vendor prefixes according to the latest standard.

  4. Remove unused CSS

    With Styled Components, it's easier to remove unused CSS or dead code, as the styles are colocated with the component. This also impacts on reducing bundle size.

  5. Theming is easy

    Styled Components makes it really easy to theme a React applications. You can even have multiple themes in your applications and yet easily maintain them.

  6. Reduces the number of HTTP requests

    Since there are no CSS files for resets, normalizers, and responsiveness, the number of HTTP requests are considerably reduced.

  7. Unique Classnames

    Styled Components generates unique classnames every time a build step takes place. This allows avoiding naming collisions or specificity issues. No more having global conflicts and being forced to resolve them with !important tags.

  8. Maintenance is easy

    Styled Components allows you to colocate styles with the component. This allows for painless maintenance. You know exactly which style is affecting your component, unlike in a big CSS file.

Cons

Of course, nothing's perfect. Let's look at some downsides associated with Styled Components.

  1. Unable to Cache Stylesheets

    Generally, a web browser caches .css files when a user visits a website for the next visit, so it doesn't have to download the same .css file again. But with styled-components, the styles are loaded in the DOM using the <style> tag. Thus, they can’t be cached and every time user has to request styles when they visit your website.

  2. React specific

    Styled Components was made with React in mind. Thus, it’s React specific. If you use any other framework, then you can’t use Styled Components.

    However, there’s an alternative very similar to styled-components known as emotion which is framework agnostic.

The post How to Redesign Unsplash Using Styled Components appeared first on SitePoint.

Build a Real-time Voting App with Pusher, Node and Bootstrap

$
0
0

In this article, I'll walk you through building a full-stack, real-time Harry Potter house voting web application.

Real-time apps usually use WebSockets, a relatively new type of transfer protocol, as opposed to HTTP, which is a single-way communication that happens only when the user requests it. WebSockets allow for persistent communication between the server and the user, and all those users connected with the application, as long as the connection is kept open.

A real-time web application is one where information is transmitted (almost) instantaneously between users and the server (and, by extension, between users and other users). This is in contrast with traditional web apps where the client has to ask for information from the server. — Quora

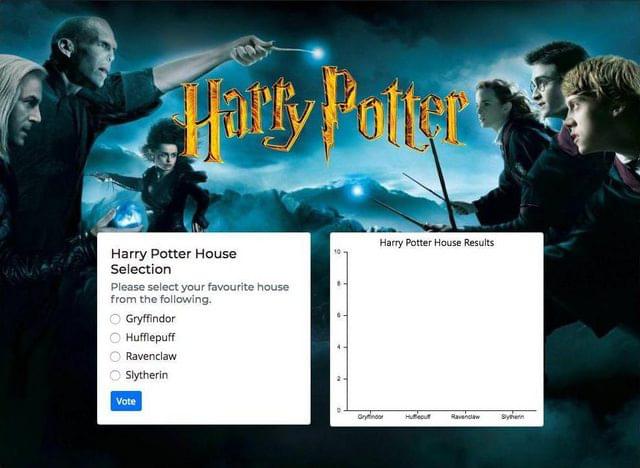
Our Harry Potter voting web app will show options (all the four houses) and a chart on the right side that updates itself when a connected user votes.

To give you a brief idea of look and feel, the final application is going to look like this:

Harry Potter with Chart JS

Here's a small preview of how the real-time application works:

To make our application real-time, we’re going to use Pusher and WebSockets. Pusher sits as a real-time layer between your servers and your clients. It maintains persistent connections to the clients — over a WebSocket if possible, and falling back to HTTP-based connectivity — so that, as soon as your servers have new data to push to the clients, they can do so instantly via Pusher.

Building our Application

Let’s create our fresh application using the command npm init. You’ll be interactively asked a few questions on the details of your application. Here's what I had:

praveen@praveen.science ➜ Harry-Potter-Pusher $ npm init
{
  "name": "harry-potter-pusher",
  "version": "1.0.0",
  "description": "A real-time voting application using Harry Potter's house selection for my article for Pusher.",
  "main": "index.js",
  "scripts": {
    "test": "echo \"Error: no test specified\" && exit 1"
  },
  "repository": {
    "type": "git",
    "url": "git+https://github.com/praveenscience/Harry-Potter-Pusher.git"
  },
  "keywords": [
    "Harry_Potter",
    "Pusher",
    "Voting",
    "Real_Time",
    "Web_Application"
  ],
  "author": "Praveen Kumar Purushothaman",
  "license": "ISC",
  "bugs": {
    "url": "https://github.com/praveenscience/Harry-Potter-Pusher/issues"
  },
  "homepage": "https://github.com/praveenscience/Harry-Potter-Pusher#readme"
}

Is this OK? (yes)

So, I left most settings with default values. Now it's time to install dependencies.

Installing Dependencies

We need Express, body-parser, Cross Origin Resource Sharing (CORS), Mongoose and Pusher installed as dependencies. To install everything in a single command, use the following. You can also have a glance of what this command outputs.

praveen@praveen.science ➜ Harry-Potter-Pusher $ npm i express body-parser cors pusher mongoose
npm notice created a lockfile as package-lock.json. You should commit this file.
npm WARN ajv-keywords@3.2.0 requires a peer of ajv@^6.0.0 but none is installed. You must install peer dependencies yourself.

+ pusher@2.1.2
+ body-parser@1.18.3
+ mongoose@5.2.6
+ cors@2.8.4
+ express@4.16.3
added 264 packages in 40.000s

Requiring Our Modules

Since this is an Express application, we need to include express() as the first thing. While doing it, we also need some accompanying modules. So, initially, let’s start with this:

const express = require("express");
const path = require("path");
const bodyParser = require("body-parser");
const cors = require("cors");

Creating the Express App

Let’s start with building our Express application now. To start with, we need to get the returned object of the express() function assigned to a new variable app:

const app = express();

Serving Static Assets

Adding the above line after the initial set of includes will initialize our app as an Express application. The next thing we need to do is to set up the static resources. Let’s create a new directory in our current project called public and let’s use Express's static middleware to serve the static files. Inside the directory, let’s create a simple index.html file that says “Hello, World”:

<!DOCTYPE html>
<html>
  <head>
    <meta charset="utf-8" />
    <meta name="viewport" content="width=device-width" />
    <title>Hello, World</title>
  </head>
  <body>
    Hello, World!
  </body>
</html>

To serve the static files, we have a built-in .use() function with express.static() in Express. The syntax is as follows:

app.use( express.static( path.join(__dirname, "public") ) );

We also need to use the body parser middleware for getting the HTTP POST content as JSON to access within the req.body. We'll also use urlencoded to get the middleware that only parses urlencoded bodies and only looks at requests where the Content-Type header matches the type option. This parser accepts only UTF-8 encoding of the body and supports automatic inflation of gzip and deflate encodings:

app.use( bodyParser.json() );
app.use( bodyParser.urlencoded( { extended: false } ) );

To allow cross-domain requests, we need to enable CORS. Let’s enable the CORS module by using the following code:

app.use( cors() );

Now all the initial configuration has been set. All we need to do now is to set a port and listen to the incoming connections on the specific port:

const port = 3000;
app.listen(port, () => {
  console.log(`Server started on port ${port}.`);
});

Make sure your final app.js looks like this:

const express = require("express");
const path = require("path");
const bodyParser = require("body-parser");
const cors = require("cors");

// Create an App.
const app = express();

// Serve the static files from public.
app.use( express.static( path.join(__dirname, "public") ) );

// Include the body-parser middleware.
app.use( bodyParser.json() );
app.use( bodyParser.urlencoded( { extended: false } ) );

// Enable CORS.
app.use( cors() );

// Set the port.
const port = 3000;
// Listen to incoming connections.
app.listen(port, () => {
  console.log(`Server started on port ${port}.`);
});

Run the command to start the server:

$ npm run dev

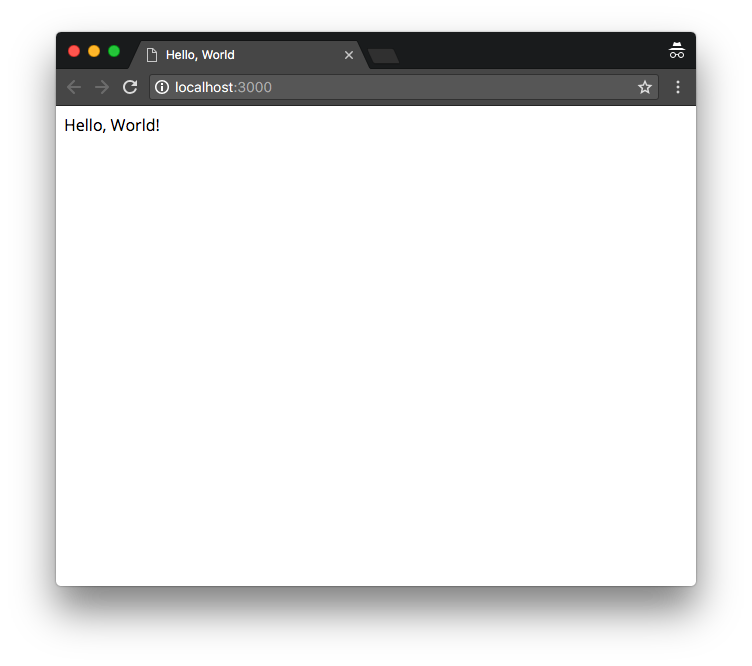
Open your http://localhost:3000/ on a new tab and see the magic. You should be seeing a new page with “Hello, World”.

Preview of Hello World in Browser

The post Build a Real-time Voting App with Pusher, Node and Bootstrap appeared first on SitePoint.

How to Build Your First Telegram Chatbot with Node.js

$
0
0

So, this morning you woke up with the idea to develop a way to store and label interesting articles you've read. After playing with the idea, you figure a Telegram chatbot is the most convenient solution for this problem.

In this guide, we'll walk you through everything you need to know to build your first Telegram chatbot using JavaScript and Node.js.

To get started, we have to register our new bot with the so-called Botfather to receive our API access token.

Bot Registration with @BotFather

The first step towards our very own Telegram bot is registering the bot with the BotFather. The BotFather is a bot itself that makes your life much easier. It helps you with registering bots, changing the bot description, adding commands, and providing you with the API token for your bot.

The API token is the most important step, as this allows you to run the code that can perform tasks for the bot.

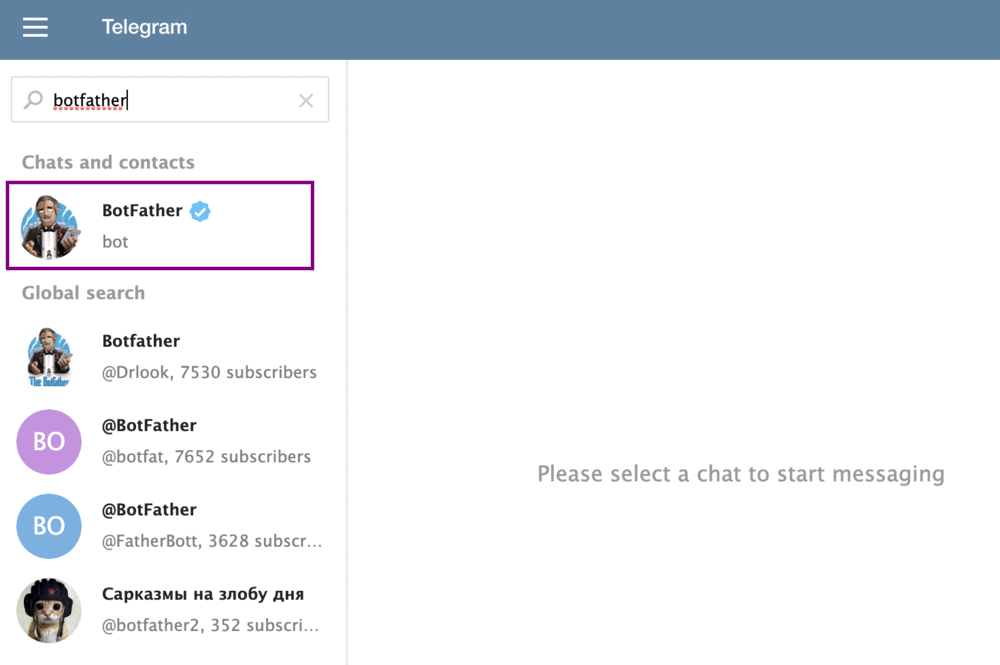
1. Finding the BotFather

The BotFather can be found on Telegram by searching for 'BotFather'. Click on the official BotFather, indicated with the white checkmark icon in the blue circle.

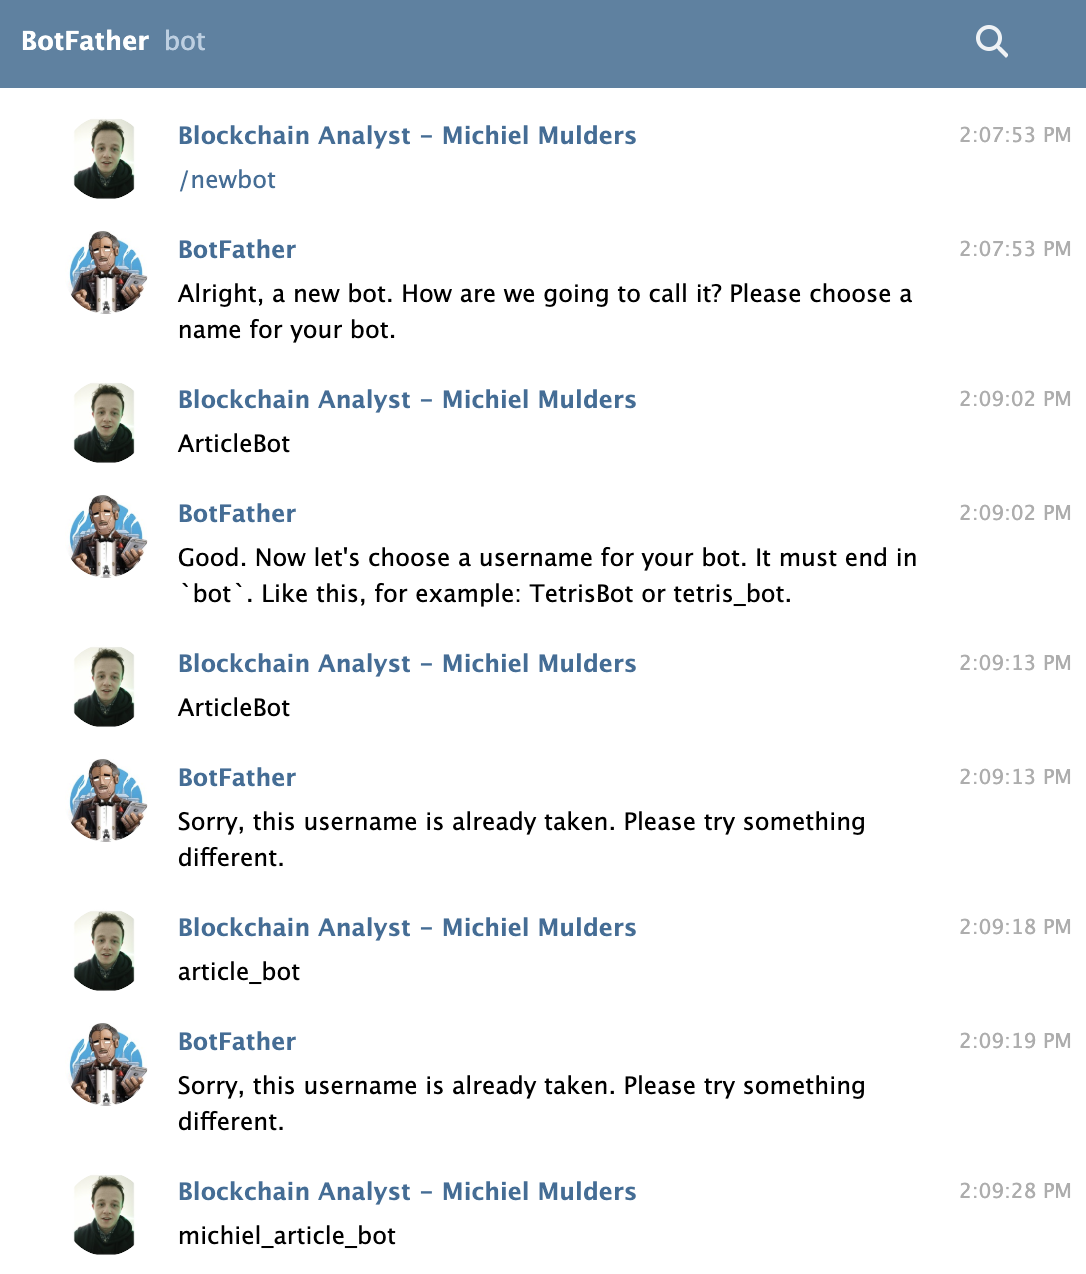
2. Registering a New Bot

Now we've found BotFather, let’s talk to him! You can start the conversation by typing /newbot. BotFather will ask you to choose a name for your both. This name can be anything and doesn’t have to be unique. To keep things simple, I named my bot ArticleBot.

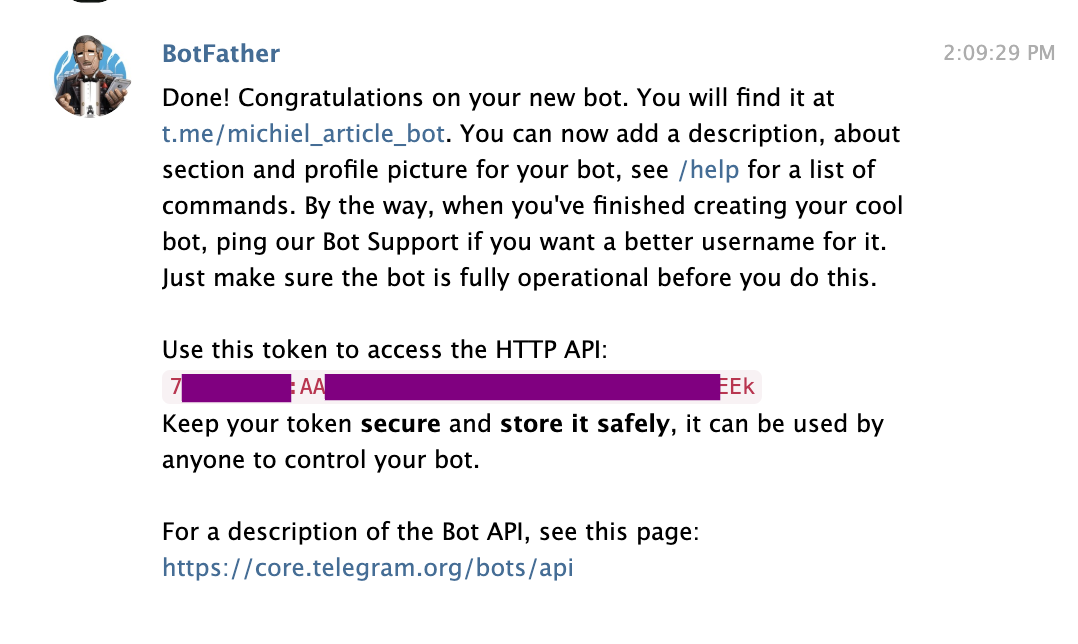
Next, you will be prompted to input a username for the bot. The username must be unique and end in bot. Therefore, I chose michiel_article_bot, as that username was not yet taken. This will also be the username you use for looking up the bot in Telegram's search field.

FatherBot will return a success message with your token to access the Telegram HTTP API. Make sure to store this token safely, and certainly don't share it with anyone else.

3. Modifying the Bot

We can further modify the bot by adding a description or setting the commands we wish the bot to know. You can message the bot with the text /setcommands. It will show you how to input the commands with the format command1 - Description.

The post How to Build Your First Telegram Chatbot with Node.js appeared first on SitePoint.
Build a JavaScript Command Line Interface (CLI) with Node.js

$
0
0
Build a Node CLI

As great as Node.js is for “traditional” web applications, its potential uses are far broader. Microservices, REST APIs, tooling, working with the Internet of Things and even desktop applications: it’s got your back.

Another area where Node.js is really useful is for building command-line applications — and that’s what we’re going to be doing in this article. We’re going to start by looking at a number of third-party packages designed to help work with the command line, then build a real-world example from scratch.

What we’re going to build is a tool for initializing a Git repository. Sure, it’ll run git init under the hood, but it’ll do more than just that. It will also create a remote repository on GitHub right from the command line, allow the user to interactively create a .gitignore file, and finally perform an initial commit and push.

As ever, the code accompanying this tutorial can be found on our GitHub repo.

Build a Node CLI

Why Build a Command-line Tool with Node.js?

Before we dive in and start building, it’s worth looking at why we might choose Node.js to build a command-line application.

The most obvious advantage is that, if you’re reading this, you’re probably already familiar with it — and, indeed, with JavaScript.

Another key advantage, as we’ll see as we go along, is that the strong Node.js ecosystem means that among the hundreds of thousands of packages available for all manner of purposes, there are a number which are specifically designed to help build powerful command-line tools.

Finally, we can use npm to manage any dependencies, rather than have to worry about OS-specific package managers such as Aptitude, Yum or Homebrew.

Tip: that isn’t necessarily true, in that your command-line tool may have other external dependencies.

What We’re Going to Build: ginit

Ginit, our Node CLI in action

For this tutorial, We’re going to create a command-line utility which I’m calling ginit. It’s git init, but on steroids.

You’re probably wondering what on earth that means.

As you no doubt already know, git init initializes a git repository in the current folder. However, that’s usually only one of a number of repetitive steps involved in the process of hooking up a new or existing project to Git. For example, as part of a typical workflow, you may well:

  1. initialise the local repository by running git init
  2. create a remote repository, for example on GitHub or Bitbucket — typically by leaving the command line and firing up a web browser
  3. add the remote
  4. create a .gitignore file
  5. add your project files
  6. commit the initial set of files
  7. push up to the remote repository.

There are often more steps involved, but we’ll stick to those for the purposes of our app. Nevertheless, these steps are pretty repetitive. Wouldn’t it be better if we could do all this from the command line, with no copy-pasting of Git URLs and such like?

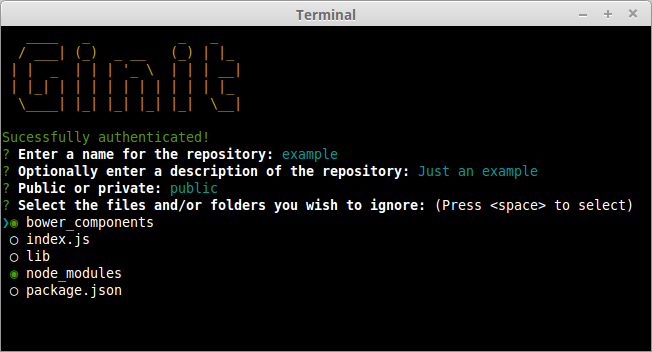
So what ginit will do is create a Git repository in the current folder, create a remote repository — we’ll be using GitHub for this — and then add it as a remote. Then it will provide a simple interactive “wizard” for creating a .gitignore file, add the contents of the folder and push it up to the remote repository. It might not save you hours, but it’ll remove some of the initial friction when starting a new project.

With that in mind, let’s get started.

The Application Dependencies

One thing is for certain: in terms of appearance, the console will never have the sophistication of a graphical user interface. Nevertheless, that doesn’t mean it has to be plain, ugly, monochrome text. You might be surprised by just how much you can do visually, while at the same time keeping it functional. We’ll be looking at a couple of libraries for enhancing the display: chalk for colorizing the output and clui to add some additional visual components. Just for fun, we’ll use figlet to create a fancy ASCII-based banner and we’ll also use clear to clear the console.

In terms of input and output, the low-level Readline Node.js module could be used to prompt the user and request input, and in simple cases is more than adequate. But we’re going to take advantage of a third-party package which adds a greater degree of sophistication — Inquirer. As well as providing a mechanism for asking questions, it also implements simple input controls: think radio buttons and checkboxes, but in the console.

We’ll also be using minimist to parse command-line arguments.

Here’s a complete list of the packages we’ll use specifically for developing on the command line:

  • chalk — colorizes the output
  • clear — clears the terminal screen
  • clui — draws command-line tables, gauges and spinners
  • figlet — creates ASCII art from text
  • inquirer — creates interactive command-line user interface
  • minimist — parses argument options
  • configstore — easily loads and saves config without you having to think about where and how.

Additionally, we’ll also be using the following:

  • @octokit/rest — a GitHub REST API client for Node.js
  • lodash — a JavaScript utility library
  • simple-git — a tool for running Git commands in a Node.js application
  • touch — a tool for implementating the Unix touch command.

Getting Started

Although we’re going to create the application from scratch, don’t forget that you can also grab a copy of the code from the repository which accompanies this article.

Create a new directory for the project. You don’t have to call it ginit, of course:

mkdir ginit
cd ginit

Create a new package.json file:

npm init

Follow the simple wizard, for example:

name: (ginit)
version: (1.0.0)
description: "git init" on steroids
entry point: (index.js)
test command:
git repository:
keywords: Git CLI
author: [YOUR NAME]
license: (ISC)

Now install the dependencies:

npm install chalk clear clui figlet inquirer minimist configstore @octokit/rest lodash simple-git touch --save

Alternatively, simply copy-paste the following package.json file — modifying the author appropriately — or grab it from the repository which accompanies this article:

{
  "name": "ginit",
  "version": "1.0.0",
  "description": "\"git init\" on steroids",
  "main": "index.js",
  "scripts": {
    "test": "echo \"Error: no test specified\" && exit 1"
  },
  "keywords": [
    "Git",
    "CLI"
  ],
  "author": "Lukas White <hello@lukaswhite.com>",
  "license": "ISC",
  "bin": {
    "ginit": "./index.js"
  },
  "dependencies": {
    "@octokit/rest": "^14.0.5",
    "chalk": "^2.3.0",
    "clear": "0.0.1",
    "clui": "^0.3.6",
    "configstore": "^3.1.1",
    "figlet": "^1.2.0",
    "inquirer": "^5.0.1",
    "lodash": "^4.17.4",
    "minimist": "^1.2.0",
    "simple-git": "^1.89.0",
    "touch": "^3.1.0"
  }
}

Now create an index.js file in the same folder and require the following dependencies:

const chalk       = require('chalk');
const clear       = require('clear');
const figlet      = require('figlet');

Adding Some Helper Methods

We’re going to create a lib folder where we’ll split our helper code into modules:

  • files.js — basic file management
  • inquirer.js — command-line user interaction
  • github.js — access token management
  • repo.js — Git repository management.

Let’s start with lib/files.js. Here, we need to:

  • get the current directory (to get a default repo name)
  • check whether a directory exists (to determine whether the current folder is already a Git repository by looking for a folder named .git).

This sounds straightforward, but there are a couple of gotchas to take into consideration.

Firstly, you might be tempted to use the fs module’s realpathSync method to get the current directory:

path.basename(path.dirname(fs.realpathSync(__filename)));

This will work when we’re calling the application from the same directory (e.g. using node index.js), but bear in mind that we’re going to be making our console application available globally. This means we’ll want the name of the directory we’re working in, not the directory where the application resides. For this purpose, it’s better to use process.cwd:

path.basename(process.cwd());

Secondly, the preferred method of checking whether a file or directory exists keeps changing.The current way is to use fs.stat or fs.statSync. These throw an error if there’s no file, so we need to use a try … catch block.

Finally, it’s worth noting that when you’re writing a command-line application, using the synchronous version of these sorts of methods is just fine.

Putting that all together, let’s create a utility package in lib/files.js:

const fs = require('fs');
const path = require('path');

module.exports = {
  getCurrentDirectoryBase : () => {
    return path.basename(process.cwd());
  },

  directoryExists : (filePath) => {
    try {
      return fs.statSync(filePath).isDirectory();
    } catch (err) {
      return false;
    }
  }
};

Go back to index.js and ensure you require the new file:

const files = require('./lib/files');

With this in place, we can start developing the application.

Initializing the Node CLI

Now let’s implement the start-up phase of our console application.

In order to demonstrate some of the packages we’ve installed to enhance the console output, let’s clear the screen and then display a banner:

clear();
console.log(
  chalk.yellow(
    figlet.textSync('Ginit', { horizontalLayout: 'full' })
  )
);

The output from this is shown below.

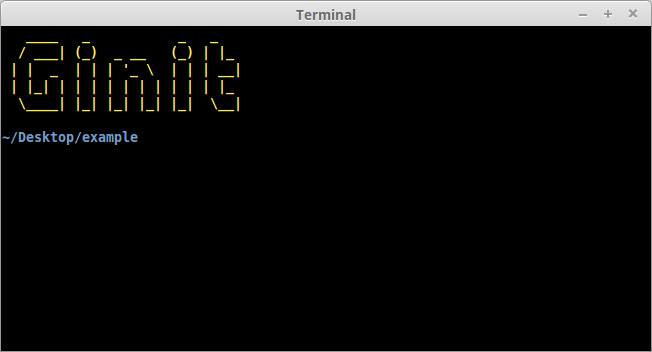
The welcome banner on our Node CLI, created using Chalk and Figlet

Next up, let’s run a simple check to ensure that the current folder isn’t already a Git repository. That’s easy: we just check for the existence of a .git folder using the utility method we just created:

if (files.directoryExists('.git')) {
  console.log(chalk.red('Already a git repository!'));
  process.exit();
}

Tip: notice we’re using the chalk module to show a red-colored message.

The post Build a JavaScript Command Line Interface (CLI) with Node.js appeared first on SitePoint.

How to Build Your First Discord Bot with Node.js

$
0
0

Nowadays, bots are being used for automating various tasks. Since the release of Amazon's Alexa devices, the hype surrounding automation bots has only started to grow. Besides Alexa, other communication tools like Discord and Telegram offer APIs to develop custom bots.

This article will solely focus on creating your first bot with the exposed Discord API. Maybe the most well-known Discord bot is the Music Bot. The music bot lets you type a song name and the bot will attach a new user to your channel who plays the requested song. It’s a commonly used bot among younger people on gaming or streaming servers.

Let’s get started with creating a custom Discord bot.

Prerequisites

  • Node.js v10 or higher installed (basic knowledge)
  • a Discord account and Discord client
  • basic knowledge of using a terminal

Step 1: Setup Test Server

First of all, we need a test server on which we can later test our Discord bot. We can create a new server by clicking the plus icon in the left bottom corner.

click create server

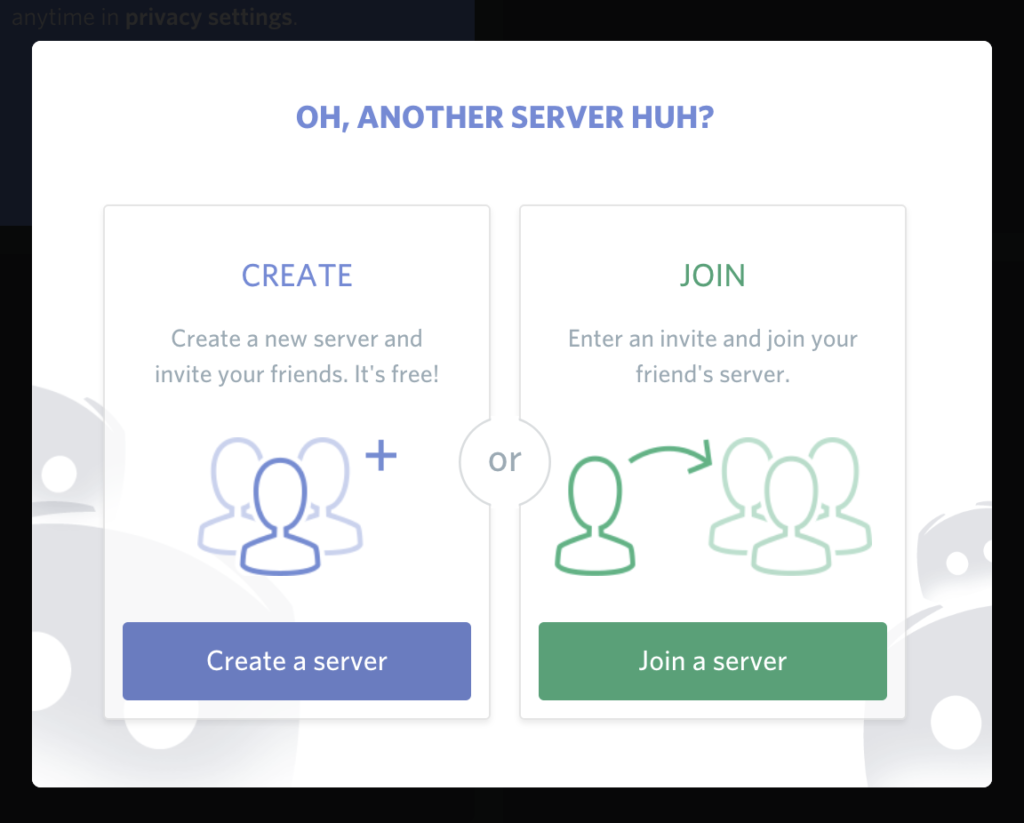
A pop-up will be displayed that asks you if you want to join a server or create a new one. Of course, we want to create a new server.

select create server

Next, we need to input the name for our server. To keep things simple, I've named the server discord_playground. If you want, you can change the server location depending on where you're located to get a better ping.

server name

If everything went well, you should see your newly created server.

new server

Step 2: Generating Auth Token

When we want to control our bot via code, we need to register the bot first under our Discord account.

To register the bot, go to the Discord Developers Portal and log in with your account.

After logging in, you should be able to see the dashboard. Let's create a new application by clicking the New Application button.

developer dashboard

Next, you'll see a pop-up that asks you to input a name for your application. Let's call our bot my-greeter-bot. By clicking the Create button, Discord will create an API application.

create application

When the application has been created, you'll see the overview of the newly created my-greeter-bot application. You'll see information like a client ID and client secret. This secret will be used later as the authorization token.

overview greeter bot

Now, click on the Bot menu option in the Settings menu. Discord will build our my-greeter-bot application and add a bot user to it.

add bot

When the bot has been built, you get an overview of your custom bot. Take a look at the Token section. Copy this authorization token and write it down somewhere, as we'll need it later to connect to our bot user.

bot tab overview

The post How to Build Your First Discord Bot with Node.js appeared first on SitePoint.

Understanding module.exports and exports in Node.js

$
0
0
Working with Modules in Node.js

In programming, modules are self-contained units of functionality that can be shared and reused across projects. They make our lives as developers easier, as we can use them to augment our applications with functionality that we haven't had to write ourselves. They also allow us to organize and decouple our code, leading to applications that are easier to understand, debug and maintain.

In this article, I'll examine how to work with modules in Node.js, focusing on how to export and consume them.

Different Module Formats

As JavaScript originally had no concept of modules, a variety of competing formats have emerged over time. Here's a list of the main ones to be aware of:

  • The Asynchronous Module Definition (AMD) format is used in browsers and uses a define function to define modules.
  • The CommonJS (CJS) format is used in Node.js and uses require and module.exports to define dependencies and modules. The npm ecosystem is built upon this format.
  • The ES Module (ESM) format. As of ES6 (ES2015), JavaScript supports a native module format. It uses an export keyword to export a module's public API and an import keyword to import it.
  • The System.register format was designed to support ES6 modules within ES5.
  • The Universal Module Definition (UMD) format can be used both in the browser and in Node.js. It's useful when a module needs to be imported by a number of different module loaders.

Please be aware that this article deals solely with the CommonJS format, the standard in Node.js. If you'd like to read into any of the other formats, I recommend this article, by SitePoint author Jurgen Van de Moere.

Requiring a Module

Node.js comes with a set of built-in modules that we can use in our code without having to install them. To do this, we need to require the module using the require keyword and assign the result to a variable. This can then be used to invoke any methods the module exposes.

For example, to list out the contents of a directory, you can use the file system module and its readdir method:

const fs = require('fs');
const folderPath = '/home/jim/Desktop/';

fs.readdir(folderPath, (err, files) => {
  files.forEach(file => {
    console.log(file);
  });
});

Note that in CommonJS, modules are loaded synchronously and processed in the order they occur.

Creating and Exporting a Module

Now let's look at how to create our own module and export it for use elsewhere in our program. Start off by creating a user.js file and adding the following:

const getName = () => {
  return 'Jim';
};

exports.getName = getName;

Now create an index.js file in the same folder and add this:

const user = require('./user');
console.log(`User: ${user.getName()}`);

Run the program using node index.js and you should see the following output to the terminal:

User: Jim

So what has gone on here? Well, if you look at the user.js file, you'll notice that we're defining a getName function, then using the exports keyword to make it available for import elsewhere. Then in the index.js file, we're importing this function and executing it. Also notice that in the require statement, the module name is prefixed with ./, as it's a local file. Also note that there's no need to add the file extension.

Exporting Multiple Methods and Values

We can export multiple methods and values in the same way:

const getName = () => {
  return 'Jim';
};

const getLocation = () => {
  return 'Munich';
};

const dateOfBirth = '12.01.1982';

exports.getName = getName;
exports.getLocation = getLocation;
exports.dob = dateOfBirth;

And in index.js:

const user = require('./user');
console.log(
  `${user.getName()} lives in ${user.getLocation()} and was born on ${user.dob}.`
);

The code above produces this:

Jim lives in Munich and was born on 12.01.1982.

Notice how the name we give the exported dateOfBirth variable can be anything we fancy (dob in this case). It doesn't have to be the same as the original variable name.

Variations in Syntax

I should also mention that it's possible to export methods and values as you go, not just at the end of the file.

For example:

exports.getName = () => {
  return 'Jim';
};

exports.getLocation = () => {
  return 'Munich';
};

exports.dob = '12.01.1982';

And thanks to destructuring assignment, we can cherry-pick what we want to import:

const { getName, dob } = require('./user');
console.log(
  `${getName()} was born on ${dob}.`
);

As you might expect, this logs:

Jim was born on 12.01.1982.

The post Understanding module.exports and exports in Node.js appeared first on SitePoint.
Learn End-to-end Testing with Puppeteer

$
0
0
End-to-end Testing with Puppeteer

Puppeteer is a Node library which provides a high-level API to control Chrome or Chromium over the DevTools Protocol. Puppeteer runs headless by default, but can be configured to run full (non-headless) Chrome or Chromium.

In this tutorial, we’ll learn what testing is, the different types of testing, and then we’ll use Puppeteer to perform end-to-end testing on our application. By the end of this tutorial, you should be able to end-to-end test your apps easily with Puppeteer.

Prerequisites

For this tutorial, you need a basic knowledge of JavaScript, ES6+ and Node.js.

You must also have installed the latest version of Node.js.

We’ll be using yarn throughout this tutorial. If you don’t have yarn already installed, install it from here.

You should also know the basics of Puppeteer. To understand the basics of Puppeteer, check out this simple tutorial.

To make sure we’re on the same page, these are the versions used in this tutorial:

  • Node 13.3.0
  • npm 6.13.2
  • yarn 1.21.1
  • puppeteer 2.0.0
  • create-react-app 3.3.0

Introduction to Testing

In simple terms, testing is a process to evaluate the application works as expected. It helps in catching bugs before your application gets deployed.

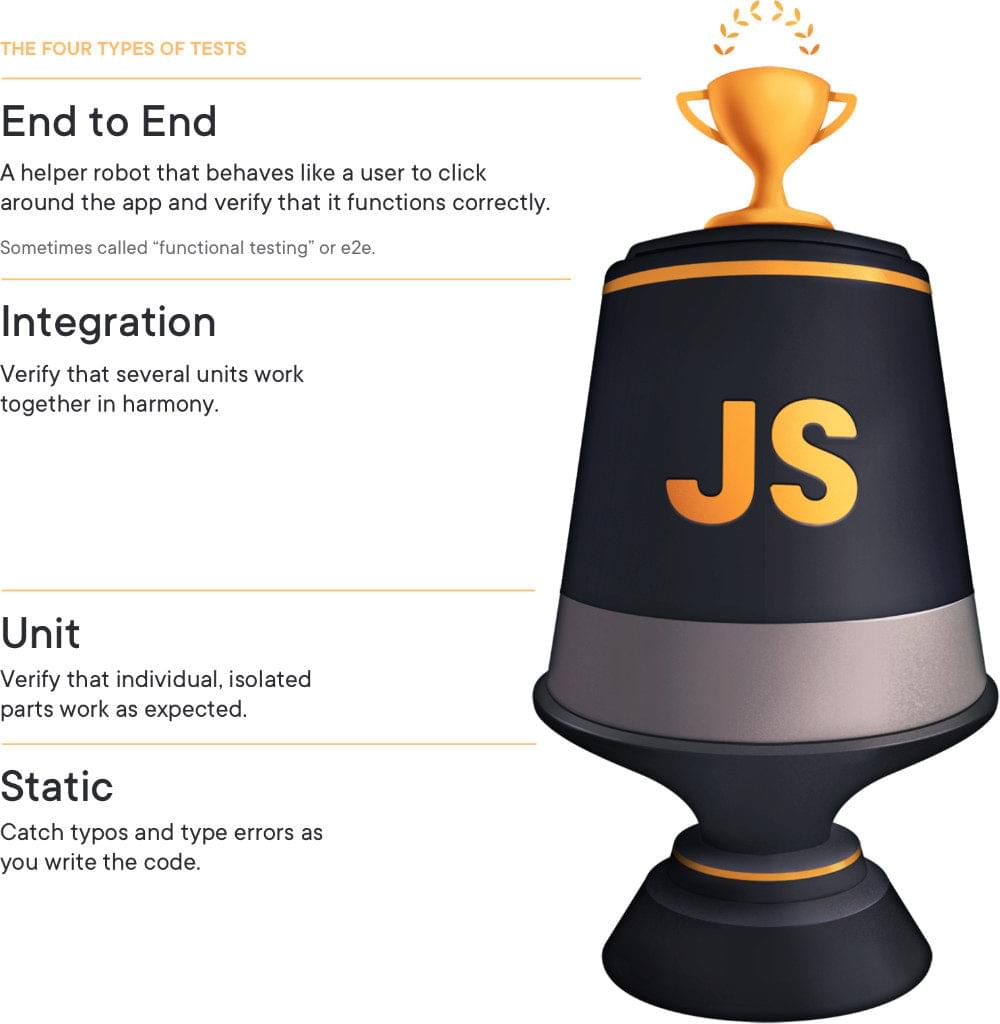
There are four different types of testing:

  1. Static Testing: uses a static type system like TypeScript, ReasonML, Flow or a linter like ESLint. This helps in capturing basic errors like typos and syntax.
  2. Unit Testing: the smallest part of an application, also known as a unit, is tested.
  3. Integration Testing: multiple related units are tested together to see if the application works perfectly in combination.
  4. End-to-end Testing: the entire application is tested from start to finish, just like a regular user would, to see if it behaves as expected.

The testing trophy by Kent C Dodds is a great visualization of the different types of testing:

Testing Trophy - Kent C Dodds

The testing trophy should be read bottom-to-top. If you perform these four levels of testing, you can be confident enough with the code you ship.

Now let’s perform end-to-end testing with Puppeteer.

End-to-end Testing with Puppeteer

Let's bootstrap a new React project with create-react-app, also known as CRA. Go ahead and type the following in the terminal:

$ npx create-react-app e2e-puppeteer

This will bootstrap a new React project in a e2e-puppeteer folder. Thanks to the latest create-react-app version, this will also install testing-library by default so we can test our applications easily.

Go inside the e2e-puppeteer directory and start the server by typing the following in the terminal:

$ cd e2e-puppeteer
$ yarn start

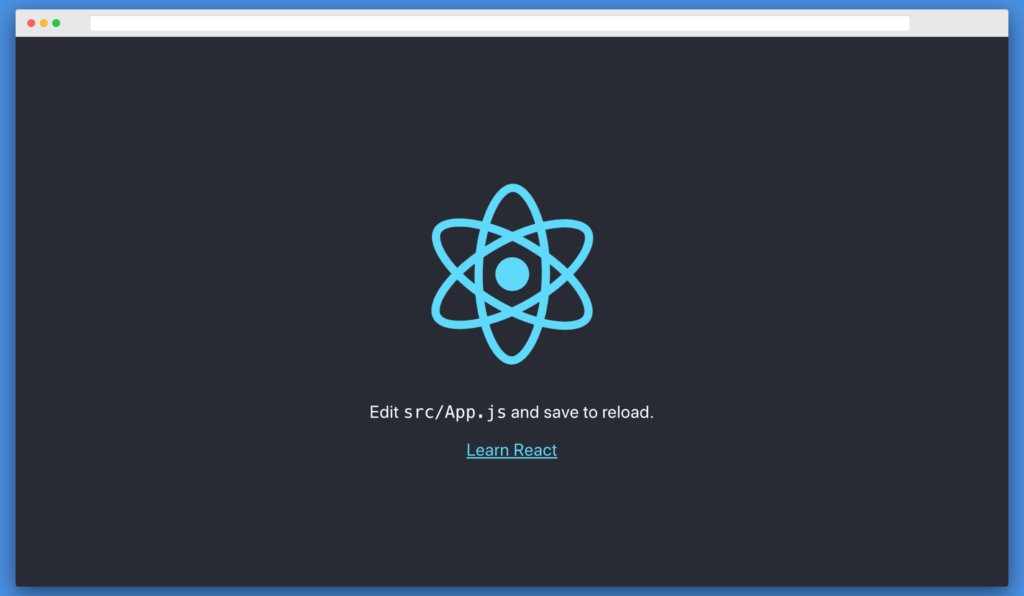
It should look like this:

React Init

Our App.js looks like this:

import React from 'react';
import logo from './logo.svg';
import './App.css';

function App() {
  return (
    <div className="App">
      <header className="App-header">
        <img src={logo} className="App-logo" alt="logo" />
        <p>
          Edit <code>src/App.js</code> and save to reload.
        </p>
        <a
          className="App-link"
          href="https://reactjs.org"
          target="_blank"
          rel="noopener noreferrer"
        >
          Learn React
        </a>
      </header>
    </div>
  );
}

export default App;

We’ll be testing the App.js function and the code will be written in App.test.js. So go ahead and open up App.test.js. It should have the following content:

import React from 'react';
import { render } from '@testing-library/react'; // 1
import App from './App';

test('renders learn react link', () => { // 2
  const { getByText } = render(<App />); // 3
  const linkElement = getByText(/learn react/i); // 4
  expect(linkElement).toBeInTheDocument(); // 5
});

Here's what's happening in the code above:

  1. We import the render function from the @testing-library/react package.
  2. We then use the global test function from Jest, which is our test runner installed by default through CRA. The first parameter is a string which describes our test, and the second parameter is a function where we write the code we want to test.
  3. Next up, we render the App component and destructure a method called getByText, which searches for all elements that have a text node with textContent.
  4. Then, we call the getByText function with the text we want to check. In this case, we check for learn react with the case insensitive flag.
  5. Finally, we make the assertion with the expect function to check if the text exists in the DOM.

This comes by default when we bootstrap with CRA. Go ahead and open up another terminal and type the following:

$ yarn test

When it shows a prompt, type a to run all the tests. You should now see this:

React Init Test

Now let's test this application with end-to-end testing.

Testing the Boilerplate with Puppeteer

Go ahead and install puppeteer as a dev dependency by typing the following in the terminal:

$ yarn add -D puppeteer

Now open up App.test.js and paste the following:

import puppeteer from "puppeteer"; // 1

let browser;
let page;

// 2
beforeAll(async () => {
  browser = await puppeteer.launch({
    headless: false
  });
  page = await browser.newPage();
  await page.goto("http://localhost:3000/");
});

// 3
test("renders learn react link", async () => {
  await page.waitForSelector(".App");

  const header = await page.$eval(".App-header>p", e => e.innerHTML);
  expect(header).toBe(`Edit <code>src/App.js</code> and save to reload.`);

  const link = await page.$eval(".App-header>a", e => {
    return {
      innerHTML: e.innerHTML,
      href: e.href
    };
  });
  expect(link.innerHTML).toBe(`Learn React`);
  expect(link.href).toBe("https://reactjs.org/");
});

// 4
afterAll(() => {
  browser.close();
});

This is what we're doing in the code above:

  1. Firstly, we import the puppeteer package and declare some global variables, browser and page.
  2. Then we have the beforeAll function provided by Jest. This runs before all tests are run. Here, we launch a new Chromium browser by calling puppeteer.launch(), while setting headless mode to false so we see what's happening. Then, we create a new page by calling browser.newPage() and then go to our React application's URL http://localhost:3000/ by calling the page.goto() function.
  3. Next up, we wait for the .App selector to load. When it loads, we get the innerHTML of .App-header>p selector by using the page.$eval() method and compare it with Edit src/App.js and save to reload.. We do the same thing with the .App-header>a selector. We get back innerHTML and href and then we compare them with Learn React and https://reactjs.org/ respectively to test our assertion with Jest's expect() function.
  4. Finally, we call the afterAll function provided by Jest. This runs after all tests are run. Here, we close the browser.

This test should automatically run and give you the following result:

E2E Test Puppeteer Basic

Let's go ahead and make a counter app.

The post Learn End-to-end Testing with Puppeteer appeared first on SitePoint.

Using MySQL with Node.js and the mysql JavaScript Client

$
0
0
Using MySQL with Node.js and the mysql JavaScript Client

NoSQL databases are rather popular among Node developers, with MongoDB (the "M" in the MEAN stack) leading the pack. When starting a new Node project, however, you shouldn't just accept Mongo as the default choice. Rather, the type of database you choose should depend on your project's requirements. If, for example, you need dynamic table creation, or real-time inserts, then a NoSQL solution is the way to go. If your project deals with complex queries and transactions, on the other hand, an SQL database makes much more sense.

In this tutorial, we'll have a look at getting started with the mysql module — a Node.js client for MySQL, written in JavaScript. I'll explain how to use the module to connect to a MySQL database and perform the usual CRUD operations, before looking at stored procedures and escaping user input.

Quick Start: How to Use MySQL in Node

If you've arrived here looking for a quick way to get up and running with MySQL in Node, we've got you covered!

Here's how to use MySQL in Node in five easy steps:

  1. Create a new project: mkdir mysql-test && cd mysql-test.
  2. Create a package.json file: npm init -y.
  3. Install the mysql module: npm install mysql.
  4. Create an app.js file and copy in the snippet below (editing the placeholders as appropriate).
  5. Run the file: node app.js. Observe a “Connected!” message.
const mysql = require('mysql');
const connection = mysql.createConnection({
  host: 'localhost',
  user: 'user',
  password: 'password',
  database: 'database name'
});
connection.connect((err) => {
  if (err) throw err;
  console.log('Connected!');
});

Installing the mysql Module

Now let's take a closer look at each of those steps.

mkdir mysql-test
cd mysql-test
npm init -y
npm install mysql

First of all we're using the command line to create a new directory and navigate to it. Then we're creating a package.json file using the command npm init -y. The -y flag means that npm will use defaults without going through an interactive process.

This step also assumes that you have Node and npm installed on your system. If this is not the case, then check out this SitePoint article to find out how to do that: Install Multiple Versions of Node.js using nvm.

After that, we're installing the mysql module from npm and saving it as a project dependency. Project dependencies (as opposed to devDependencies) are those packages required for the application to run. You can read more about the differences between the two here.

If you need further help using npm, then be sure to check out this guide, or ask in our forums.

Getting Started

Before we get on to connecting to a database, it's important that you have MySQL installed and configured on your machine. If this is not the case, please consult the installation instructions on their home page.

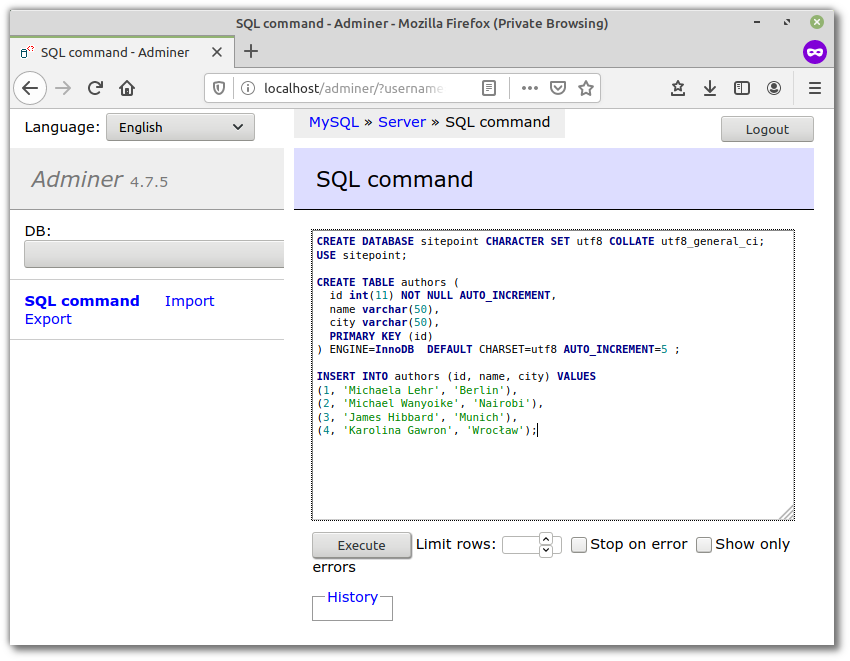
The next thing we need to do is to create a database and a database table to work with. You can do this using a
graphical interface, such as Adminer, or using the command line. For this article I'll be using a database called sitepoint and a table called authors. Here's a dump of the database, so that you can get up and running quickly if you wish to follow along:

CREATE DATABASE sitepoint CHARACTER SET utf8 COLLATE utf8_general_ci;
USE sitepoint;

CREATE TABLE authors (
  id int(11) NOT NULL AUTO_INCREMENT,
  name varchar(50),
  city varchar(50),
  PRIMARY KEY (id)
) ENGINE=InnoDB  DEFAULT CHARSET=utf8 AUTO_INCREMENT=5 ;

INSERT INTO authors (id, name, city) VALUES
(1, 'Michaela Lehr', 'Berlin'),
(2, 'Michael Wanyoike', 'Nairobi'),
(3, 'James Hibbard', 'Munich'),
(4, 'Karolina Gawron', 'Wrocław');

Using MySQL with Node.js & the mysql JavaScript Client

Connecting to the Database

Now, let's create a file called app.js in our mysql-test directory and see how to connect to MySQL from Node.js.

const mysql = require('mysql');

// First you need to create a connection to the database
// Be sure to replace 'user' and 'password' with the correct values
const con = mysql.createConnection({
  host: 'localhost',
  user: 'user',
  password: 'password',
});

con.connect((err) => {
  if(err){
    console.log('Error connecting to Db');
    return;
  }
  console.log('Connection established');
});

con.end((err) => {
  // The connection is terminated gracefully
  // Ensures all remaining queries are executed
  // Then sends a quit packet to the MySQL server.
});

Now open up a terminal and enter node app.js. Once the connection is successfully established you should be able to see the “Connection established” message in the console. If something goes wrong (for example, you enter the wrong password), a callback is fired, which is passed an instance of the JavaScript Error object (err). Try logging this to the console to see what additional useful information it contains.

Using nodemon to Watch the Files for Changes

Running node app.js by hand every time we make a change to our code is going to get a bit tedious, so let's automate that. This part isn't necessary to follow along with the rest of the tutorial, but will certainly save you some keystrokes.

Let's start off by installing a the nodemon package. This is a tool that automatically restarts a Node application when file changes in a directory are detected:

npm install --save-dev nodemon

Now run ./node_modules/.bin/nodemon app.js and make a change to app.js. nodemon should detect the change and restart the app.

Note: we're running nodemon straight from the node_modules folder. You could also install it globally, or create an npm script to kick it off.

Executing Queries

Reading

Now that you know how to establish a connection to a MySQL database from Node.js, let's see how to execute SQL queries. We'll start by specifying the database name (sitepoint) in the createConnection command:

const con = mysql.createConnection({
  host: 'localhost',
  user: 'user',
  password: 'password',
  database: 'sitepoint'
});

Once the connection is established, we'll use the con variable to execute a query against the database table authors:

con.query('SELECT * FROM authors', (err,rows) => {
  if(err) throw err;

  console.log('Data received from Db:');
  console.log(rows);
});

When you run app.js (either using nodemon or by typing node app.js into your terminal), you should be able to see the data returned from the database logged to the terminal:

[ RowDataPacket { id: 1, name: 'Michaela Lehr', city: 'Berlin' },
  RowDataPacket { id: 2, name: 'Michael Wanyoike', city: 'Nairobi' },
  RowDataPacket { id: 3, name: 'James Hibbard', city: 'Munich' },
  RowDataPacket { id: 4, name: 'Karolina Gawron', city: 'Wrocław' } ]

Data returned from the MySQL database can be parsed by simply looping over the rows object.

rows.forEach( (row) => {
  console.log(`${row.name} lives in ${row.city}`);
});

This gives you the following:

Michaela Lehr lives in Berlin
Michael Wanyoike lives in Nairobi
James Hibbard lives in Munich
Karolina Gawron lives in Wrocław

The post Using MySQL with Node.js and the mysql JavaScript Client appeared first on SitePoint.

What Is Node and When Should I Use It?

$
0
0
What Is Node and When Should I Use It?

So you’ve heard of Node.js, but aren’t quite sure what it is or where it fits into your development workflow. Or maybe you’ve heard people singing Node’s praises and now you’re wondering if it’s something you need to learn. Perhaps you’re familiar with another back-end technology and want to find out what’s different about Node.

If that sounds like you, then keep reading. In this article, I’ll take a beginner-friendly, high-level look at Node.js and its main paradigms. I’ll examine Node’s main use cases, as well as the current state of the Node landscape, and offer you a wide range of jumping off points (for further reading) along the way.

Please note that, throughout the article, I’ll use “Node” and “Node.js” interchangeably.

What Is Node.js?

There are plenty of definitions to be found online. Let’s take a look at a couple of the more popular ones. This is what the project’s home page has to say:

Node.js® is a JavaScript runtime built on Chrome's V8 JavaScript engine.

And this is what Stack Overflow has to offer:

Node.js is an event-based, non-blocking, asynchronous I/O runtime that uses Google's V8 JavaScript engine and libuv library.

Hmmm, “event-based”, “non-blocking”, “asynchronous I/O” — that’s quite a lot to digest in one go. So let’s approach this from a different angle and begin by focusing on the other detail that both descriptions mention — the V8 JavaScript engine.

Node Is Built on Google Chrome’s V8 JavaScript Engine

The V8 engine is the open-source JavaScript engine that runs in Google Chrome and other Chromium-based web browsers, including Brave, Opera, and Vivaldi. It was designed with performance in mind and is responsible for compiling JavaScript directly to native machine code that your computer can execute.

However, when we say that Node is built on the V8 engine, we don’t mean that Node programs are executed in a browser. They aren’t. Rather, the creator of Node (Ryan Dahl) took the V8 engine and enhanced it with various features, such as a file system API, an HTTP library, and a number of operating system–related utility methods.

This means that Node.js is a program we can use to execute JavaScript on our computers. In other words, it’s a JavaScript runtime.

How Do I Install Node.js?

In this next section, we’ll install Node and write a couple of simple programs. We’ll also look at npm, a package manager that comes bundled with Node.

Node Binaries vs Version Manager

Many websites will recommend that you head to the official Node download page and grab the Node binaries for your system. While that works, I would suggest that you use a version manager instead. This is a program that allows you to install multiple versions of Node and switch between them at will. There are various advantages to using a version manager. For example, it negates potential permission issues when using Node with npm and lets you set a Node version on a per-project basis.

If you fancy going the version manager route, please consult our quick tip: Install Multiple Versions of Node.js using nvm. Otherwise, grab the correct binaries for your system from the link above and install those.

“Hello, World!” the Node.js Way

You can check that Node is installed on your system by opening a terminal and typing node -v. If all has gone well, you should see something like v12.14.1 displayed. This is the current LTS version at the time of writing.

Next, create a new file hello.js and copy in the following code:

console.log("Hello, World!");

This uses Node’s built-in console module to display a message in a terminal window. To run the example, enter the following command:

node hello.js

If Node.js is configured properly, “Hello, World!” will be displayed.

Node.js Has Excellent Support for Modern JavaScript

As can be seen on this compatibility table, Node has excellent support for ECMAScript 2015 (ES6) and beyond. As you’re only targeting one runtime (a specific version of the V8 engine), this means that you can write your JavaScript using the latest and most modern syntax. It also means that you don’t generally have to worry about compatibility issues — as you would if you were writing JavaScript that would run in different browsers.

To illustrate the point, here’s a second program that makes use of several modern JavaScript features, such as tagged template literals, object destructuring and Array.prototype.flatMap():

function upcase(strings, ...values) {
  return values.map(name => name[0].toUpperCase() + name.slice(1))
    .join(' ') + strings[2];
}

const person = {
  first: 'brendan',
  last: 'eich',
  age: 56,
  position: 'CEO of Brave Software',
};

const { first, last } = person;
const emoticon = [ ['┌', '('], ['˘', '⌣'], ['˘', ')', 'ʃ'] ];

console.log(
  upcase`${first} ${last} is the creator of JavaScript! ` + emoticon.flat().join('')
);

Save this code to a file called index.js and run it from your terminal using the command node index.js. You should see Brendan Eich is the creator of JavaScript! ┌(˘⌣˘)ʃ output to the terminal.

Introducing npm, the JavaScript Package Manager

As I mentioned earlier, Node comes bundled with a package manager called npm. To check which version you have installed on your system, type npm -v.

In addition to being the package manager for JavaScript, npm is also the world’s largest software registry. There are over 1,000,000 packages of JavaScript code available to download, with billions of downloads per week. Let’s take a quick look at how we would use npm to install a package.

Installing a Package Globally

Open your terminal and type the following:

npm install -g jshint

This will install the jshint package globally on your system. We can use it to lint the index.js file from the previous example:

jshint index.js

You should now see a number of ES6-related errors. If you want to fix them up, add /* jshint esversion: 6 */ to the top of the index.js file, re-run the command and linting should pass.

If you’d like a refresher on linting, see A Comparison of JavaScript Linting Tools.

The post What Is Node and When Should I Use It? appeared first on SitePoint.
Forms, File Uploads and Security with Node.js and Express

$
0
0
Forms, File Uploads and Security with Node.js and Express

If you’re building a web application, you’re likely to encounter the need to build HTML forms on day one. They’re a big part of the web experience, and they can be complicated.

Typically the form-handling process involves:

  • displaying an empty HTML form in response to an initial GET request
  • user submitting the form with data in a POST request
  • validation on both the client and the server
  • re-displaying the form populated with escaped data and error messages if invalid
  • doing something with the sanitized data on the server if it’s all valid
  • redirecting the user or showing a success message after data is processed.

Handling form data also comes with extra security considerations.

We’ll go through all of these and explain how to build them with Node.js and Express — the most popular web framework for Node. First, we’ll build a simple contact form where people can send a message and email address securely and then take a look what’s involved in processing file uploads.

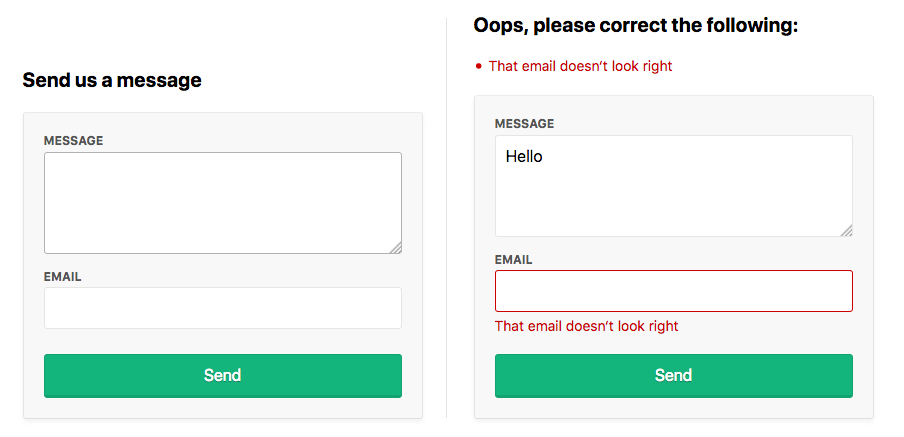
A contact form with email and message with validation errors

As ever, the complete code can be found in our GitHub repo.

Setup

Make sure you’ve got a recent version of Node.js installed. node -v should return 8.9.0 or higher.

Download the starter code from here with Git:

git clone -b starter https://github.com/sitepoint-editors/node-forms.git node-forms-starter
cd node-forms-starter
npm install
npm start

Note: The repo has two branches, starter and master. The starter branch contains the minimum setup you need to follow this article. The master branch contains a full, working demo (link above).

There’s not too much code in there. It’s just a bare-bones Express setup with EJS templates and error handlers:

// server.js
const path = require('path');
const express = require('express');
const layout = require('express-layout');

const routes = require('./routes');
const app = express();

app.set('views', path.join(__dirname, 'views'));
app.set('view engine', 'ejs');

const middlewares = [
  layout(),
  express.static(path.join(__dirname, 'public')),
];
app.use(middlewares);

app.use('/', routes);

app.use((req, res, next) => {
  res.status(404).send("Sorry can't find that!");
});

app.use((err, req, res, next) => {
  console.error(err.stack);
  res.status(500).send('Something broke!');
});

app.listen(3000, () => {
  console.log('App running at http://localhost:3000');
});

The root url / simply renders the index.ejs view:

// routes.js
const express = require('express');
const router = express.Router();

router.get('/', (req, res) => {
  res.render('index');
});

module.exports = router;

Displaying the Form

When people make a GET request to /contact, we want to render a new view contact.ejs:

// routes.js
router.get('/contact', (req, res) => {
  res.render('contact');
});

The contact form will let them send us a message and their email address:

<!-- views/contact.ejs -->
<div class="form-header">
  <h2>Send us a message</h2>
</div>
<form method="post" action="/contact" novalidate>
  <div class="form-field">
    <label for="message">Message</label>
    <textarea class="input" id="message" name="message" rows="4" autofocus></textarea>
  </div>
  <div class="form-field">
    <label for="email">Email</label>
    <input class="input" id="email" name="email" type="email" value="" />
  </div>
  <div class="form-actions">
    <button class="btn" type="submit">Send</button>
  </div>
</form>

See what it looks like at http://localhost:3000/contact.

Form Submission

To receive POST values in Express, you first need to include the body-parser middleware, which exposes submitted form values on req.body in your route handlers. Add it to the end of the middlewares array:

// server.js
const bodyParser = require('body-parser');

const middlewares = [
  // ...
  bodyParser.urlencoded({ extended: true }),
];

It’s a common convention for forms to POST data back to the same URL as was used in the initial GET request. Let’s do that here and handle POST /contact to process the user input.

Let’s look at the invalid submission first. If invalid, we need to pass back the submitted values to the view (so users don’t need to re-enter them) along with any error messages we want to display:

router.get('/contact', (req, res) => {
  res.render('contact', {
    data: {},
    errors: {}
  });
});

router.post('/contact', (req, res) => {
  res.render('contact', {
    data: req.body, // { message, email }
    errors: {
      message: {
        msg: 'A message is required'
      },
      email: {
        msg: 'That email doesn‘t look right'
      }
    }
  });
});

If there are any validation errors, we’ll do the following:

  • display the errors at the top of the form
  • set the input values to what was submitted to the server
  • display inline errors below the inputs
  • add a form-field-invalid class to the fields with errors.
<!-- views/contact.ejs -->
<div class="form-header">
  <% if (Object.keys(errors).length === 0) { %>
    <h2>Send us a message</h2>
  <% } else { %>
    <h2 class="errors-heading">Oops, please correct the following:</h2>
    <ul class="errors-list">
      <% Object.values(errors).forEach(error => { %>
        <li><%= error.msg %></li>
      <% }) %>
    </ul>
  <% } %>
</div>

<form method="post" action="/contact" novalidate>
  <div class="form-field <%= errors.message ? 'form-field-invalid' : '' %>">
    <label for="message">Message</label>
    <textarea class="input" id="message" name="message" rows="4" autofocus><%= data.message %></textarea>
    <% if (errors.message) { %>
      <div class="error"><%= errors.message.msg %></div>
    <% } %>
  </div>
  <div class="form-field <%= errors.email ? 'form-field-invalid' : '' %>">
    <label for="email">Email</label>
    <input class="input" id="email" name="email" type="email" value="<%= data.email %>" />
    <% if (errors.email) { %>
      <div class="error"><%= errors.email.msg %></div>
    <% } %>
  </div>
  <div class="form-actions">
    <button class="btn" type="submit">Send</button>
  </div>
</form>

Submit the form at http://localhost:3000/contact to see this in action. That’s everything we need on the view side.

Validation and Sanitization

There’s a handy middleware called express-validator for validating and sanitizing data using the validator.js library. Let’s add it to our app.

Validation

With the validators provided, we can easily check that a message and a valid email address was provided:

// routes.js
const { check, validationResult, matchedData } = require('express-validator');

router.post('/contact', [
  check('message')
    .isLength({ min: 1 })
    .withMessage('Message is required'),
  check('email')
    .isEmail()
    .withMessage('That email doesn‘t look right')
], (req, res) => {
  const errors = validationResult(req);
  res.render('contact', {
    data: req.body,
    errors: errors.mapped()
  });
});

Sanitization

With the sanitizers provided, we can trim whitespace from the start and end of the values, and normalize the email address into a consistent pattern. This can help remove duplicate contacts being created by slightly different inputs. For example, ' Mark@gmail.com' and 'mark@gmail.com ' would both be sanitized into 'mark@gmail.com'.

Sanitizers can simply be chained onto the end of the validators:

// routes.js
router.post('/contact', [
  check('message')
    .isLength({ min: 1 })
    .withMessage('Message is required')
    .trim(),
  check('email')
    .isEmail()
    .withMessage('That email doesn‘t look right')
    .bail()
    .trim()
    .normalizeEmail()
], (req, res) => {
  const errors = validationResult(req);
  res.render('contact', {
    data: req.body,
    errors: errors.mapped()
  });

  const data = matchedData(req);
  console.log('Sanitized:', data);
});

The matchedData function returns the output of the sanitizers on our input.

Also, notice our use of the bail method, which stops running validations if any of the previous ones have failed. We need this because if a user submits the form without entering a value into the email field, the normalizeEmail will attempt to normalize an empty string and convert it to an @. This will then be inserted into our email field when we re-render the form.

The post Forms, File Uploads and Security with Node.js and Express appeared first on SitePoint.
An Introduction to MongoDB

$
0
0
Introduction to MongoDB

MongoDB is a cross-platform, open-source, NoSQL database, used by many modern Node-based web applications to persist data.

In this beginner-friendly tutorial, I’ll demonstrate how to install Mongo, then start using it to store and query data. I’ll also look at how to interact with a Mongo database from within a Node program, and also highlight some of the differences between Mongo and a traditional relational database (such as MySQL) along the way.

Terminology and Basic Concepts

MongoDB is a document-oriented database. This means that it doesn’t use tables and rows to store its data, but instead collections of JSON-like documents. These documents support embedded fields, so related data can be stored within them.

MongoDB is also a schema-less database, so we don’t need to specify the number or type of columns before inserting our data.

Here’s an example of what a MongoDB document might look like:

{
  _id: ObjectId(3da252d3902a),
  type: "Tutorial",
  title: "An Introduction to MongoDB",
  author: "Manjunath M",
  tags: [ "mongodb", "compass", "crud" ],
  categories: [
    {
      name: "javascript",
      description: "Tutorialss on client-side and server-side JavaScript programming"
    },
    {
      name: "databases",
      description: "Tutorialss on different kinds of databases and their management"
    },
  ],
  content: "MongoDB is a cross-platform, open-source, NoSQL database..."
}

As you can see, the document has a number of fields (type, title etc.), which store values (“Tutorial”, “An Introduction to MongoDB” etc.). These values can contain strings, numbers, arrays, arrays of sub-documents (for example, the categories field), geo-coordinates and more.

The _id field name is reserved for use as a primary key. Its value must be unique in the collection, it’s immutable, and it may be of any type other than an array.

Tip: for those wondering what “JSON-like” means, internally Mongo uses something called BSON (short for Bin­ary JSON). In practice, you don’t really need to know much about BSON when working with MongoDB.

As you might guess, a document in a NoSQL database corresponds to a row in an SQL database. A group of documents together is known as a collection, which is roughly synonymous with a table in a relational database.

Here’s a table summarizing the different terms:

SQL Server MongoDB
Database Database
Table Collection
Row Document
Column Field
Index Index

If you’re starting a new project and are unsure whether to choose Mongo or a relational database such as MySQL, now might be a good time to read our tutorial SQL vs NoSQL: How to Choose.

With that said, let’s go ahead and install MongoDB.

Installing MongoDB

Note: if you’d just like to follow along with this tutorial without installing any software on your PC, there are a couple of online services you can use. Mongo playground, for example, is a simple sandbox to test and share MongoDB queries online.

MongoDB comes in various editions. The one we’re interested in is the MongoDB Community Edition.

The project’s home page has excellent documentation on installing Mongo, and I won’t try to replicate that here. Rather, I’ll offer you links to instructions for each of the main operating systems:

If you use a non-Ubuntu-based version of Linux, you can check out this page for installation instructions for other distros. MongoDB is also normally available through the official Linux software channels, but sometimes this will pull in an outdated version.

Post Installation Configuration

Once you have MongoDB installed for your system, you might encounter this error:

dbpath (/data/db) does not exist.
 Create this directory or give existing directory in --dbpath.
 See http://dochub.mongodb.org/core/startingandstoppingmongo

This means that Mongo can’t find (or access) the directory it uses to store its databases. This is pretty easy to remedy:

sudo mkdir -p /data/db
sudo chown -R `id -un` /data/db

The first command creates the data/db directory. The second sets permissions so that Mongo can write to that directory.

Install the Compass GUI

We’ll be using the command line in this tutorial, but MongoDB also offers a tool called Compass to connect to and manage your databases using a GUI.

If you’re on Windows, Compass can be installed as part of the main Mongo installation (just select the appropriate option from the wizard). Otherwise, you can download Compass for your respective OS here.

This is what it looks like:

Mongo DB Compass GUI

The Mongo Shell

We can test our installation by opening the Mongo shell. You can do this by opening a terminal window and typing mongo.

Note: this assumes that <mongodb installation dir>/bin is in your path. If for any reason this isn’t the case, change into the <mongodb installation dir>/bin directory and rerun the command.

If you get an Error: couldn't connect to server error, you’ll need to start the Mongo server (in a second terminal window) with the command mongod.

Once you’re in the Mongo shell, type in db.version() to see the version of MongoDB you’re running. At the time of writing, this should output 4.2.2.

Please note that you can exit the Mongo shell by running quit() and the Mongo daemon by pressing Ctrl + C at any time.

Now let’s get acquainted with some MongoDB basics.

Basic Database Operations

Enter the Mongo shell if you haven’t already (by typing mongo into a terminal):

[mj@localhost ~]$ mongo
MongoDB shell version v4.2.2
connecting to: mongodb://127.0.0.1:27017/?compressors=disabled&gssapiServiceName=mongodb
Implicit session: session { "id" : UUID("08a624a0-b330-4233-b56b-1d5b15a48fea") }
MongoDB server version: 4.2.2

Let’s start off by creating a database to work with. To create a database, MongoDB has a use DATABASE_NAME command:

> use exampledb
switched to db exampledb

To display all the existing databases, try show dbs:

> show dbs

admin          0.000GB
config         0.000GB
local          0.000GB

The exampledb isn’t in the list because we need to insert at least one document into the database. To insert a document, you can use db.COLLECTION_NAME.insertOne({"key":"value"}). Here’s an example:

> db.users.insertOne({name: "Bob"})
{
   "acknowledged" : true,
   "insertedId" : ObjectId("5a52c53b223039ee9c2daaec")
}

MongoDB automatically creates a new users collection and inserts a document with the key–value pair 'name':'Bob'. The ObjectId returned is the ID of the document inserted. MongoDB creates a unique ObjectId for each document on creation, and it becomes the default value of the _id field.

Now we should be able to see our database:

>show dbs
admin          0.000GB
config         0.000GB
exampledb      0.000GB
local          0.000GB

Similarly, you can confirm that the collection was created using the show collections command:

> show collections
users

We’ve created a database, added a collection named users and inserted a document into it. Now let’s try dropping it. To drop an existing database, use the dropDatabase() command, as exemplified below:

>db.dropDatabase()
{ "dropped" : "exampledb", "ok" : 1 }

show dbs confirms that the database was indeed dropped:

> show dbs
admin          0.000GB
config         0.000GB
local          0.000GB

For more database operations, please consult the MongoDB reference page on database commands.

The post An Introduction to MongoDB appeared first on SitePoint.
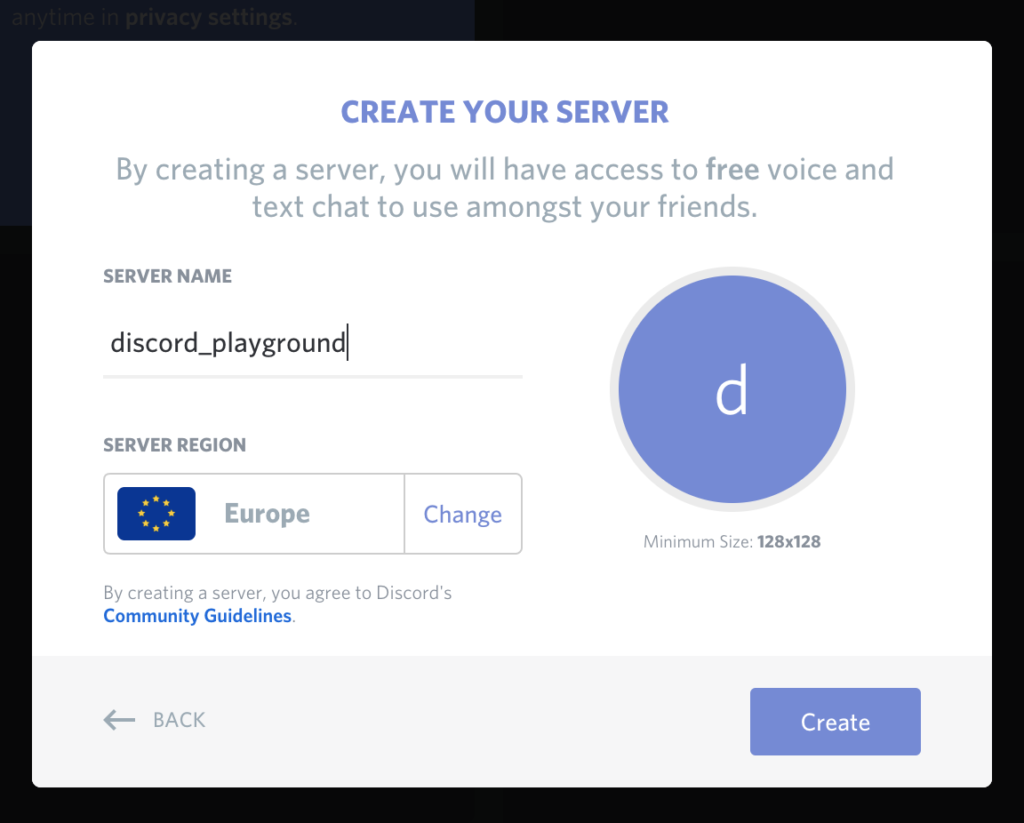
Build a Simple Beginner App with Node, Bootstrap and MongoDB

$
0
0
Building a Simple Beginner App with Node, Bootstrap and MongoDB

If you’re just getting started with Node.js and want to try your hand at building a web app, things can often get a little overwhelming. Once you get beyond the “Hello, World!” tutorials, much of the material out there has you copy-pasting code, with little or no explanation as to what you’re doing or why.

This means that, by the time you’ve finished, you’ve built something nice and shiny, but you also have relatively few takeaways that you can apply to your next project.

In this tutorial, I’m going to take a slightly different approach. Starting from the ground up, I’ll demonstrate how to build a no-frills web app using Node.js, but instead of focusing on the end result, I’ll focus on a range of things you’re likely to encounter when building a real-world app. These include routing, templating, dealing with forms, interacting with a database and even basic authentication.

This won’t be a JavaScript 101. If that’s the kind of thing you’re after, look here. It will, however, be suitable for those people who feel reasonably confident with the JavaScript language, and who are looking to take their first steps in Node.js.

What We’ll Be Building

We’ll be using Node.js and the Express framework to build a simple registration form with basic validation, which persists its data to a MongoDB database. We’ll add a view to list successful registration, which we’ll protect with basic HTTP authentication, and we’ll use Bootstrap to add some styling. The tutorial is structured so that you can follow along step by step. However, if you’d like to jump ahead and see the end result, the code for this tutorial is also available on GitHub.

Basic Setup

Before we can start coding, we’ll need to get Node, npm and MongoDB installed on our machines. I won’t go into depth on the various installation instructions, but if you have any trouble getting set up, please visit our forums and ask for help there.

Node.js

Many websites will recommend that you head to the official Node download page and grab the Node binaries for your system. While that works, I would suggest that you use a version manager instead. This is a program which allows you to install multiple versions of Node and switch between them at will. There are various advantages to using a version manager. For example, it negates potential permission issues which would otherwise see you installing packages with admin rights.

If you fancy going the version manager route, please consult our quick tip: Install Multiple Versions of Node.js Using nvm. Otherwise, grab the correct binaries for your system from the link above and install those.

npm

npm is a JavaScript package manager which comes bundled with Node, so no extra installation is necessary here. We’ll be making quite extensive use of npm throughout this tutorial, so if you’re in need of a refresher, please consult A Beginner’s Guide to npm — the Node Package Manager.

MongoDB

MongoDB is a document database which stores data in flexible, JSON-like documents. If you’ve never worked with Mongo before, you might like to check out our beginner-friendly introduction to MongoDB.

The quickest way to get up and running with Mongo is to use a service such as mLabs. They have a free sandbox plan which provides a single database with 0.5GB of storage running on a shared virtual machine. This is more than adequate for a simple app with a handful of users. If this sounds like the best option for you, please consult their quick-start guide.

You can also install Mongo locally. To do this, please visit the official download page and download the correct version of the community server for your operating system. There’s a link to detailed, OS-specific installation instructions beneath every download link, which you can consult if you run into trouble.

A MongoDB GUI

Although not strictly necessary for following along with this tutorial, you might also like to install Compass, the official GUI for MongoDB. This tool helps you visualize and manipulate your data, allowing you to interact with documents with full CRUD functionality.

Check that Everything is Installed Correctly

To check that Node and npm are installed correctly, open your terminal and type:

node -v

followed by:

npm -v

This will output the version number of each program (12.14.1 and 6.13.6 respectively at the time of writing).

If you installed Mongo locally, you can check the version number using:

mongo --version

This should output a bunch of information, including the version number (4.2.2 at the time of writing).

Check the Database Connection Using Compass

If you’ve installed Mongo locally, you start the server by typing the following command into a terminal:

mongod

Next, open Compass. You should be able to accept the defaults (server: localhost, port: 27017), press the CONNECT button, and establish a connection to the database server.

MongoDB Compass connected to localhost:27107

MongoDB Compass connected to localhost

Note that the databases admin, config and local are created automatically.

Using a Cloud-hosted Solution

If you’re using mLabs, create a database subscription (as described in their quick-start guide), then make a note of the connection details.

Open Compass, click New Connection, then Fill in connection fields individually. Select Username / Password as the authentication method, then fill out the rest of the details. Finally, click CONNECT and you should be off to the races.

Note: if you wish to use a connection string, it should look like this: mongodb://<dbuser>:<dbpassword>@ds211709.mlab.com:11709/?authSource=<dbname>.

MongoDB Compass connected to mLabs

MongoDB Compass connected to mLabs

Note that I called my database sp-node-article. You can call yours what you like.

Initialize the Application

With everything set up correctly, the first thing we need to do is initialize our new project. To do this, create a folder named demo-node-app, enter that directory and type the following in a terminal:

npm init -y

This will create and auto-populate a package.json file in the project root. We can use this file to specify our dependencies and to create various npm scripts, which will aid our development workflow.

Install Express

Express is a lightweight web application framework for Node.js, which provides us with a robust set of features for writing web apps. These features include such things as route handling, template engine integration and a middleware framework, which allows us to perform additional tasks on request and response objects. There’s nothing you can do in Express that you couldn’t do in plain Node.js, but using Express means we don’t have to re-invent the wheel and it reduces boilerplate.

So let’s install Express. To do this, run the following in your terminal:

npm install express

This will see Express added to the dependencies section of the package.json file. This signals to anyone else running our code that Express is a package our app needs to function properly.

Install nodemon

nodemon is a convenience tool. It will watch the files in the directory it was started in, and if it detects any changes, it will automatically restart your Node application (meaning you don’t have to). In contrast to Express, nodemon is not something the app requires to function properly (it just aids us with development), so install it using:

npm install --save-dev nodemon

This will add nodemon to the dev-dependencies section of the package.json file.

Create Some Initial Files

We’re almost through with the setup. All we need to do now is create a couple of initial files before kicking off the app.

In the demo-node-app folder create an app.js file and a start.js file. Also create a routes folder, with an index.js file inside. After you’re done, things should look like this:

.
├── app.js
├── node_modules
│   └── ...
├── package.json
├── package-lock.json
├── routes
│   └── index.js
└── start.js

Now, let’s add some code to those files.

In app.js:

const express = require('express');
const routes = require('./routes/index');

const app = express();
app.use('/', routes);

module.exports = app;

Here, we’re importing both the express module and (the export value of) our routes file into the application. The require function we’re using to do this is a built-in Node function which imports an object from another file or module. If you’d like a refresher on importing and exporting modules, read Understanding module.exports and exports in Node.js.

After that, we’re creating a new Express app using the express function and assigning it to an app variable. We then tell the app that, whenever it receives a request from forward slash anything, it should use the routes file.

Finally, we export our app variable so that it can be imported and used in other files.

In start.js:

const app = require('./app');

const server = app.listen(3000, () => {
  console.log(`Express is running on port ${server.address().port}`);
});

Here we’re importing the Express app we created in app.js. (Note that we can leave the .js off the file name in the require statement.) We then tell our app to listen on port 3000 for incoming connections and output a message to the terminal to indicate that the server is running.

And in routes/index.js:

const express = require('express');

const router = express.Router();

router.get('/', (req, res) => {
  res.send('It works!');
});

module.exports = router;

Here, we’re importing Express into our routes file and then grabbing the router from it. We then use the router to respond to any requests to the root URL (in this case http://localhost:3000) with an “It works!” message.

Kick off the App

Finally, let’s add an npm script to make nodemon start watching our app. Change the scripts section of the package.json file to look like this:

"scripts": {
  "watch": "nodemon ./start.js"
},

The scripts property of the package.json file is extremely useful, as it lets you specify arbitrary scripts to run in different scenarios. This means that you don’t have to repeatedly type out long-winded commands with a difficult-to-remember syntax. If you’d like to find out more about what npm scripts can do, read Give Grunt the Boot! A Guide to Using npm as a Build Tool.

Now, type npm run watch from the terminal and visit http://localhost:3000.

You should see “It works!”

The post Build a Simple Beginner App with Node, Bootstrap and MongoDB appeared first on SitePoint.
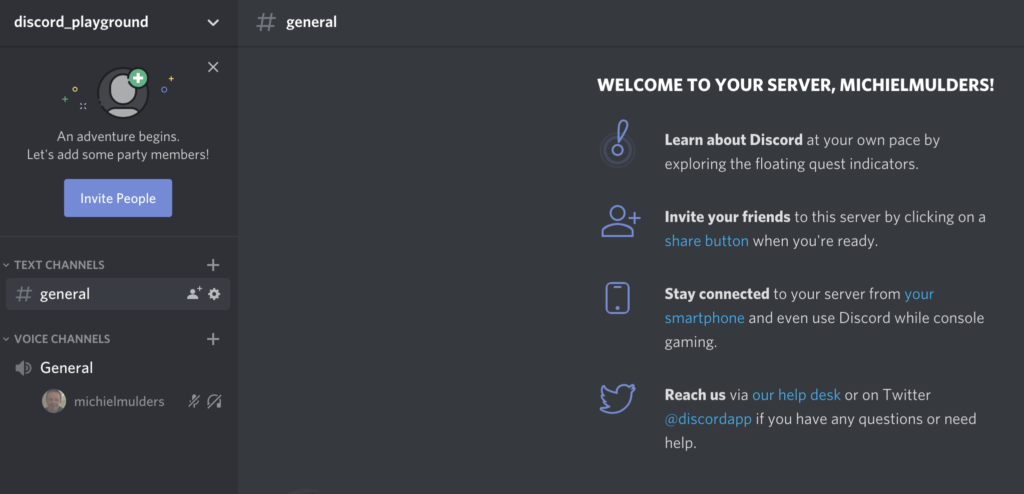
How to Build a File Upload Form with Express and DropzoneJS

$
0
0
How to Build a File Upload Form with Express and DropzoneJS

Let’s face it, nobody likes forms. Developers don’t like building them, designers don’t particularly enjoy styling them, and users certainly don’t like filling them in.

Of all the components that can make up a form, the file control could just be the most frustrating of the lot. It’s a real pain to style, it’s clunky and awkward to use, and uploading a file will slow down the submission process of any form.

That’s why a plugin to enhance them is always worth a look, and DropzoneJS is just one such option. It will make your file upload controls look better, make them more user-friendly, and by using AJAX to upload the file in the background, it will at the very least make the process seem quicker. It also makes it easier to validate files before they even reach your server, providing near-instantaneous feedback to the user.

We’re going to take a look at DropzoneJS in some detail. We’ll show how to implement it. and look at some of the ways in which it can be tweaked and customized. We’ll also implement a simple server-side upload mechanism using Node.js.

As ever, you can find the code for this tutorial on our GitHub repository.

Introducing DropzoneJS

DropzoneJS allows users to upload files using drag and drop. Whilst the usability benefits could justifiably be debated, it’s an increasingly common approach and one which is in tune with the way a lot of people work with files on their desktop. It’s also pretty well supported across major browsers.

DropzoneJS isn’t simply a drag and drop based widget, however. Clicking the widget launches the more conventional file chooser dialog approach.

Here’s an animation of the widget in action:

The DropzoneJS widget in action

Alternatively, take a look at this most minimal of examples.

You can use DropzoneJS for any type of file, though the nice little thumbnail effect makes it ideally suited to uploading images in particular.

Features

To summarize some of the plugin’s features and characteristics, DropzoneJS:

  • can be used with or without jQuery
  • has drag and drop support
  • generates thumbnail images
  • supports multiple uploads, optionally in parallel
  • includes a progress bar
  • is fully themeable
  • includes extensible file validation support
  • is available as an AMD module or RequireJS module
  • comes in at around 43KB when minified and 13KB when gzipped

Browser Support

Taken from the official documentation, browser support is as follows:

  • Chrome 7+
  • Firefox 4+
  • IE 10+
  • Opera 12+ (Version 12 for macOS is disabled because their API is buggy)
  • Safari 6+

There are a couple of ways to handle fallbacks for when the plugin isn’t fully supported, which we’ll look at later.

Getting Set Up

The simplest way to get started with DropzoneJS is to include the latest version from a CDN. At the time of writing, this is version 5.5.1.

Alternatively, you can download the latest release from the project’s GitLab page. There’s also a third-party package providing support for ReactJS.

Then, make sure you include both the main JavaScript file and the CSS styles in your page. For example:

<!DOCTYPE html>
<html lang="en">
<head>
  <meta charset="UTF-8">
  <title>File Upload Example</title>
  <link
    rel="stylesheet"
    href="https://cdnjs.cloudflare.com/ajax/libs/dropzone/5.5.1/min/dropzone.min.css">
</head>
<body>

  <script src="https://cdnjs.cloudflare.com/ajax/libs/dropzone/5.5.1/min/dropzone.min.js"></script>
</body>
</html>

Note that the project supplies two CSS files — a basic.css file with some minimal styling, and a more extensive dropzone.css file. Minified versions of dropzone.css and dropzone.js are also available.

Basic Usage

The simplest way to implement the plugin is to attach it to a form, although you can use any HTML such as a <div>. Using a form, however, means fewer options to set — most notably the URL, which is the most important configuration property.

You can initialize it simply by adding the dropzone class. For example:

<form id="upload-widget" method="post" action="/upload" class="dropzone"></form>

Technically, that’s all you need to do, though in most cases you’ll want to set some additional options. The format for that is as follows:

Dropzone.options.WIDGET_ID = {
  //
};

To derive the widget ID for setting the options, take the ID you defined in your HTML and camel-case it. For example, upload-widget becomes uploadWidget:

Dropzone.options.uploadWidget = {
  //
};

You can also create an instance programmatically:

const uploader = new Dropzone('#upload-widget', options);

Next up, we’ll look at some of the available configuration options.

Basic Configuration Options

The url option defines the target for the upload form, and is the only required parameter. That said, if you’re attaching it to a form element then it’ll simply use the form’s action attribute, in which case you don’t even need to specify that.

The method option sets the HTTP method and again, it will take this from the form element if you use that approach, or else it’ll simply default to POST, which should suit most scenarios.

The paramName option is used to set the name of the parameter for the uploaded file. If you’re using a file upload form element, it will match the name attribute. If you don’t include it, it defaults to file.

maxFiles sets the maximum number of files a user can upload, if it’s not set to null.

By default, the widget will show a file dialog when it’s clicked, though you can use the clickable parameter to disable this by setting it to false, or alternatively you can provide an HTML element or CSS selector to customize the clickable element.

Those are the basic options, but let’s now look at some of the more advanced options.

Enforcing Maximum File Size

The maxFilesize property determines the maximum file size in megabytes. This defaults to a size of 1000 bytes, but using the filesizeBase property, you could set it to another value — for example, 1024 bytes. You may need to tweak this to ensure that your client and server code calculate any limits in precisely the same way.

Restricting to Certain File Types

The acceptedFiles parameter can be used to restrict the type of file you want to accept. This should be in the form of a comma-separated list of MIME types, although you can also use wildcards.

For example, to only accept images:

acceptedFiles: 'image/*',

Modifying the Size of the Thumbnail

By default, the thumbnail is generated at 120x120px. That is, it’s square. There are a couple of ways you can modify this behavior.

The first is to use the thumbnailWidth and/or the thumbnailHeight configuration options.

If you set both thumbnailWidth and thumbnailHeight to null, the thumbnail won’t be resized at all.

If you want to completely customize the thumbnail generation behavior, you can even override the resize function.

One important point about modifying the size of the thumbnail is that the dz-image class provided by the package sets the thumbnail size in the CSS, so you’ll need to modify that accordingly as well.

Additional File Checks

The accept option allows you to provide additional checks to determine whether a file is valid before it gets uploaded. You shouldn’t use this to check the number of files (maxFiles), file type (acceptedFiles), or file size (maxFilesize), but you can write custom code to perform other sorts of validation.

You’d use the accept option like this:

accept: function(file, done) {
  if (!someCheck()) {
    return done('This is invalid!');
  }
  return done();
}

As you can see, it’s asynchronous. You can call done() with no arguments and validation passes, or provide an error message and the file will be rejected, displaying the message alongside the file as a popover.

We’ll look at a more complex, real-world example later, when we look at how to enforce minimum or maximum image sizes.

Sending Additional Headers

Often you’ll need to attach additional headers to the uploader’s HTTP request.

As an example, one approach to CSRF (cross-site request forgery) protection is to output a token in the view, then have your POST/PUT/DELETE endpoints check the request headers for a valid token. Suppose you outputted your token like this:

<meta name="csrf-token" content="CL2tR2J4UHZXcR9BjRtSYOKzSmL8U1zTc7T8d6Jz">

Then, you could add this to the configuration:

headers: {
  'x-csrf-token': document.querySelector('meta[name=csrf-token]').getAttributeNode('content').value,
},

Alternatively, here’s the same example but using jQuery:

headers: {
  'x-csrf-token': $('meta[name="csrf-token"]').attr('content')
},

Your server should then verify the x-csrf-token header, perhaps using some middleware.

Handling Fallbacks

The simplest way to implement a fallback is to insert a <div> into your form containing input controls, setting the class name on the element to fallback. For example:

<form id="upload-widget" method="post" action="/upload" class="dropzone">
  <div class="fallback">
    <input name="file" type="file" />
  </div>
</form>

Alternatively, you can provide a function to be executed when the browser doesn’t support the plugin using the fallback configuration parameter.

You can force the widget to use the fallback behavior by setting forceFallback to true, which might help during development.

Handling Errors

You can customize the way the widget handles errors by providing a custom function using the error configuration parameter. The first argument is the file, the error message the second, and if the error occurred server-side, the third parameter will be an instance of XMLHttpRequest.

As always, client-side validation is only half the battle. You must also perform validation on the server. When we implement a simple server-side component later, we’ll look at the expected format of the error response, which when properly configured will be displayed in the same way as client-side errors (illustrated below).

Displaying errors with DropzoneJS

Overriding Messages and Translation

There are a number of additional configuration properties which set the various messages displayed by the widget. You can use these to customize the displayed text, or to translate them into another language.

Most notably, dictDefaultMessage is used to set the text which appears in the middle of the dropzone, prior to someone selecting a file to upload.

You’ll find a complete list of the configurable string values — all of which begin with dictin the documentation.

Events

There are a number of events you can listen to in order to customize or enhance the plugin.

There are two ways to listen to an event. The first is to create a listener within an initialization function:

Dropzone.options.uploadWidget = {
  init: function() {
    this.on('success', function(file, resp){
      ...
    });
  },
  ...
};

This is the alternative approach, which is useful if you decide to create the Dropzone instance programatically:

const uploader = new Dropzone('#upload-widget');
uploader.on('success', function(file, resp){
  ...
});

Perhaps the most notable aspect is the success event, which is fired when a file has been successfully uploaded. The success callback takes two arguments: the first a file object, and the second an instance of XMLHttpRequest.

Other useful events include addedfile and removedfile, for when a file has been added or removed from the upload list; thumbnail, which fires once the thumbnail has been generated; and uploadprogress, which you might use to implement your own progress meter.

There are also a bunch of events which take an event object as a parameter and which you could use to customize the behavior of the widget itself — drop, dragstart, dragend, dragenter, dragover and dragleave.

You’ll find a complete list of events in the relevant section of the documentation.

The post How to Build a File Upload Form with Express and DropzoneJS appeared first on SitePoint.
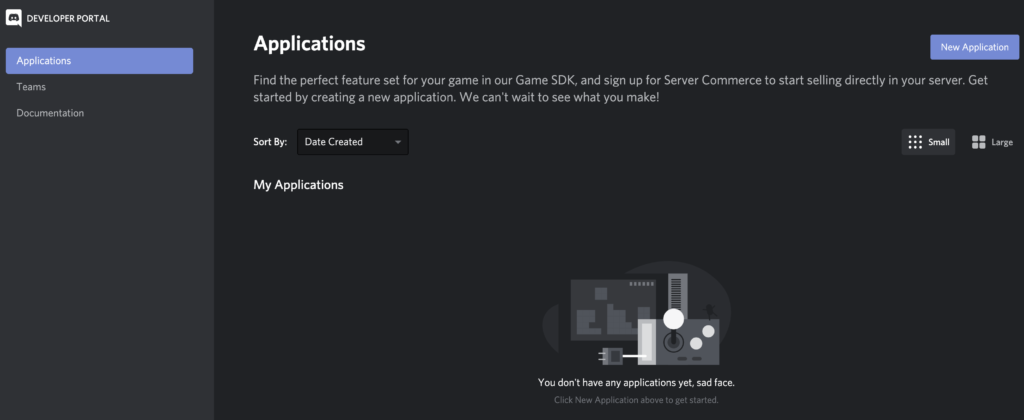
A Beginner’s Guide to npm, the Node Package Manager

$
0
0
A Beginner’s Guide to npm

Node.js makes it possible to write applications in JavaScript on the server. It’s built on the V8 JavaScript runtime and written in C++ — so it’s fast. Originally, it was intended as a server environment for applications, but developers started using it to create tools to aid them in local task automation. Since then, a whole new ecosystem of Node-based tools (such as Grunt, Gulp and webpack) has evolved to transform the face of front-end development.

To make use of these tools (or packages) in Node.js, we need to be able to install and manage them in a useful way. This is where npm, the Node package manager, comes in. It installs the packages you want to use and provides a useful interface to work with them.

In this guide, we're going to look at the basics of working with npm. We'll show you how to install packages in local and global mode, as well as delete, update and install a certain version of a package. We’ll also show you how to work with package.json to manage a project’s dependencies. If you’re more of a video person, why not sign up for SitePoint Premium and watch our free screencast: What is npm and How Can I Use It?

But before we can start using npm, we first have to install Node.js on our system. Let’s do that now.

Installing Node.js

Head to the Node.js download page and grab the version you need. There are Windows and Mac installers available, as well as pre-compiled Linux binaries and source code. For Linux, you can also install Node via the package manager, as outlined here.

For this tutorial, we’re going to use v12.15.0. At the time of writing, this is the current Long Term Support (LTS) version of Node.

Tip: You might also consider installing Node using a version manager. This negates the permissions issue raised in the next section.

Let’s see where node was installed and check the version:

$ which node
/usr/bin/node
$ node --version
v12.15.0

To verify that your installation was successful, let’s give Node’s REPL a try:

$ node
> console.log('Node is running');
Node is running
> .help
.break    Sometimes you get stuck, this gets you out
.clear    Alias for .break
.editor   Enter editor mode
.exit     Exit the repl
.help     Print this help message
.load     Load JS from a file into the REPL session
.save     Save all evaluated commands in this REPL session to a file

Press ^C to abort current expression, ^D to exit the repl

The Node.js installation worked, so we can now focus our attention on npm, which was included in the install:

$ which npm
/usr/bin/npm
$ npm --version
6.13.7

Updating npm

npm, which originally stood for Node Package Manager, is a separate project from Node.js. It tends to be updated more frequently. You can check the latest available npm version on this page. If you realize you have an older version, you can update as follows.

For Linux and Mac users, use the following command:

npm install -g npm@latest

For Windows users, the process might be slightly more complicated. This is what it says on the project's home page:

Many improvements for Windows users have been made in npm 3 - you will have a better experience if you run a recent version of npm. To upgrade, either use Microsoft's upgrade tool, download a new version of Node, or follow the Windows upgrade instructions in the Installing/upgrading npm post.

For most users, the upgrade tool will be the best bet. To use it, you’ll need to open PowerShell as administrator and execute the following command:

Set-ExecutionPolicy Unrestricted -Scope CurrentUser -Force

This will ensure you can execute scripts on your system. Next, you’ll need to install the npm-windows-upgrade tool. After you’ve installed the tool, you need to run it so that it can update npm for you. Do all this within the elevated PowerShell console:

npm install --global --production npm-windows-upgrade
npm-windows-upgrade --npm-version latest

Node Packaged Modules

npm can install packages in local or global mode. In local mode, it installs the package in a node_modules folder in your parent working directory. This location is owned by the current user.

If you’re not using a version manager (which you probably should be), global packages are installed in {prefix}/lib/node_modules/, which is owned by root (where {prefix} is usually /usr/ or /usr/local). This means you would have to use sudo to install packages globally, which could cause permission errors when resolving third-party dependencies, as well as being a security concern.

Let’s change that!

Parcel delivery company
Time to manage those packages

Changing the Location of Global Packages

Let’s see what output npm config gives us:

$ npm config list
; cli configs
metrics-registry = "https://registry.npmjs.org/"
scope = ""
user-agent = "npm/6.13.7 node/v12.15.0 linux x64"

; node bin location = /usr/bin/nodejs
; cwd = /home/sitepoint
; HOME = /home/sitepoint
; "npm config ls -l" to show all defaults.

This gives us information about our install. For now, it’s important to get the current global location:

$ npm config get prefix
/usr

This is the prefix we want to change, in order to install global packages in our home directory. To do that create a new directory in your home folder:

$ cd ~ && mkdir .node_modules_global
$ npm config set prefix=$HOME/.node_modules_global

With this simple configuration change, we’ve altered the location to which global Node packages are installed. This also creates a .npmrc file in our home directory:

$ npm config get prefix
/home/sitepoint/.node_modules_global
$ cat .npmrc
prefix=/home/sitepoint/.node_modules_global

We still have npm installed in a location owned by root. But because we changed our global package location, we can take advantage of that. We need to install npm again, but this time in the new, user-owned location. This will also install the latest version of npm:

npm install npm@latest -g

Finally, we need to add .node_modules_global/bin to our $PATH environment variable, so that we can run global packages from the command line. Do this by appending the following line to your .profile, .bash_profileor .bashrc and restarting your terminal:

export PATH="$HOME/.node_modules_global/bin:$PATH"

Now our .node_modules_global/bin will be found first and the correct version of npm will be used:

$ which npm
/home/sitepoint/.node_modules_global/bin/npm
$ npm --version
6.13.7

Tip: you can avoid all of this if you use a Node version manager. Check out this tutorial to find out how: Installing Multiple Versions of Node.js Using nvm.

Installing Packages in Global Mode

At the moment, we only have one package installed globally — the npm package itself. So let’s change that and install UglifyJS (a JavaScript minification tool). We use the --global flag, but this can be abbreviated to -g:

$ npm install uglify-js --global
/home/sitepoint/.node_modules_global/bin/uglifyjs -> /home/sitepoint/.node_modules_global/lib/node_modules/uglify-js/bin/uglifyjs
+ uglify-js@3.7.7
added 3 packages from 38 contributors in 0.259s

As you can see from the output, additional packages are installed. These are UglifyJS’s dependencies.

Listing Global Packages

We can list the global packages we've installed with the npm list command:

$ npm list --global
home/sitepoint/.node_modules_global/lib
├─┬ npm@6.9.0
│ ├── abbrev@1.1.1
│ ├── ansicolors@0.3.2
│ ├── ansistyles@0.1.3
│ ├── aproba@2.0.0
│ ├── archy@1.0.0
....................
└─┬ uglify-js@3.5.3
  ├── commander@2.19.0
  └── source-map@0.6.1

The output, however, is rather verbose. We can change that with the --depth=0 option:

$ npm list -g --depth=0
/home/sitepoint/.node_modules_global/lib
├── npm@6.13.7
└── uglify-js@3.7.7

That’s better; now we see just the packages we’ve installed along with their version numbers.

Any packages installed globally will become available from the command line. For example, here’s how you would use the Uglify package to minify example.js into example.min.js:

$ uglifyjs example.js -o example.min.js

Installing Packages in Local Mode

When you install packages locally, you normally do so using a package.json file. Let’s go ahead and create one:

$ mkdir project && cd project

$ npm init
package name: (project)
version: (1.0.0)
description: Demo of package.json
entry point: (index.js)
test command:
git repository:
keywords:
author:
license: (ISC)

Press Return to accept the defaults, then press it again to confirm your choices. This will create a package.json file at the root of the project:

{
  "name": "project",
  "version": "1.0.0",
  "description": "",
  "main": "index.js",
  "scripts": {
    "test": "echo \"Error: no test specified\" && exit 1"
  },
  "author": "",
  "license": "ISC"
}

Tip: If you want a quicker way to generate a package.json file use npm init --y.

The fields are hopefully pretty self-explanatory, with the exception of main and scripts. The main field is the primary entry point to your program, and the scripts field lets you specify script commands that are run at various times in the life cycle of your package. We can leave these as they are for now, but if you’d like to find out more, see the package.json documentation on npm and this article on using npm as a build tool.

Now let’s try and install Underscore:

$ npm install underscore
npm notice created a lockfile as package-lock.json. You should commit this file.
npm WARN project@1.0.0 No repository field.

+ underscore@1.9.2
added 1 package from 1 contributor and audited 1 package in 0.412s
found 0 vulnerabilities

Note that a lockfile is created. We’ll be coming back to this later.

Now if we have a look in package.json, we’ll see that a dependencies field has been added:

{
  ...
  "dependencies": {
    "underscore": "^1.9.2"
  }
}

The post A Beginner’s Guide to npm, the Node Package Manager appeared first on SitePoint.


Build a Native Desktop GIF Searcher App Using NodeGui

$
0
0
Build a Native Desktop GIF Searcher App Using NodeGui

NodeGui is an open-source library for building cross-platform, native desktop apps with Node.js. NodeGui apps can run on macOS, Windows, and Linux. The apps built with NodeGui are written using JavaScript, styled with CSS and rendered as native desktop widgets using the Qt framework.

Some of the features of NodeGui are:

  • native widgets with built-in support for dark mode
  • low CPU and memory footprint
  • styling with CSS including complete support for Flexbox layout
  • complete Node.js API support and access to all Node.js compatible npm modules
  • excellent debugging support using Chrome's DevTools
  • first-class TypeScript support

NodeGui is powered by the Qt framework, which makes it CPU and memory efficient compared with other Chromium-based solutions such as Electron. This means that applications written using NodeGui do not open up a browser instance and render the UI in it. Instead, all the widgets are rendered natively.

This tutorial will demonstrate how to install NodeGui and use it to build a meme searcher that lives in the system tray and communicates with the GIPHY API.

The full source code for this tutorial is available on GitHub.

Installation and Basic Setup

For this tutorial it’s assumed that you have Node.js v12 or greater installed. You can confirm that both Node and npm are available by running:

# This command should print the version of Node.js
node -v

# This command should print the version of npm
npm -v

If you need help with this step, check out our tutorial on installing Node.

Install CMake and Compilation Tools

NodeGui requires CMake and C++ compilation tools for building the native C++ layer of the project. Make sure you install CMake >= 3.1 along with a C++ compiler that supports C++11 and up. The detailed instructions are a bit different depending on your operating system.

macOS

It’s recommended to install CMake using Homebrew. Run the following commands in a terminal after installing Homebrew:

brew install cmake
brew install make

You can confirm the installation by running:

# This command should print the version of CMake which should be higher than 3.1
cmake --version

make --version

Lastly, you need GCC/Clang to compile C++ code. Verify that you have GCC installed using this command:

gcc --version

If you don’t have GCC installed, make sure you install Command Line Tools for Xcode or XCode Developer tools from Apple's developer page.

Windows

You can install CMake on Windows by downloading the latest release from the CMake download page.

It’s strongly recommend you use Powershell as the preferred terminal in Windows.

You can confirm the CMake installation by running:

# This command should print the version of CMake which should be higher than 3.1
cmake --version

Lastly, you need a C++ compiler. One possibility would be to install Visual Studio 2017 or higher. It’s recommended you choose the Desktop development with C++ workload during the installation process.

Linux

We’ll focus on Ubuntu 18.04 for the purposes of this tutorial. It’s recommended to install CMake using the package manager. Run the following commands in a terminal:

sudo apt-get install pkg-config build-essential
sudo apt-get install cmake make

You can confirm the installation by running:

# This command should print the version of CMake which should be higher than 3.1
cmake --version

make --version

Lastly, you need GCC to compile C++ code. Verify that you have GCC installed using the command:

# gcc version should be >= v7
gcc --version

Hello World

In order to get started with our NodeGui meme app, we’ll clone the starter project.

Note: Running this requires Git and npm.

Open a terminal and run:

git clone https://github.com/nodegui/nodegui-starter memeapp
cd memeapp
npm install
npm start

If everything goes well, you should see a working hello world NodeGui app on the screen.

Hello World NodeGui example

By default, the nodegui-starter project is a TypeScript project. However, in this tutorial we’ll be writing our application in JavaScript. In order to convert our starter to a JS project, we’ll make the following minor changes:

  1. Delete the index.ts file in the src folder.

  2. Create a new file index.js in the src directory with the following contents:

    src/index.js

    const { QMainWindow, QLabel } = require('@nodegui/nodegui');
    
    const win = new QMainWindow();
    win.setWindowTitle('Meme Search');
    
    const label = new QLabel();
    label.setText('Hello World');
    
    win.setCentralWidget(label);
    win.show();
    
    global.win = win;
    

As far as development is concerned, a NodeGui application is essentially a Node.js application. All APIs and features found in NodeGui are accessible through the @nodegui/nodegui module, which can be required like any other Node.js module. Additionally, you have access to all Node.js APIs and Node modules. NodeGui uses native components instead of web-based components as building blocks.

In the above example, we’ve imported QMainWindow and QLabel to create a native window that displays the text “Hello World”.

Now run the app again:

npm start

Hello World JavaScript version

Now that we have our basic setup ready, let's start building our meme searcher 🥳.

Note: If something doesn't work while following this tutorial, check your package.json file to ensure that the starter project has pulled in the most up-to-date version of NodeGui.

Displaying an Animated GIF

Since memes are generally animated GIFs, we’ll start by creating a basic window that displays a GIF image from a URL.

To do this, we’ll make use of QMovie along with QLabel. QMovie is not a widget but a container that can play simple animations. We’ll use it in combination with QLabel.

An example usage of QMovie looks like this:

const movie = new QMovie();
movie.setFileName('/absolute/path/to/animated.gif');
movie.start();

const animatedLabel = new QLabel();
animatedLabel.setMovie(movie);

Since, we want to load an image from a URL, we can’t use QMovie's setFileName method, which is reserved only for local files. Instead, we’ll download the GIF image using axios as a buffer and use the QMovie method loadFromData instead.

So let's start with the axios installation:

npm i axios

Now let's create a function that will take a URL as a parameter and will return a configured QMovie instance for the GIF:

async function getMovie(url) {
  const { data } = await axios.get(url, { responseType: 'arraybuffer' });
  const movie = new QMovie();
  movie.loadFromData(data);
  movie.start();
  return movie;
}

The getMovie function takes in a URL, tells axios to download the GIF as a buffer, and then uses that buffer to create a QMovie instance.

You can think of QMovie as a class that handles the inner logic of playing the GIF animation frame by frame. QMovie is not a widget, so it can't be shown on the screen as it is. Instead, we’ll use a regular QLabel instance and set QMovie to it.

Since getMovie returns a promise, we need to make some changes to the code. After some minor refactoring, we end up with the following.

src/index.js

const { QMainWindow, QMovie, QLabel } = require('@nodegui/nodegui');
const axios = require('axios').default;

async function getMovie(url) {
  const { data } = await axios.get(url, { responseType: 'arraybuffer' });
  const movie = new QMovie();
  movie.loadFromData(data);
  movie.start();
  return movie;
}

const main = async () => {
  const win = new QMainWindow();
  win.setWindowTitle('Meme Search');

  const label = new QLabel();
  const gifMovie = await getMovie(
    'https://upload.wikimedia.org/wikipedia/commons/e/e3/Animhorse.gif'
  );
  label.setMovie(gifMovie);

  win.setCentralWidget(label);
  win.show();
  global.win = win;
};

main().catch(console.error);

The main function is our entry point. Here we create a window and a label. We then instantiate a QMovie instance with the help of our getMovie function, and finally set the QMovie to a QLabel.

Run the app with npm start and you should see something like this:

Basic animation example showing a galloping horse

Fetching GIFs from the GIPHY API

Giphy.com has a public API which anyone can use to build great apps that use animated GIFs. In order to use the GIPHY API, you should register at developers.giphy.com and obtain an API key. You can find further instructions here.

We’ll be using the search endpoint feature for implementing our meme search.

Let’s start by writing a searchGifs function that will take a searchTerms parameter as input and request GIFs using the above endpoint:

const GIPHY_API_KEY = 'Your API key here';

async function searchGifs(searchTerm) {
  const url = 'https://api.giphy.com/v1/gifs/search';
  const res = await axios.get(url, {
    params: {
      api_key: GIPHY_API_KEY,
      limit: 25,
      q: searchTerm,
      lang: 'en',
      offset: 0,
      rating: 'pg-13'
    }
  });
  return res.data.data;
}

The result of the function after execution will look something like this:

[
  {
    "type": "gif",
    "id": "dzaUX7CAG0Ihi",
    "url": "https://giphy.com/gifs/hello-hi-dzaUX7CAG0Ihi",
    "images": {
      "fixed_width_small": {
        "height": "54",
        "size": "53544",
        "url": "https://media3.giphy.com/media/dzaUX7CAG0Ihi/100w.gif?cid=725ec7e0c00032f700929ce9f09f3f5fe5356af8c874ab12&rid=100w.gif",
        "width": "100"
      },
      "downsized_large": {
        "height": "220",
        "size": "807719",
        "url": "https://media3.giphy.com/media/dzaUX7CAG0Ihi/giphy.gif?cid=725ec7e0c00032f700929ce9f09f3f5fe5356af8c874ab12&rid=giphy.gif",
        "width": "410"
      },
      ...
    },
    "slug": "hello-hi-dzaUX7CAG0Ihi",
    ...
    "import_datetime": "2016-01-07 15:40:35",
    "trending_datetime": "1970-01-01 00:00:00"
  },
  {
    type: "gif",
    ...
  },
  ...
]

The result is essentially an array of objects that contain information about each GIF. We’re particularly interested in returnValue[i].images.fixed_width_small.url for each image, which contains the URL to the GIF.

Showing a List of GIFs Using the API's Response

In order to show a list of GIFs, we’ll create a getGifViews function that will:

  1. create a QWidget container
  2. create a QMovie widget for each GIF
  3. create a QLabel from each QMovie instance
  4. attach each QLabel as a child of the QWidget container
  5. return the QWidget container

The code looks like this:

async function getGifViews(listOfGifs) {
  const container = new QWidget();
  container.setLayout(new FlexLayout());

  const promises = listOfGifs.map(async gif => {
    const { url, width } = gif.images.fixed_width_small;
    const movie = await getMovie(url);
    const gifView = new QLabel();
    gifView.setMovie(movie);
    gifView.setInlineStyle(`width: ${width}`);
    container.layout.addWidget(gifView);
  });

  await Promise.all(promises);

  container.setInlineStyle(`
      flex-direction: 'row';
      flex-wrap: 'wrap';
      justify-content: 'space-around';
      width: 330px;
      height: 300px;
  `);

  return container;
}

Let’s break this down a bit.

First, we create our container widget. QWidgets are essentially empty widgets that act as containers. They’re similar to <div> elements in the web world.

Next, in order to assign child widgets to the QWidget, we need to give it a layout. A layout dictates how the child widgets should be arranged inside a parent. Here we choose FlexLayout.

Then, we use our getMovie function to create a QMovie instance for each GIF URL. We assign the QMovie instance to a QLabel (named gifView) and give it some basic styling using the setInlineStyle method. Finally, we add the QLabel widget to the container's layout using the layout.addWidget method.

Since this is all happening asynchronously, we wait for everything to resolve using Promise.all, before setting some container styles and returning the container widget.

The post Build a Native Desktop GIF Searcher App Using NodeGui appeared first on SitePoint.
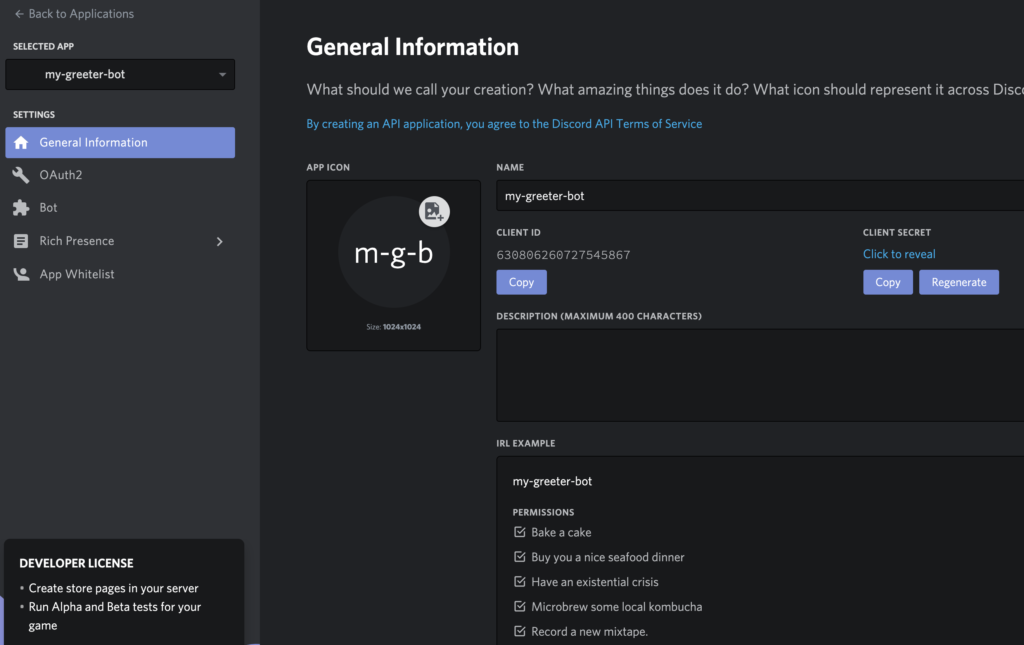
Quick Tip: Configuring NGINX and SSL with Node.js

$
0
0
Quick Tip: Configuring NGINX and SSL with Node.js

NGINX is a high-performance HTTP server as well as a reverse proxy. Unlike traditional servers, NGINX follows an event-driven, asynchronous architecture. As a result, the memory footprint is low and performance is high. If you’re running a Node.js-based web app, you should seriously consider using NGINX as a reverse proxy.

NGINX can be very efficient in serving static assets. For all other requests, it will talk to your Node.js back end and send the response to the client. In this tutorial, we’ll discuss how to configure NGINX to work with Node.js. We’ll also see how to setup SSL in the NGINX server.

Note: Node also has a built-in HTTPS module and can be configured to read the necessary certificate files without the need for a reverse proxy. You can find out more about this in our article How to Use SSL/TLS with Node.js.

Installing NGINX

Assuming you already have Node.js installed on your machine (if not, check here), let’s see how to install NGINX.

Installation on Linux

If you’re running Ubuntu, you can use the following command to install NGINX:

sudo apt-get update
sudo apt-get install nginx

If you’re running a Linux distro other than Ubuntu, check out the NGINX installation docs for more information.

NGINX will start automatically once it’s installed.

Installation on macOS

If you’re on macOS, you can use Homebrew to install NGINX easily. The steps are as following:

  • Homebrew needs the directory /usr/local to be chown’d to your username. So, run the following command in terminal first:

    sudo chown -R 'username here' /usr/local
    
  • Now the following two commands will install NGINX on your system:

    brew link pcre
    brew install nginx
    
  • Once the installation is complete, you can type the following command to start NGINX:

    sudo nginx
    
  • The NGINX config file can be found here: /usr/local/etc/nginx/nginx.conf.

Installation on Windows

For Windows, head over to the NGINX downloads page and get the zip. The next step is unzipping the archive and moving to the directory in the command prompt as follows:

unzip nginx-1.3.13.zip
cd nginx-1.3.13
start nginx

As you can see, the command start nginx will start NGINX.

Now that the installation is done, let’s see how you can configure a simple server.

Setting Up a Node.js Server

First, let’s create a simple Node.js server. We’ll start by initiating a project and installing the Express package:

mkdir node-demo && cd node-demo
npm init -y
npm i express

Create a file called server.js, with the following contents:

const express = require('express')
const app = express()
const port = 3000

app.get('/', (req, res) => res.send('Hello World!'))

app.listen(port, () => console.log(`Example app listening on port ${port}!`))

You can start the server by running node server.js.

The post Quick Tip: Configuring NGINX and SSL with Node.js appeared first on SitePoint.

Managing Dates and Times Using Moment.js

$
0
0

Working with dates and times has always been a bit cumbersome. I've always thought that a JavaScript library for manipulating dates would be quite helpful. It was only recently that I was introduced to Moment.js, the awesome JavaScript library for validating, parsing, and manipulating dates and times.

Getting Started with Moment.js

Moment.js is freely available for download from the project's home page. Moment.js can be run from the browser as well as from within a Node.js application. In order to use it with Node, install the module using the following command.

[code]
npm install moment
[/code]

Then, simply require() and use it in your application as shown below.

[js]
var moment = require('moment');

moment().format();
[/js]

In order to run Moment from the browser, download the script and include it using a script tag, as shown in the following example. Moment.js creates a global moment object which can be used to access all the date and time parsing and manipulation functionality.

[html]


[/html]

Date Formatting

In the past, I recall converting date strings into Date objects, grabbing individual pieces of data, and then performing string concatentations. Moment.js has simplified the process of date conversion to any particular format. Date format conversion with Moment is simple, as shown in the following example.

[js]
moment().format('YYYY MM DD');
[/js]

moment() gives the current date and time, while format() converts the current date and time to the specified format. This example formats a date as a four digit year, followed by a space, followed by a two digit month, another space, and a two digit date. You can see this code in action by checking out this demo.

Date Validation

Another annoying task that Moment.js has simplified is date validation. In order to perform validation, simply pass a date string to the moment object and call the isValid() method. This method returns true if the date is valid, and false otherwise. An example of this is shown below, along with this accompanying demo.

[js]
var dateEntered = $('#txtEnteredDate').val();

if (!moment(dateEntered,'MM-DD-YYYY').isValid()) {
console.log('Invalid Date');
} else {
console.log('Valid Date');
}
[/js]

There are a number of other helpful flags in the object returned by moment():

  • overflow - This is set when an overflow occurs. An example would be the 13th month or 32nd day.
  • invalidMonth - Set when the month is invalid, like Jannnuaarry.
  • empty - Set when the entered date contains nothing parsable.
  • nullInput - Set when the entered date is null.

Manipulating Dates

There are a number of options for manipulating the moment object. For example, you can add or subtract days, months, years, etc. This is achieved via the add() and subtract() methods. The following example shows how seven days, months, or weeks are added to the current date.

[js]
moment().add('days', 7); // adds 7 days to current date
moment().add('months', 7); // adds 7 months to current date
moment().add('years', 7); // adds 7 years to current date
[/js]

Similarly, the subtract() method is shown below.

[js]
moment().subtract('days', 7); // subtracts 7 days to current date
moment().subtract('months', 7); // subtracts 7 months to current date
moment().subtract('years', 7); // subtracts 7 years to current date
[/js]

Time From Now

Another common task is determining how much time exists between two dates. For calculating time from the current date, Moment.js uses a method named fromNow(). Here is a sample which checks how much time exists from the current time:

[js]
moment().fromNow();
[/js]

This code sample displays "a few seconds ago." If we supply a date to the moment object it would display the time range from now as per the difference. For example, the following code displays "7 days ago."

The post Managing Dates and Times Using Moment.js appeared first on SitePoint.
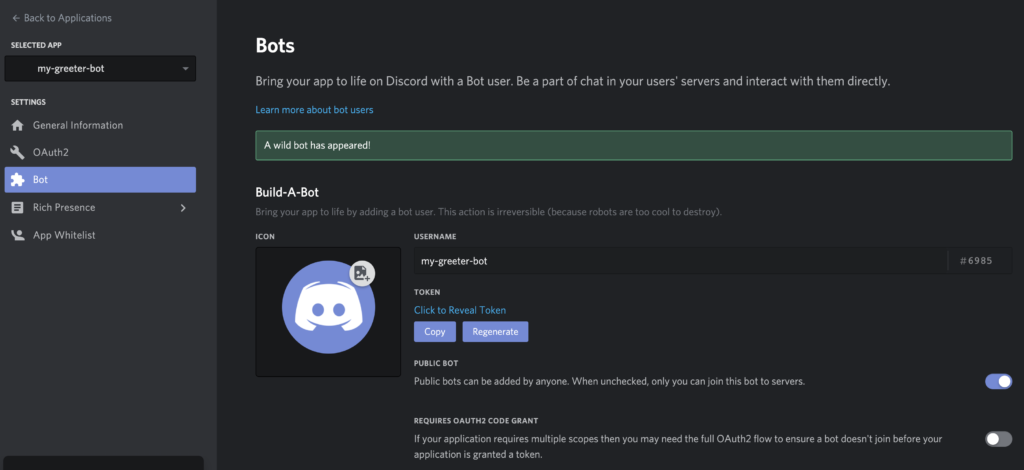
How to Build and Structure a Node.js MVC Application

$
0
0
Inside the monitor a puppet manipulates on-screen windows and popups

In a non-trivial application, the architecture is as important as the quality of the code itself. We can have well-written pieces of code, but if we don’t have good organization, we’ll have a hard time as the complexity increases. There’s no need to wait until the project is half-way done to start thinking about the architecture; the best time is before starting, using our goals as beacons for our choices.

Node.js doesn’t have a de facto framework with strong opinions on architecture and code organization in the same way that Ruby has the Rails framework, for example. As such, it can be difficult to get started with building full web applications with Node.

In this tutorial, we’re going to build the basic functionality of a note-taking app using the MVC architecture. To accomplish this, we’re going to employ the Hapi.js framework for Node.js and SQLite as a database, using Sequelize.js, plus other small utilities, to speed up our development. We’re going to build the views using Pug, the templating language.

What is MVC?

Model-View-Controller (or MVC) is probably one of the most popular architectures for applications. As with a lot of other cool things in computer history, the MVC model was conceived at PARC for the Smalltalk language as a solution to the problem of organizing applications with graphical user interfaces. It was created for desktop applications, but since then, the idea has been adapted to other mediums including the Web.

We can describe the MVC architecture in simple terms:

  • Model: the part of our application that will deal with the database or any data-related functionality.
  • View: everything the user will see — basically, the pages that we’re going to send to the client.
  • Controller: the logic of our site, and the glue between models and views. Here we call our models to get the data, then we put that data on our views to be sent to the users.

Our application will allow us to create, view, edit and delete plain-text notes. It won’t have other functionality, but because we’ll have a solid architecture already defined we won’t have a lot of trouble adding things later.

This tutorial assumes you have a recent version of Node installed on your machine. If this isn’t the case, please consult our tutorial on getting up and running with Node.

You can check out the final application in the accompanying GitHub repository, so you get a general overview of the application structure.

Laying out the Foundation

The first step when building any Node.js application is to create a package.json file, which is going to contain all of our dependencies and scripts. Instead of creating this file manually, npm can do the job for us using the init command:

mkdir notes-board
cd notes-board
npm init -y

After the process is complete, we’ll have a package.json file ready to use.

Note: if you’re not familiar with these commands, checkout our Beginner’s Guide to npm.

We’re going to proceed to install Hapi.js — the framework of choice for this tutorial. It provides a good balance between simplicity, stability and features that will work well for our use case (although there are other options that would also work just fine).

npm install @hapi/hapi@18.4.0

This command will download Hapi.js and add it to our package.json file as a dependency.

Note: We’ve specified v18.4.0 of Hapi.js, as it’s compatible with Node versions 8, 10, and 12. If you’re using Node 12, you can opt to install the latest version (Hapi v19.1.0).

Now we can create our entry file — the web server that will start everything. Go ahead and create a server.js file in your application directory and add the following code to it:

"use strict";

const Hapi = require("@hapi/hapi");
const Settings = require("./settings");

const init = async () => {
  const server = new Hapi.Server({ port: Settings.port });

  server.route({
    method: "GET",
    path: "/",
    handler: (request, h) => {
      return "Hello, world!";
    }
  });

  await server.start();
  console.log(`Server running at: ${server.info.uri}`);
};

process.on("unhandledRejection", err => {
  console.log(err);
  process.exit(1);
});

init();

This is going to be the foundation of our application.

First, we indicate that we’re going to use strict mode, which is a common practice when using the Hapi.js framework.

Next, we include our dependencies and instantiate a new server object where we set the connection port to 3000 (the port can be any number above 1023 and below 65535).

Our first route for our server will work as a test to see if everything is working, so a “Hello, world!” message is enough for us. In each route, we have to define the HTTP method and path (URL) that it will respond to, and a handler, which is a function that will process the HTTP request. The handler function can take two arguments: request and h. The first one contains information about the HTTP call, and the second will provide us with methods to handle our response to that call.

Finally, we start our server with the server.start() method.

Storing Our Settings

It’s good practice to store our configuration variables in a dedicated file. This file exports a JSON object containing our data, where each key is assigned from an environment variable — but without forgetting a fallback value.

In this file, we can also have different settings depending on our environment (such as development or production). For example, we can have an in-memory instance of SQLite for development purposes, but a real SQLite database file on production.

Selecting the settings depending on the current environment is quite simple. Since we also have an env variable in our file which will contain either development or production, we can do something like the following to get the database settings:

const dbSettings = Settings[Settings.env].db;

So dbSettings will contain the setting of an in-memory database when the env variable is development, or will contain the path of a database file when the env variable is production.

Also, we can add support for a .env file, where we can store our environment variables locally for development purposes. This is accomplished using a package like dotenv for Node.js, which will read a .env file from the root of our project and automatically add the found values to the environment.

Note: if you decide to also use a .env file, make sure you install the package with npm install dotenv and add it to .gitignore so you don’t publish any sensitive information.

Our settings.js file will look like this:

// This will load our .env file and add the values to process.env,
// IMPORTANT: Omit this line if you don't want to use this functionality
require("dotenv").config({ silent: true });

module.exports = {
  port: process.env.PORT || 3000,
  env: process.env.NODE_ENV || "development",

  // Environment-dependent settings
  development: {
    db: {
      dialect: "sqlite",
      storage: ":memory:"
    }
  },
  production: {
    db: {
      dialect: "sqlite",
      storage: "db/database.sqlite"
    }
  }
};

Now we can start our application by executing the following command and navigating to http://localhost:3000 in our web browser:

node server.js

Note: this project was tested on Node v12.15.0. If you get any errors, ensure you have an updated installation.

Defining the Routes

The definition of routes gives us an overview of the functionality supported by our application. To create our additional routes, we just have to replicate the structure of the route that we already have in our server.js file, changing the content of each one.

Let’s start by creating a new directory called lib in our project. Here we’re going to include all the JS components.

Inside lib, let’s create a routes.js file and add the following content:

"use strict";
const Path = require("path");

module.exports = [
  // we’re going to define our routes here
];

In this file, we’ll export an array of objects that contain each route of our application. To define the first route, add the following object to the array:

{
  method: "GET",
  path: "/",
  handler: (request, h) => {
    return "All the notes will appear here";
  },
  config: {
    description: "Gets all the notes available"
  }
},

Our first route is for the home page (/), and since it will only return information, we assign it a GET method. For now, it will only give us the message “All the notes will appear here”, which we’re going to change later for a controller function. The description field in the config section is only for documentation purposes.

Then, we create the four routes for our notes under the /note/ path. Since we’re building a CRUD application, we’ll need one route for each action with the corresponding HTTP methods.

Add the following definitions next to the previous route:

{
  method: "POST",
  path: "/note",
  handler: (request, h) => {
    return "New note";
  },
  config: {
    description: "Adds a new note"
  }
},
{
  method: "GET",
  path: "/note/{slug}",
  handler: (request, h) => {
    return "This is a note";
  },
  config: {
    description: "Gets the content of a note"
  }
},
{
  method: "PUT",
  path: "/note/{slug}",
  handler: (request, h) => {
    return "Edit a note";
  },
  config: {
    description: "Updates the selected note"
  }
},
{
  method: "GET",
  path: "/note/{slug}/delete",
  handler: (request, h) => {
    return "This note no longer exists";
  },
  config: {
    description: "Deletes the selected note"
  }
}

We’ve done the same as in the previous route definition, but this time we’ve changed the method to match the action we want to execute.

The only exception is the delete route. In this case, we’re going to define it with the GET method rather than DELETE and add an extra /delete in the path. This way, we can call the delete action just by visiting the corresponding URL.

Note: if you plan to implement a strict REST interface, then you would have to use the DELETE method and remove the /delete part of the path.

We can name parameters in the path by surrounding the word in curly braces. Since we’re going to identify notes by a slug, we add {slug} to each path, with the exception of the POST route; we don’t need it there because we’re not going to interact with a specific note, but to create one.

You can read more about Hapi.js routes on the official documentation.

Now, we have to add our new routes to the server.js file. Let’s import the routes file at the top of the file:

const Routes = require("./lib/routes");

Then let’s replace our current test route with the following:

server.route(Routes);

The post How to Build and Structure a Node.js MVC Application appeared first on SitePoint.

How to Debug a Node.js Application: Tips, Tricks and Tools

$
0
0
Two figures in protective suits with weapons, battling a giant spider-like bug

Software development is complex and, at some point, your Node.js application will fail. If you’re lucky, your code will crash with an obvious error message. If you’re unlucky, your application will carry on regardless but not generate the results you expect. If you’re really unlucky, everything will work fine until the first user discovers a catastrophic disk-wiping bug.

What is Debugging?

Debugging is the black art of fixing software defects. Fixing a bug is often easy — a corrected character or additional line of code solves the problem. Finding that bug is another matter, and developers can spend many unhappy hours trying to locate the source of an issue. Fortunately, Node.js has some great tools to help trace errors.

Terminology

Debugging has its own selection of obscure jargon, including the following:

Term Explanation
breakpoint the point at which a debugger stops a program so its state can be inspected
debugger a tool which offers debugging facilities such as running code line by line to inspect internal variable states
feature as in the claim: “it’s not a bug, it’s a feature”. All developers say it at some point during their career
frequency how often or under what conditions a bug will occur
it doesn’t work the most-often made but least useful bug report
log point an instruction to a debugger to show the value of a variable at a point during execution
logging output of runtime information to the console or a file
logic error the program works but doesn’t act as intended
priority where a bug is allocated on a list of planned updates
race condition hard-to-trace bugs dependent the sequence or timing of uncontrollable events
refactoring rewriting code to help readability and maintenance
regression re-emergence of a previously fixed bug perhaps owing to other updates
related a bug which is similar or related to another
reproduce the steps required to cause the error
RTFM error user incompetence disguised as a bug report, typically followed by a response to “Read The Flipping Manual”
step into when running code line by line in a debugger, step into the function being called
step out when running line by line, complete execution of the current function and return to the calling code
step over when running line by line, complete execution of a command without stepping into a function it calls
severity the impact of a bug on system. For example, data loss would normally be considered more problematic than a UI issue unless the frequency of occurrence is very low
stack trace the historical list of all functions called before the error occurred
syntax error typographical errors, such as console.lug()
user error an error caused by a user rather than the application, but may still incur an update depending on that person’s seniority
watch a variable to examine during debugger execution
watchpoint similar to a breakpoint, except the program is stopped when a variable is set to a specific value

How to Avoid Bugs

Bugs can often be prevented before you test your application …

Use a Good Code Editor

A good code editor will offer numerous features including line numbering, auto-completion, color-coding, bracket matching, formatting, auto-indentation, variable renaming, snippet reuse, object inspection, function navigation, parameter prompts, refactoring, unreachable code detection, suggestions, type checking, and more.

Node.js devs are spoiled for choice with free editors such as VS Code, Atom, and Brackets, as well as plenty of commercial alternatives.

Use a Code Linter

A linter can report code faults such as syntax errors, poor indentation, undeclared variables, and mismatching brackets before you save and test your code. The popular options for JavaScript and Node.js include ESLint, JSLint, and JSHint.

These are often installed as global Node.js modules so you can run checks from the command line:

eslint myfile.js

However, most linters have code editor plugins, such as ESLint for VS Code and linter-eslint for Atom which check your code as you type:

ESLint for VS Code

Use Source Control

A source control system such as Git can help safe-guard your code and manage revisions. It becomes easier to discover where and when a bug was introduced and who should receive the blame! Online repositories such as GitHub and Bitbucket offer free space and management tools.

Adopt an Issue-tracking System

Does a bug exist if no one knows about it? An issue-tracking system is used to report bugs, find duplicates, document reproduction steps, determine severity, calculate priorities, assign developers, record discussions, and track progress of any fixes.

Online source repositories often offer basic issue tracking, but dedicated solutions may be appropriate for larger teams and projects.

Use Test-driven Development

Test-driven Development (TDD) is a development process which encourages developers to write code which tests the operation of a function before it’s written — for example, is X returned when function Y is passed input Z.

Tests can be run as the code is developed to prove a function works and spot any issues as further changes are made. That said, your tests could have bugs too …

Step Away

It’s tempting to stay up all night in a futile attempt to locate the source of a nasty bug. Don’t. Step away and do something else. Your brain will subconsciously work on the problem and wake you at 4am with a solution. Even if that doesn’t happen, fresh eyes will spot that obvious missing semicolon.

Node.js Debugging: Environment Variables

Environment variables that are set within the host operating system can be used to control Node.js application settings. The most common is NODE_ENV, which is typically set to development when debugging.

Environment variables can be set on Linux/macOS:

NODE_ENV=development

Windows cmd:

set NODE_ENV=development

Or Windows Powershell:

$env:NODE_ENV="development"

Internally, an application will enable further debugging features and messages. For example:

// is NODE_ENV set to "development"?
const DEVMODE = (process.env.NODE_ENV === 'development');

if (DEVMODE) {
  console.log('application started in development mode on port ${PORT}');
}

NODE_DEBUG enables debugging messages using the Node.js util.debuglog (see below), but also consult the documentation of your primary modules and frameworks to discover further options.

Note that environment variables can also be saved to a .env file. For example:

NODE_ENV=development
NODE_LOG=./log/debug.log
SERVER_PORT=3000
DB_HOST=localhost
DB_NAME=mydatabase

Then loaded using the dotenv module:

require('dotenv').config();

Node.js Debugging: Command Line Options

Various command-line options can be passed to the node runtime when launching an application. One of the most useful is --trace-warnings, which outputs stack traces for process warnings (including deprecations).

Any number of options can be set, including:

  • --enable-source-maps: enable source maps (experimental)
  • --throw-deprecation: throw errors when deprecated features are used
  • --inspect: activate the V8 inspector (see below)

By way of an example, let’s try to log the crypto module’s DEFAULT_ENCODING property, which was deprecated in Node v10:

const crypto = require('crypto');

function bar() {
  console.log(crypto.DEFAULT_ENCODING);
}

function foo(){
  bar();
}

foo();

Now run this with the following:

node index.js

We’ll then see this:

buffer
(node:7405) [DEP0091] DeprecationWarning: crypto.DEFAULT_ENCODING is deprecated.

However, we can also do this:

node --trace-warnings index.js

That produces the following:

buffer
(node:7502) [DEP0091] DeprecationWarning: crypto.DEFAULT_ENCODING is deprecated.
    at bar (/home/Desktop/index.js:4:22)
    at foo (/home/Desktop/index.js:8:3)
    at Object.<anonymous> (/home/Desktop/index.js:11:1)
    at Module._compile (internal/modules/cjs/loader.js:1151:30)
    at Object.Module._extensions..js (internal/modules/cjs/loader.js:1171:10)
    at Module.load (internal/modules/cjs/loader.js:1000:32)
    at Function.Module._load (internal/modules/cjs/loader.js:899:14)
    at Function.executeUserEntryPoint [as runMain] (internal/modules/run_main.js:71:12)
    at internal/main/run_main_module.js:17:47

This tells us that the deprecation warning comes from the code in line 4 (the console.log statement), which was executed when the bar function ran. The bar function was called by the foo function on line 8 and the foo function was called on line 11 of our script.

Note that the same options can also be passed to nodemon.

Console Debugging

One of the easiest ways to debug an application is to output values to the console during execution:

console.log( myVariable );

Few developers delve beyond this humble debugging command, but they’re missing out on many more possibilities, including these:

console method description
.log(msg) output a message to the console
.dir(obj,opt) uses util.inspect to pretty-print objects and properties
.table(obj) outputs arrays of objects in tabular format
.error(msg) output an error message
.count(label) a named counter reporting the number of times the line has been executed
.countReset[label] resets a named counter
.group(label) indents a group of log messages
.groupEnd(label) ends the indented group
.time(label) starts a timer to calculate the duration of an operation
.timeLog([label] reports the elapsed time since the timer started
.timeEnd(label) stops the timer and reports the total duration
.trace() outputs a stack trace (a list of all calling functions)
.clear() clear the console

console.log() accepts a list of comma-separated values. For example:

let x = 123;
console.log('x:', x);
// x: 123

However, ES6 destructuring can offer similar output with less typing effort:

console.log({x});
// { x: 123 }

Larger objects can be output as a condensed string using this:

console.log( JSON.stringify(obj) );

util.inspect will format objects for easier reading, but console.dir() does the hard work for you.

The post How to Debug a Node.js Application: Tips, Tricks and Tools appeared first on SitePoint.

Viewing all 225 articles
Browse latest View live