Quantcast
Channel: Node.js – SitePoint
Viewing all 225 articles
Browse latest View live

A Beginner Splurge in Node.js

$
0
0

It's 3 a.m., hands over the keyboard while staring at an empty console. The bright prompt over a dark backdrop ready, yearning to take in commands. Want to hack up Node.js for a little while? One of the exciting news about Node.js is that it runs anywhere. This opens up the stack to various ways to experiment with it. For any seasoned veteran, this is a fun run of the command line tooling. What I like the most is that we can survey the stack from within the safety net of the command line. The cool thing is that we are still talking about JavaScript, hence most of you should not have any problem. So, why not fire up node up in the console?

In this article, I'll introduce you to Node.js. My goal is to go over the main highlights while hiking up some pretty high ground. This is an intermediate overview of the stack while keeping it all inside the console. If you want a beginner-friendly guide about Node.js, I suggest you to watch the SitePoint premium's course Node.js: An Introduction.

Continue reading %A Beginner Splurge in Node.js%


An Introduction to Gulp.js

$
0
0

Developers spend precious little time coding. Even if we ignore irritating meetings, much of the job involves basic tasks which can sap your working day:

  • generating HTML from templates and content files
  • compressing new and modified images
  • compiling Sass to CSS code
  • removing console and debugger statements from scripts
  • transpiling ES6 to cross-browser–compatible ES5 code
  • code linting and validation
  • concatenating and minifying CSS and JavaScript files
  • deploying files to development, staging and production servers.

Tasks must be repeated every time you make a change. You may start with good intentions, but the most infallible developer will forget to compress an image or two. Over time, pre-production tasks become increasingly arduous and time-consuming; you'll dread the inevitable content and template changes. It's mind-numbing, repetitive work. Wouldn’t it be better to spend your time on more profitable jobs?

If so, you need a task runner or build process.

That Sounds Scarily Complicated!

Creating a build process will take time. It's more complex than performing each task manually, but over the long term, you’ll save hours of effort, reduce human error and save your sanity. Adopt a pragmatic approach:

  • Automate the most frustrating tasks first.
  • Try not to over-complicate your build process. An hour or two is more than enough for the initial setup.
  • Choose task runner software and stick with it for a while. Don't switch to another option on a whim.

Some of the tools and concepts may be new to you, but take a deep breath and concentrate on one thing at a time.

Task Runners: the Options

Build tools such as GNU Make have been available for decades, but web-specific task runners are a relatively new phenomenon. The first to achieve critical mass was Grunt — a Node.js task runner which used plugins controlled (originally) by a JSON configuration file. Grunt was hugely successful, but there were a number of issues:

  1. Grunt required plugins for basic functionality such as file watching.
  2. Grunt plugins often performed multiple tasks, which made customisation more awkward.
  3. JSON configuration could become unwieldy for all but the most basic tasks.
  4. Tasks could run slowly because Grunt saved files between every processing step.

Many issues were addressed in later editions, but Gulp had already arrived and offered a number of improvements:

  1. Features such as file watching were built in.
  2. Gulp plugins were (mostly) designed to do a single job.
  3. Gulp used JavaScript configuration code that was less verbose, easier to read, simpler to modify, and provided better flexibility.
  4. Gulp was faster because it uses Node.js streams to pass data through a series of piped plugins. Files were only written at the end of the task.

Of course, Gulp itself isn't perfect, and new task runners such as Broccoli.js, Brunch and webpack have also been competing for developer attention. More recently, npm itself has been touted as a simpler option. All have their pros and cons, but Gulp remains the favorite and is currently used by more than 40% of web developers.

Gulp requires Node.js, but while some JavaScript knowledge is beneficial, developers from all web programming faiths will find it useful.

What About Gulp 4?

This tutorial describes how to use Gulp 3 — the most recent release version at the time of writing. Gulp 4 has been in development for some time but remains a beta product. It's possible to use or switch to Gulp 4, but I recommend sticking with version 3 until the final release.

Step 1: Install Node.js

Node.js can be downloaded for Windows, macOS and Linux from nodejs.org/download/. There are various options for installing from binaries, package managers and docker images, and full instructions are available.

Note for Windows users: Node.js and Gulp run on Windows, but some plugins may not install or run if they depend on native Linux binaries such as image compression libraries. One option for Windows 10 users is the new bash command-line, which solves many issues.

Once installed, open a command prompt and enter:

node -v

This reveals the version number. You're about to make heavy use of npm — the Node.js package manager which is used to install modules. Examine its version number:

npm -v

Note for Linux users: Node.js modules can be installed globally so they’re available throughout your system. However, most users will not have permission to write to the global directories unless npm commands are prefixed with sudo. There are a number of options to fix npm permissions and tools such as nvm can help, but I often change the default directory. For example, on Ubuntu/Debian-based platforms:

cd ~
mkdir .node_modules_global
npm config set prefix=$HOME/.node_modules_global
npm install npm -g

Then add the following line to the end of ~/.bashrc:

export PATH="$HOME/.node_modules_global/bin:$PATH"

Finally, update with this:

source ~/.bashrc

Step 2: Install Gulp Globally

Install Gulp command-line interface globally so the gulp command can be run from any project folder:

npm install gulp-cli -g

Verify Gulp has installed with this:

gulp -v

Step 3: Configure Your Project

Note for Node.js projects: you can skip this step if you already have a package.json configuration file.

Presume you have a new or pre-existing project in the folder project1. Navigate to this folder and initialize it with npm:

cd project1
npm init

You’ll be asked a series of questions. Enter a value or hit Return to accept defaults. A package.json file will be created on completion which stores your npm configuration settings.

Note for Git users: Node.js installs modules to a node_modules folder. You should add this to your .gitignore file to ensure they’re not committed to your repository. When deploying the project to another PC, you can run npm install to restore them.

For the remainder of this article, we'll presume your project folder contains the following sub-folders:

src folder: preprocessed source files

This contains further sub-folders:

  • html - HTML source files and templates
  • images — the original uncompressed images
  • js — multiple preprocessed script files
  • scss — multiple preprocessed Sass .scss files

build folder: compiled/processed files

Gulp will create files and create sub-folders as necessary:

  • html — compiled static HTML files
  • images — compressed images
  • js — a single concatenated and minified JavaScript file
  • css — a single compiled and minified CSS file

Your project will almost certainly be different but this structure is used for the examples below.

Tip: If you're on a Unix-based system and you just want to follow along with the tutorial, you can recreate the folder structure with the following command:

mkdir -p src/{html,images,js,scss} build/{html,images,js,css}

Step 4: Install Gulp Locally

You can now install Gulp in your project folder using the command:

npm install gulp --save-dev

This installs Gulp as a development dependency and the "devDependencies" section of package.json is updated accordingly. We’ll presume Gulp and all plugins are development dependencies for the remainder of this tutorial.

Alternative Deployment Options

Development dependencies are not installed when the NODE_ENV environment variable is set to production on your operating system. You would normally do this on your live server with the Mac/Linux command:

export NODE_ENV=production

Or on Windows:

set NODE_ENV=production

This tutorial presumes your assets will be compiled to the build folder and committed to your Git repository or uploaded directly to the server. However, it may be preferable to build assets on the live server if you want to change the way they are created. For example, HTML, CSS and JavaScript files are minified on production but not development environments. In that case, use the --save option for Gulp and all plugins, i.e.

npm install gulp --save

This sets Gulp as an application dependency in the "dependencies" section of package.json. It will be installed when you enter npm install and can be run wherever the project is deployed. You can remove the build folder from your repository since the files can be created on any platform when required.

Step 4: Create a Gulp Configuration File

Create a new gulpfile.js configuration file in the root of your project folder. Add some basic code to get started:

// Gulp.js configuration
var
  // modules
  gulp = require('gulp'),

  // development mode?
  devBuild = (process.env.NODE_ENV !== 'production'),

  // folders
  folder = {
    src: 'src/',
    build: 'build/'
  }
;

This references the Gulp module, sets a devBuild variable to true when running in development (or non-production mode) and defines the source and build folder locations.

ES6 note: ES5-compatible JavaScript code is provided in this tutorial. This will work for all versions of Gulp and Node.js with or without the --harmony flag. Most ES6 features are supported in Node 6 and above so feel free to use arrow functions, let, const, etc. if you're using a recent version.

gulpfile.js won't do anything yet because you need to …

Step 5: Create Gulp Tasks

On its own, Gulp does nothing. You must:

  1. install Gulp plugins, and
  2. write tasks which utilize those plugins to do something useful.

It's possible to write your own plugins but, since almost 3,000 are available, it's unlikely you'll ever need to. You can search using Gulp's own directory at gulpjs.com/plugins/, on npmjs.com, or search "gulp something" to harness the mighty power of Google.

Gulp provides three primary task methods:

  • gulp.task — defines a new task with a name, optional array of dependencies and a function.
  • gulp.src — sets the folder where source files are located.
  • gulp.dest — sets the destination folder where build files will be placed.

Any number of plugin calls are set with pipe between the .src and .dest.

Continue reading %An Introduction to Gulp.js%

User Authentication with the MEAN Stack

$
0
0

In this article, we’re going to look at managing user authentication in the MEAN stack. We’ll use the most common MEAN architecture of having an Angular single-page app using a REST API built with Node, Express and MongoDB.

When thinking about user authentication, we need to tackle the following things:

  1. let a user register
  2. save their data, but never directly store their password
  3. let a returning user log in
  4. keep a logged in user’s session alive between page visits
  5. have some pages that can only been seen by logged in users
  6. change output to the screen depending on logged in status (e.g. a “login” button or a “my profile” button).

Before we dive into the code, let’s take a few minutes for a high-level look at how authentication is going to work in the MEAN stack.

The MEAN Stack Authentication Flow

So what does authentication look like in the MEAN stack?

Still keeping this at a high level, these are the components of the flow:

  • user data is stored in MongoDB, with the passwords hashed
  • CRUD functions are built in an Express API — Create (register), Read (login, get profile), Update, Delete
  • an Angular application calls the API and deals with the responses
  • the Express API generates a JSON Web Token (JWT, pronounced “Jot”) upon registration or login, and passes this to the Angular application
  • the Angular application stores the JWT in order to maintain the user’s session
  • the Angular application checks the validity of the JWT when displaying protected views
  • the Angular application passes the JWT back to Express when calling protected API routes.

JWTs are preferred over cookies for maintaining the session state in the browser. Cookies are better for maintaining state when using a server-side application.

The Example Application

The code for this article is available on GitHub. To run the application, you’ll need to have Node.js installed, along with MongoDB. (For instructions on how to install, please refer to Mongo’s official documentation — Windows, Linux, macOS).

The Angular App

To keep the example in this article simple, we’ll start with an Angular app with four pages:

  1. home page
  2. register page
  3. login page
  4. profile page

The pages are pretty basic and look like this to start with:

Screenshots of the app

The profile page will only be accessible to authenticated users. All the files for the Angular app are in a folder inside the Angular CLI app called /client.

We’ll use the Angular CLI for building and running the local server. If you’re unfamiliar with the Angular CLI, refer to the Angular 2 Tutorial: Create a CRUD App with Angular CLI to get started.

The REST API

We’ll also start off with the skeleton of a REST API built with Node, Express and MongoDB, using Mongoose to manage the schemas. This API has three routes:

  1. /api/register (POST) — to handle new users registering
  2. /api/login (POST) — to handle returning users logging in
  3. /api/profile/USERID (GET) — to return profile details when given a USERID.

The code for the API is all held in another folder inside the Express app, called api. This holds the routes, controllers and model, and is organized like this:

Screenshot of api folder structure

At this starting point, each of the controllers simply responds with a confirmation, like this:

module.exports.register = function(req, res) {
  console.log("Registering user: " + req.body.email);
  res.status(200);
  res.json({
    "message" : "User registered: " + req.body.email
  });
};

Okay, let’s get on with the code, starting with the database.

Creating the MongoDB Data Schema with Mongoose

There’s a simple user schema defined in /api/models/users.js. It defines the need for an email address, a name, a hash and a salt. The hash and salt will be used instead of saving a password. The email is set to unique as we’ll use it for the login credentials. Here’s the schema:

var userSchema = new mongoose.Schema({
  email: {
    type: String,
    unique: true,
    required: true
  },
  name: {
    type: String,
    required: true
  },
  hash: String,
  salt: String
});

Managing the Password without Saving It

Saving user passwords is a big no-no. Should a hacker get a copy of your database, you want to make sure they can’t use it to log in to accounts. This is where the hash and salt come in.

The salt is a string of characters unique to each user. The hash is created by combining the password provided by the user and the salt, and then applying one-way encryption. As the hash can’t be decrypted, the only way to authenticate a user is to take the password, combine it with the salt and encrypt it again. If the output of this matches the hash, the password must have been correct.

To do the setting and the checking of the password, we can use Mongoose schema methods. These are essentially functions that you add to the schema. They’ll both make use of the Node.js crypto module.

At the top of the users.js model file, require crypto so that we can use it:

var crypto = require('crypto');

Nothing needs installing, as crypto ships as part of Node. Crypto itself has several methods; we’re interested in randomBytes to create the random salt and pbkdf2Sync to create the hash (there’s much more about Crypto in the Node.js API docs).

Setting the Password

To save the reference to the password, we can create a new method called setPassword on the userSchema schema that accepts a password parameter. The method will then use crypto.randomBytes to set the salt, and crypto.pbkdf2Sync to set the hash:

userSchema.methods.setPassword = function(password){
  this.salt = crypto.randomBytes(16).toString('hex');
  this.hash = crypto.pbkdf2Sync(password, this.salt, 1000, 64, 'sha512').toString('hex');
};

We’ll use this method when creating a user. Instead of saving the password to a password path, we’ll be able to pass it to the setPassword function to set the salt and hash paths in the user document.

Checking the Password

Checking the password is a similar process, but we already have the salt from the Mongoose model. This time we just want to encrypt the salt and the password and see if the output matches the stored hash.

Add another new method to the users.js model file, called validPassword:

userSchema.methods.validPassword = function(password) {
  var hash = crypto.pbkdf2Sync(password, this.salt, 1000, 64, 'sha512').toString('hex');
  return this.hash === hash;
};

Generating a JSON Web Token (JWT)

One more thing the Mongoose model needs to be able to do is generate a JWT, so that the API can send it out as a response. A Mongoose method is ideal here too, as it means we can keep the code in one place and call it whenever needed. We’ll need to call it when a user registers and when a user logs in.

To create the JWT, we’ll use a module called jsonwebtoken which needs to be installed in the application, so run this on the command line:

npm install jsonwebtoken --save

Then require this in the users.js model file:

var jwt = require('jsonwebtoken');

This module exposes a sign method that we can use to create a JWT, simply passing it the data we want to include in the token, plus a secret that the hashing algorithm will use. The data should be sent as a JavaScript object, and include an expiry date in an exp property.

Adding a generateJwt method to userSchema in order to return a JWT looks like this:

userSchema.methods.generateJwt = function() {
  var expiry = new Date();
  expiry.setDate(expiry.getDate() + 7);

  return jwt.sign({
    _id: this._id,
    email: this.email,
    name: this.name,
    exp: parseInt(expiry.getTime() / 1000),
  }, "MY_SECRET"); // DO NOT KEEP YOUR SECRET IN THE CODE!
};

Note: It’s important that your secret is kept safe: only the originating server should know what it is. It’s best practice to set the secret as an environment variable, and not have it in the source code, especially if your code is stored in version control somewhere.

That’s everything we need to do with the database.

Set Up Passport to Handle the Express Authentication

Passport is a Node module that simplifies the process of handling authentication in Express. It provides a common gateway to work with many different authentication “strategies”, such as logging in with Facebook, Twitter or Oauth. The strategy we’ll use is called “local”, as it uses a username and password stored locally.

To use Passport, first install it and the strategy, saving them in package.json:

npm install passport --save
npm install passport-local --save

Configure Passport

Inside the api folder, create a new folder config and create a file in there called passport.js. This is where we define the strategy.

Before defining the strategy, this file needs to require Passport, the strategy, Mongoose and the User model:

var passport = require('passport');
var LocalStrategy = require('passport-local').Strategy;
var mongoose = require('mongoose');
var User = mongoose.model('User');

For a local strategy, we essentially just need to write a Mongoose query on the User model. This query should find a user with the email address specified, and then call the validPassword method to see if the hashes match. Pretty simple.

There’s just one curiosity of Passport to deal with. Internally, the local strategy for Passport expects two pieces of data called username and password. However, we’re using email as our unique identifier, not username. This can be configured in an options object with a usernameField property in the strategy definition. After that, it’s over to the Mongoose query.

So all in, the strategy definition will look like this:

passport.use(new LocalStrategy({
    usernameField: 'email'
  },
  function(username, password, done) {
    User.findOne({ email: username }, function (err, user) {
      if (err) { return done(err); }
      // Return if user not found in database
      if (!user) {
        return done(null, false, {
          message: 'User not found'
        });
      }
      // Return if password is wrong
      if (!user.validPassword(password)) {
        return done(null, false, {
          message: 'Password is wrong'
        });
      }
      // If credentials are correct, return the user object
      return done(null, user);
    });
  }
));

Note how the validPassword schema method is called directly on the user instance.

Now Passport just needs to be added to the application. So in app.js we need to require the Passport module, require the Passport config and initialize Passport as middleware. The placement of all of these items inside app.js is quite important, as they need to fit into a certain sequence.

The Passport module should be required at the top of the file with the other general require statements:

var express = require('express');
var path = require('path');
var favicon = require('serve-favicon');
var logger = require('morgan');
var cookieParser = require('cookie-parser');
var bodyParser = require('body-parser');
var passport = require('passport');

The config should be required after the model is required, as the config references the model.

require('./api/models/db');
require('./api/config/passport');

Finally, Passport should be initialized as Express middleware just before the API routes are added, as these routes are the first time that Passport will be used.

app.use(passport.initialize());
app.use('/api', routesApi);

We’ve now got the schema and Passport set up. Next, it’s time to put these to use in the routes and controllers of the API.

Continue reading %User Authentication with the MEAN Stack%

Build a JavaScript Command Line Interface (CLI) with Node.js

$
0
0

As great as Node.js is for “traditional” web applications, its potential uses are far broader. Microservices, REST APIs, tooling, working with the Internet of Things and even desktop applications: it’s got your back.

Another area where Node.js is really useful is for building command-line applications — and that’s what we’re going to be doing in this article. We’re going to start by looking at a number of third-party packages designed to help work with the command line, then build a real-world example from scratch.

What we’re going to build is a tool for initializing a Git repository. Sure, it’ll run git init under the hood, but it’ll do more than just that. It will also create a remote repository on GitHub right from the command line, allow the user to interactively create a .gitignore file, and finally perform an initial commit and push.

As ever, the code accompanying this tutorial can be found on our GitHub repo.

Build a Node CLI

Why Build a Command-line Tool with Node.js?

Before we dive in and start building, it’s worth looking at why we might choose Node.js to build a command-line application.

The most obvious advantage is that, if you’re reading this, you’re probably already familiar with it — and, indeed, with JavaScript.

Another key advantage, as we’ll see as we go along, is that the strong Node.js ecosystem means that among the hundreds of thousands of packages available for all manner of purposes, there are a number which are specifically designed to help build powerful command-line tools.

Finally, we can use npm to manage any dependencies, rather than have to worry about OS-specific package managers such as Aptitude, Yum or Homebrew.

Tip: that isn’t necessarily true, in that your command-line tool may have other external dependencies.

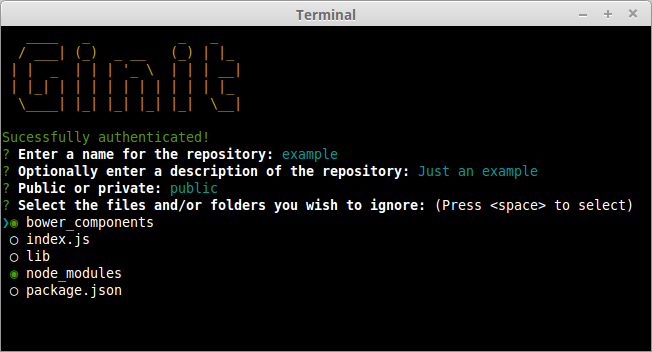
What We’re Going to Build: ginit

Ginit, our Node CLI in action

For this tutorial, We’re going to create a command-line utility which I’m calling ginit. It’s git init, but on steroids.

You’re probably wondering what on earth that means.

As you no doubt already know, git init initializes a git repository in the current folder. However, that’s usually only one of a number of repetitive steps involved in the process of hooking up a new or existing project to Git. For example, as part of a typical workflow, you may well:

  1. initialise the local repository by running git init
  2. create a remote repository, for example on GitHub or Bitbucket — typically by leaving the command line and firing up a web browser
  3. add the remote
  4. create a .gitignore file
  5. add your project files
  6. commit the initial set of files
  7. push up to the remote repository.

There are often more steps involved, but we’ll stick to those for the purposes of our app. Nevertheless, these steps are pretty repetitive. Wouldn’t it be better if we could do all this from the command line, with no copy-pasting of Git URLs and such like?

So what ginit will do is create a Git repository in the current folder, create a remote repository — we’ll be using GitHub for this — and then add it as a remote. Then it will provide a simple interactive “wizard” for creating a .gitignore file, add the contents of the folder and push it up to the remote repository. It might not save you hours, but it’ll remove some of the initial friction when starting a new project.

With that in mind, let’s get started.

The Application Dependencies

One thing is for certain: in terms of appearance, the console will never have the sophistication of a graphical user interface. Nevertheless, that doesn’t mean it has to be plain, ugly, monochrome text. You might be surprised by just how much you can do visually, while at the same time keeping it functional. We’ll be looking at a couple of libraries for enhancing the display: chalk for colorizing the output and clui to add some additional visual components. Just for fun, we’ll use figlet to create a fancy ASCII-based banner and we’ll also use clear to clear the console.

In terms of input and output, the low-level Readline Node.js module could be used to prompt the user and request input, and in simple cases is more than adequate. But we’re going to take advantage of a third-party package which adds a greater degree of sophistication — Inquirer. As well as providing a mechanism for asking questions, it also implements simple input controls: think radio buttons and checkboxes, but in the console.

We’ll also be using minimist to parse command-line arguments.

Here’s a complete list of the packages we’ll use specifically for developing on the command line:

  • chalk — colorizes the output
  • clear — clears the terminal screen
  • clui — draws command-line tables, gauges and spinners
  • figlet — creates ASCII art from text
  • inquirer — creates interactive command-line user interface
  • minimist — parses argument options
  • configstore — easily loads and saves config without you having to think about where and how.

Additionally, we’ll also be using the following:

  • @octokit/rest — a GitHub REST API client for Node.js
  • lodash — a JavaScript utility library
  • simple-git — a tool for running Git commands in a Node.js application
  • touch — a tool for implementating the Unix touch command.

Getting Started

Although we’re going to create the application from scratch, don’t forget that you can also grab a copy of the code from the repository which accompanies this article.

Create a new directory for the project. You don’t have to call it ginit, of course:

mkdir ginit
cd ginit

Create a new package.json file:

npm init

Follow the simple wizard, for example:

name: (ginit)
version: (1.0.0)
description: "git init" on steroids
entry point: (index.js)
test command:
git repository:
keywords: Git CLI
author: [YOUR NAME]
license: (ISC)

Now install the dependencies:

npm install chalk clear clui figlet inquirer minimist configstore @octokit/rest lodash simple-git touch --save

Alternatively, simply copy-paste the following package.json file — modifying the author appropriately — or grab it from the repository which accompanies this article:

{
  "name": "ginit",
  "version": "1.0.0",
  "description": "\"git init\" on steroids",
  "main": "index.js",
  "scripts": {
    "test": "echo \"Error: no test specified\" && exit 1"
  },
  "keywords": [
    "Git",
    "CLI"
  ],
  "author": "Lukas White <hello@lukaswhite.com>",
  "license": "ISC",
  "bin": {
    "ginit": "./index.js"
  },
  "dependencies": {
    "@octokit/rest": "^14.0.5",
    "chalk": "^2.3.0",
    "clear": "0.0.1",
    "clui": "^0.3.6",
    "configstore": "^3.1.1",
    "figlet": "^1.2.0",
    "inquirer": "^5.0.1",
    "lodash": "^4.17.4",
    "minimist": "^1.2.0",
    "simple-git": "^1.89.0",
    "touch": "^3.1.0"
  }
}

Now create an index.js file in the same folder and require the following dependencies:

const chalk       = require('chalk');
const clear       = require('clear');
const figlet      = require('figlet');

Adding Some Helper Methods

We’re going to create a lib folder where we’ll split our helper code into modules:

  • files.js — basic file management
  • inquirer.js — command-line user interaction
  • github.js — access token management
  • repo.js — Git repository management.

Let’s start with lib/files.js. Here, we need to:

  • get the current directory (to get a default repo name)
  • check whether a directory exists (to determine whether the current folder is already a Git repository by looking for a folder named .git).

This sounds straightforward, but there are a couple of gotchas to take into consideration.

Firstly, you might be tempted to use the fs module’s realpathSync method to get the current directory:

path.basename(path.dirname(fs.realpathSync(__filename)));

This will work when we’re calling the application from the same directory (e.g. using node index.js), but bear in mind that we’re going to be making our console application available globally. This means we’ll want the name of the directory we’re working in, not the directory where the application resides. For this purpose, it’s better to use process.cwd:

path.basename(process.cwd());

Secondly, the preferred method of checking whether a file or directory exists keeps changing.The current way is to use fs.stat or fs.statSync. These throw an error if there’s no file, so we need to use a try … catch block.

Finally, it’s worth noting that when you’re writing a command-line application, using the synchronous version of these sorts of methods is just fine.

Putting that all together, let’s create a utility package in lib/files.js:

const fs = require('fs');
const path = require('path');

module.exports = {
  getCurrentDirectoryBase : () => {
    return path.basename(process.cwd());
  },

  directoryExists : (filePath) => {
    try {
      return fs.statSync(filePath).isDirectory();
    } catch (err) {
      return false;
    }
  }
};

Go back to index.js and ensure you require the new file:

const files = require('./lib/files');

With this in place, we can start developing the application.

Initializing the Node CLI

Now let’s implement the start-up phase of our console application.

In order to demonstrate some of the packages we’ve installed to enhance the console output, let’s clear the screen and then display a banner:

clear();
console.log(
  chalk.yellow(
    figlet.textSync('Ginit', { horizontalLayout: 'full' })
  )
);

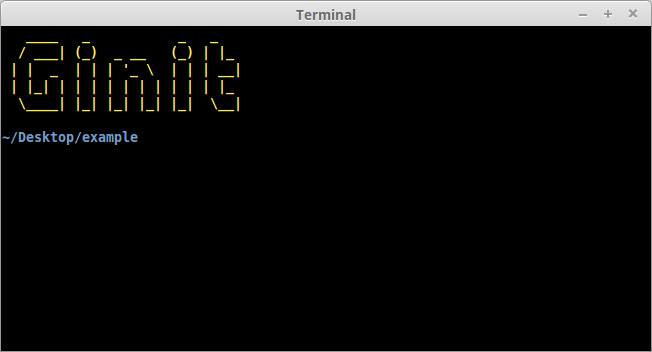
The output from this is shown below.

The welcome banner on our Node CLI, created using Chalk and Figlet

Next up, let’s run a simple check to ensure that the current folder isn’t already a Git repository. That’s easy: we just check for the existence of a .git folder using the utility method we just created:

if (files.directoryExists('.git')) {
  console.log(chalk.red('Already a git repository!'));
  process.exit();
}

Tip: notice we’re using the chalk module to show a red-colored message.

Continue reading %Build a JavaScript Command Line Interface (CLI) with Node.js%

Passport Authentication for Node.js Applications

$
0
0

In this tutorial, we'll be implementing authentication via Facebook and GitHub in a Node.js web application. For this, we'll be using Passport, an authentication middleware for Node.js. Passport supports authentication with OpenId/OAuth providers.

Express Web App

Before getting started, make sure you have Node.js installed on your machine.

We'll begin by creating the folder for our app and then accessing that folder on the terminal:

mkdir AuthApp
cd AuthApp

To create the node app we'll use the following command:

npm init

You'll be prompted to provide some information for Node's package.json. Just hit enter until the end to leave the default configuration.

Next, we'll need an HTML file to send to the client. Create a file called auth.html in the root folder of your app, with the following contents:

&lt;html&gt;
  &lt;head&gt;
    &lt;title&gt;Node.js OAuth&lt;/title&gt;
  &lt;/head&gt;
  &lt;body&gt;
    &lt;a href=auth/facebook&gt;Sign in with Facebook&lt;/a&gt;
    &lt;br&gt;&lt;/br&gt;
    &lt;a href=auth/github&gt;Sign in with Github&lt;/a&gt;
  &lt;/body&gt;
&lt;/html&gt;

That's all the HTML we'll need for this tutorial.

You’ll also require Express, a framework for building web apps that’s inspired by Ruby's Sinatra. In order to install Express, from the terminal type the following command:

npm install express --save

Once you’ve done that, it's time to write some code.

Create a file index.js in the root folder of your app and add the following content to it:

/*  EXPRESS SETUP  */

const express = require('express');
const app = express();

app.get('/', (req, res) =&gt; res.sendFile('auth.html', { root : __dirname}));

const port = process.env.PORT || 3000;
app.listen(port , () =&gt; console.log('App listening on port ' + port));

In the code above, we require Express and create our Express app by calling express(). Then we declare the route for the home page of our app. There we send the HTML file we’ve created to the client accessing that route. Then, we use process.env.PORT to set the port to the environment port variable if it exists. Otherwise, we'll default to 3000, which is the port we'll be using locally. This gives you enough flexibility to switch from development, directly to a production environment where the port might be set by a service provider like, for instance, Heroku. Right below, we call app.listen() with the port variable we set up, and a simple log to let us know that it's all working fine, and on which port is the app listening.

Now we should start our app to make sure all is working correctly. Simply write the following command on the terminal:

node index.js

You should see the message: App listening on port 3000. If that’s not the case, you probably missed a step. Go back and try again.

Moving on, let's see if our page is being served to the client. Go to your web browser and navigate to http://localhost:3000.

If you can see the page we created in auth.html, we're good to go.

Head back to the terminal and stop the app with ctrl + c. So remember, when I say start the app, you write node index.js, and when I say stop the app, you do ctrl + c. Clear? Good, you've just been programmed :-)

Setting up Passport

As you'll soon come to realize, Passport makes it a breeze to provide authentication for our users. Let's install Passport with the following command:

npm install passport --save

Now we have to set up Passport. Add the following code at the bottom of the index.js file:

/*  PASSPORT SETUP  */

const passport = require('passport');
app.use(passport.initialize());
app.use(passport.session());

app.get('/success', (req, res) =&gt; res.send("You have successfully logged in"));
app.get('/error', (req, res) =&gt; res.send("error logging in"));

passport.serializeUser(function(user, cb) {
  cb(null, user);
});

passport.deserializeUser(function(obj, cb) {
  cb(null, obj);
});

Here we require Passport and initialize it along with its session authentication middleware, directly inside our Express app. Then, we set up the '/success' and '/error' routes, which will render a message telling us how the authentication went. It’s the same syntax for our last route, only this time instead of using [res.SendFile()](http://expressjs.com/en/api.html#res.sendFile) we're using [res.send()](http://expressjs.com/en/api.html#res.send), which will render the given string as text/html in the browser. Then we're using serializeUser and deserializeUser callbacks. The first one will be invoked on authentication and its job is to serialize the user instance and store it in the session via a cookie. The second one will be invoked every subsequent request to deserialize the instance, providing it the unique cookie identifier as a “credential”. You can read more about that in the Passport documentation.

As a side note, this very simple sample app of ours will work just fine without deserializeUser, but it kills the purpose of keeping a session, which is something you'll need in every app that requires login.

That's all for the actual Passport setup. Now we can finally get onto business.

Continue reading %Passport Authentication for Node.js Applications%

Local Authentication Using Passport in Node.js

$
0
0

In Passport Authentication for Node.js Applications, we talked about authentication using Passport as it relates to social login (Google, Facebook, GitHub, etc.). In this article, we’ll see how we can use Passport for local authentication with a MongoDB back end.

All of the code from this article is available for download on GitHub.

Prerequisites

  • Node.js — Download and install Node.js.
  • MongoDB — Download and install MongoDB Community Server. Follow the instructions for your OS. Note, if you’re using Ubuntu, this guide can help you get Mongo up and running.

Creating the Project

Once all of the prerequisite software is set up, we can get started.

We’ll begin by creating the folder for our app and then accessing that folder on the terminal:

mkdir AuthApp
cd AuthApp

To create the node app, we’ll use the following command:

npm init

You’ll be prompted to provide some information for Node’s package.json. Just hit enter until the end to leave the default configuration.

HTML

Next, we’ll need a form with username and password inputs as well as a Submit button. Let’s do that! Create a file called auth.html in the root folder of your app, with the following contents:

<html>
  <body>
    <form action="/" method="post">
      <div>
        <label>Username:</label>
        <input type="text" name="username" />
        <br/>
      </div>
      <div>
        <label>Password:</label>
        <input type="password" name="password" />
      </div>
      <div>
        <input type="submit" value="Submit" />
      </div>
    </form>
  </body>
</html>

That will do just fine.

Setting up Express

Now we need to install Express, of course. Go to the terminal and write this command:

npm install express --save

We’ll also need to install the body-parser middleware which is used to parse the request body that Passport uses to authenticate the user.

Let’s do that. Run the following command:

npm install body-parser --save

When that’s done, create a file index.js in the root folder of your app and add the following content to it:

/*  EXPRESS SETUP  */

const express = require('express');
const app = express();

const bodyParser = require('body-parser');
app.use(bodyParser.urlencoded({ extended: true }));

app.get('/', (req, res) => res.sendFile('auth.html', { root : __dirname}));

const port = process.env.PORT || 3000;
app.listen(port , () => console.log('App listening on port ' + port));

We’re doing almost the same as in the previous tutorial. First we require Express and create our Express app by calling [express()](http://expressjs.com/en/api.html#express). The next line is the only difference with our previous Express setup. We’ll need the body-parser middleware this time, in order for authentication to work correctly. Then we declare the route for the home page of our app. There we send the HTML file we created to the client accessing that route. Then, we use process.env.PORT to set the port to the environment port variable if it exists. Otherwise, we’ll default to 3000, which is the port we’ll be using locally. This gives you enough flexibility to switch from development, directly to a production environment where the port might be set by a service provider like, for instance, Heroku. Right below we called [app.listen()](http://expressjs.com/en/api.html#app.listen) with the port variable we set up and a simple log to let us know that it’s all working fine and on which port is the app listening.

That’s all for the Express setup. Now we have to set up Passport, exactly as we did the last time. I’ll show you how to do that in case you didn’t read the previous tutorial.

Setting up Passport

First, we install passport with the following command:

npm install passport --save

Then, add the following lines at the bottom of your index.js file:

/*  PASSPORT SETUP  */

const passport = require('passport');
app.use(passport.initialize());
app.use(passport.session());

app.get('/success', (req, res) => res.send("Welcome "+req.query.username+"!!"));
app.get('/error', (req, res) => res.send("error logging in"));

passport.serializeUser(function(user, cb) {
  cb(null, user.id);
});

passport.deserializeUser(function(id, cb) {
  User.findById(id, function(err, user) {
    cb(err, user);
  });
});

Here, we require passport and initialize it along with its session authentication middleware, directly inside our Express app. Then, we set up the '/success' and '/error' routes which will render a message telling us how the authentication went. If it succeeds, we’re going to show the username parameter, which we’ll pass to the request. We’re using the same syntax for our last route, only this time instead of using [res.SendFile()](http://expressjs.com/en/api.html#res.sendFile) we’re using [res.send()](http://expressjs.com/en/api.html#res.send), which will render the given string as text/html on the browser. Then we’re using serializeUser and deserializeUser callbacks. The first one will be invoked on authentication, and its job is to serialize the user instance with the information we pass to it (the user ID in this case) and store it in the session via a cookie. The second one will be invoked every subsequent request to deserialize the instance, providing it the unique cookie identifier as a “credential”. You can read more about that in the Passprot documentation.

As a side note, this very simple sample app of ours will work just fine without deserializeUser, but it kills the purpose of keeping a session, which is by all means something you’ll need in every app that requires login.

Continue reading %Local Authentication Using Passport in Node.js%

Forms, File Uploads and Security with Node.js and Express

$
0
0

If you’re building a web application, you’re likely to encounter the need to build HTML forms on day one. They’re a big part of the web experience, and they can be complicated.

Typically the form handling process involves:

  • displaying an empty HTML form in response to an initial GET request
  • user submitting the form with data in a POST request
  • validation on both the client and the server
  • re-displaying the form populated with escaped data and error messages if invalid
  • doing something with the sanitized data on the server if it’s all valid
  • redirecting the user or showing a success message after data is processed.

Handling form data also comes with extra security considerations.

We’ll go through all of these and explain how to build them with Node.js and Express — the most popular web framework for Node. First, we’ll build a simple contact form where people can send a message and email address securely and then take a look what’s involved in processing file uploads.

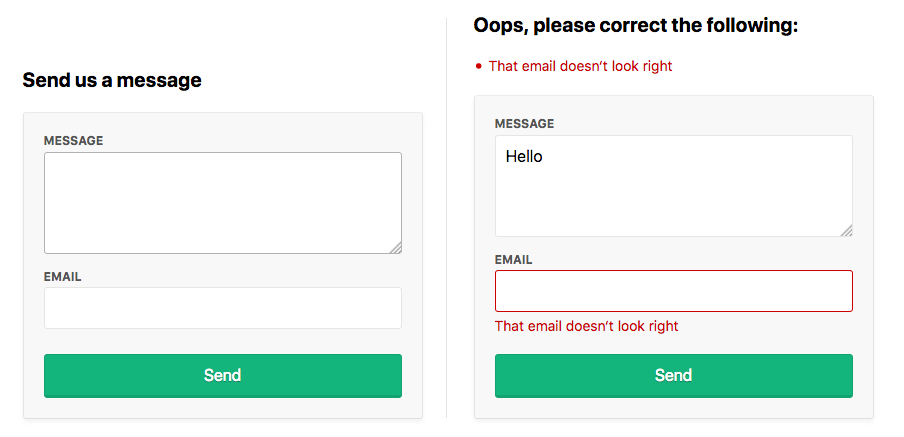
A contact form with email and message with validation errors

Setup

Make sure you’ve got a recent version of Node.js installed; node -v should return 8.9.0 or higher.

Download the starting code from here with git:

git clone https://github.com/sitepoint-editors/node-forms.git
cd node-forms
npm install
npm start

There’s not too much code in there. It’s just a bare-bones Express setup with EJS templates and error handlers:

// server.js
const path = require('path')
const express = require('express')
const layout = require('express-layout')
const routes = require('./routes')
const app = express()

app.set('views', path.join(__dirname, 'views'))
app.set('view engine', 'ejs')

const middleware = [
  layout(),
  express.static(path.join(__dirname, 'public')),
]
app.use(middleware)

app.use('/', routes)

app.use((req, res, next) => {
  res.status(404).send("Sorry can't find that!")
})

app.use((err, req, res, next) => {
  console.error(err.stack)
  res.status(500).send('Something broke!')
})

app.listen(3000, () => {
  console.log(`App running at http://localhost:3000`)
})

The root url / simply renders the index.ejs view.

// routes.js
const express = require('express')
const router = express.Router()

router.get('/', (req, res) => {
  res.render('index')
})

module.exports = router

Displaying the Form

When people make a GET request to /contact, we want to render a new view contact.ejs:

// routes.js
router.get('/contact', (req, res) => {
  res.render('contact')
})

The contact form will let them send us a message and their email address:

<!-- views/contact.ejs -->
<div class="form-header">
  <h2>Send us a message</h2>
</div>
<form method="post" action="/contact" novalidate>
  <div class="form-field">
    <label for="message">Message</label>
    <textarea class="input" id="message" name="message" rows="4" autofocus></textarea>
  </div>
  <div class="form-field">
    <label for="email">Email</label>
    <input class="input" id="email" name="email" type="email" value="" />
  </div>
  <div class="form-actions">
    <button class="btn" type="submit">Send</button>
  </div>
</form>

See what it looks like at http://localhost:3000/contact.

Form Submission

To receive POST values in Express, you first need to include the body-parser middleware, which exposes submitted form values on req.body in your route handlers. Add it to the end of the middlewares array:

// server.js
const bodyParser = require('body-parser')

const middlewares = [
  // ...
  bodyParser.urlencoded()
]

It’s a common convention for forms to POST data back to the same URL as was used in the initial GET request. Let’s do that here and handle POST /contact to process the user input.

Let’s look at the invalid submission first. If invalid, we need to pass back the submitted values to the view so they don’t need to re-enter them along with any error messages we want to display:

router.get('/contact', (req, res) => {
  res.render('contact', {
    data: {},
    errors: {}
  })
})

router.post('/contact', (req, res) => {
  res.render('contact', {
    data: req.body, // { message, email }
    errors: {
      message: {
        msg: 'A message is required'
      },
      email: {
        msg: 'That email doesn‘t look right'
      }
    }
  })
})

If there are any validation errors, we’ll do the following:

  • display the errors at the top of the form
  • set the input values to what was submitted to the server
  • display inline errors below the inputs
  • add a form-field-invalid class to the fields with errors.
<!-- views/contact.ejs -->
<div class="form-header">
  <% if (Object.keys(errors).length === 0) { %>
    <h2>Send us a message</h2>
  <% } else { %>
    <h2 class="errors-heading">Oops, please correct the following:</h2>
    <ul class="errors-list">
      <% Object.values(errors).forEach(error => { %>
        <li><%= error.msg %></li>
      <% }) %>
    </ul>
  <% } %>
</div>

<form method="post" action="/contact" novalidate>
  <div class="form-field <%= errors.message ? 'form-field-invalid' : '' %>">
    <label for="message">Message</label>
    <textarea class="input" id="message" name="message" rows="4" autofocus><%= data.message %></textarea>
    <% if (errors.message) { %>
      <div class="error"><%= errors.message.msg %></div>
    <% } %>
  </div>
  <div class="form-field <%= errors.email ? 'form-field-invalid' : '' %>">
    <label for="email">Email</label>
    <input class="input" id="email" name="email" type="email" value="<%= data.email %>" />
    <% if (errors.email) { %>
      <div class="error"><%= errors.email.msg %></div>
    <% } %>
  </div>
  <div class="form-actions">
    <button class="btn" type="submit">Send</button>
  </div>
</form>

Submit the form at http://localhost:3000/contact to see this in action. That’s everything we need on the view side.

Continue reading %Forms, File Uploads and Security with Node.js and Express%

Understanding module.exports and exports in Node.js

$
0
0
Understanding module.exports and exports in Node.js

As developers, we often face situations where we need to use unfamiliar code. A question will arise during these moments. How much time should I invest in understanding the code that I'm about to use? A typical answer is learn enough to start coding; then explore that topic further when time permits. Well, the time has come to gain a better understanding of module.exports and exports in Node.js. Here's what I have learned.

Note: this post covers using modules in Node. If you want to learn how you can use modules inside of the browser, read: Understanding JavaScript Modules: Bundling & Transpiling.

What is a Module

A module encapsulates related code into a single unit of code. When creating a module, this can be interpreted as moving all related functions into a file. Let's illustrate this point with an example involving an application built with Node.js. Imagine that we created a file called greetings.js and it contains the following two functions:

[js]
// greetings.js
sayHelloInEnglish = function() {
return "Hello";
};

sayHelloInSpanish = function() {
return "Hola";
};
[/js]

Exporting a Module

The utility of greetings.js increases when its encapsulated code can be utilized in other files. So let's refactor greetings.js to achieve this goal. To comprehend what is actually happening, we can follow a three-step process:

1) Imagine that this line of code exists as the first line of code in greetings.js:

[js]
// greetings.js
var exports = module.exports = {};
[/js]

2) Assign any expression in greetings.js that we want to become available in other files to the exports object:

[js]
// greetings.js
// var exports = module.exports = {};

exports.sayHelloInEnglish = function() {
return "HELLO";
};

exports.sayHelloInSpanish = function() {
return "Hola";
};
[/js]

In the code above, we could have replaced exports with module.exports and achieved the same result. If this seems confusing, remember that exports and module.exports reference the same object.

3) This is the current value of module.exports:

[js]
module.exports = {
sayHelloInEnglish: function() {
return "HELLO";
},

sayHelloInSpanish: function() {
return "Hola";
}
};
[/js]

The post Understanding module.exports and exports in Node.js appeared first on SitePoint.


Build a Health Tracking App with React, GraphQL, and User Authentication

$
0
0

This article was originally published on the Okta developer blog. Thank you for supporting the partners who make SitePoint possible.

I think you’ll like the story I’m about to tell you. I’m going to show you how to build a GraphQL API with Vesper framework, TypeORM, and MySQL. These are Node frameworks, and I’ll use TypeScript for the language. For the client, I’ll use React, reactstrap, and Apollo Client to talk to the API. Once you have this environment working, and you add secure user authentication, I believe you’ll love the experience!

Why focus on secure authentication? Well, aside from the fact that I work for Okta, I think we can all agree that pretty much every application depends upon a secure identity management system. For most developers who are building React apps, there’s a decision to be made between rolling your own authentication/authorization or plugging in a service like Okta. Before I dive into building a React app, I want to tell you a bit about Okta, and why I think it’s an excellent solution for all JavaScript developers.

What Is Okta?

In short, we make identity management a lot easier, more secure, and more scalable than what you’re used to. Okta is a cloud service that allows developers to create, edit, and securely store user accounts and user account data, and connect them with one or multiple applications. Our API enables you to:

Are you sold? Register for a forever-free developer account, and when you’re done, come on back so we can learn more about building secure apps in React!

Why a Health Tracking App?

In late September through mid-October 2014, I’d done a 21-Day Sugar Detox during which I stopped eating sugar, started exercising regularly, and stopped drinking alcohol. I’d had high blood pressure for over ten years and was on blood pressure medication at the time. During the first week of the detox, I ran out of blood pressure medication. Since a new prescription required a doctor visit, I decided I’d wait until after the detox to get it. After three weeks, not only did I lose 15 pounds, but my blood pressure was at normal levels!

Before I started the detox, I came up with a 21-point system to see how healthy I was each week. Its rules were simple: you can earn up to three points per day for the following reasons:

  1. If you eat healthy, you get a point. Otherwise, zero.
  2. If you exercise, you get a point.
  3. If you don’t drink alcohol, you get a point.

I was surprised to find I got eight points the first week I used this system. During the detox, I got 16 points the first week, 20 the second, and 21 the third. Before the detox, I thought eating healthy meant eating anything except fast food. After the detox, I realized that eating healthy for me meant eating no sugar. I’m also a big lover of craft beer, so I modified the alcohol rule to allow two healthier alcohol drinks (like a greyhound or red wine) per day.

My goal is to earn 15 points per week. I find that if I get more, I’ll likely lose weight and have good blood pressure. If I get fewer than 15, I risk getting sick. I’ve been tracking my health like this since September 2014. I’ve lost weight, and my blood pressure has returned to and maintained normal levels. I haven’t had good blood pressure since my early 20s, so this has been a life-changer for me.

I built 21-Points Health to track my health. I figured it’d be fun to recreate a small slice of that app, just tracking daily points.

Building an API with TypeORM, GraphQL, and Vesper

TypeORM is a nifty ORM (object-relational mapper) framework that can run in most JavaScript platforms, including Node, a browser, Cordova, React Native, and Electron. It’s heavily influenced by Hibernate, Doctrine, and Entity Framework. Install TypeORM globally to begin creating your API.

npm i -g typeorm@0.2.7

Create a directory to hold the React client and GraphQL API.

mkdir health-tracker
cd health-tracker

Create a new project with MySQL using the following command:

typeorm init --name graphql-api --database mysql

Edit graphql-api/ormconfig.json to customize the username, password, and database.

{
    ...
    "username": "health",
    "password": "pointstest",
    "database": "healthpoints",
    ...
}

TIP: To see the queries being executed against MySQL, change the “logging” value in this file to be “all”. Many other logging options are available too.

Install MySQL

Install MySQL if you don’t already have it installed. On Ubuntu, you can use sudo apt-get install mysql-server. On macOS, you can use Homebrew and brew install mysql. For Windows, you can use the MySQL Installer.

Once you’ve got MySQL installed and configured with a root password, login and create a healthpoints database.

mysql -u root -p
create database healthpoints;
use healthpoints;
grant all privileges on *.* to 'health'@'localhost' identified by 'points';

Navigate to your graphql-api project in a terminal window, install the project’s dependencies, then start it to ensure you can connect to MySQL.

cd graphql-api
npm i
npm start

You should see the following output:

Inserting a new user into the database...
Saved a new user with id: 1
Loading users from the database...
Loaded users:  [ User { id: 1, firstName: 'Timber', lastName: 'Saw', age: 25 } ]
Here you can setup and run express/koa/any other framework.

Install Vesper to Integrate TypeORM and GraphQL

Vesper is a Node framework that integrates TypeORM and GraphQL. To install it, use good ol’ npm.

npm i vesper@0.1.9

Now it’s time to create some GraphQL models (that define what your data looks like) and some controllers (that explain how to interact with your data).

Create graphql-api/src/schema/model/Points.graphql:

type Points {
  id: Int
  date: Date
  exercise: Int
  diet: Int
  alcohol: Int
  notes: String
  user: User
}

Create graphql-api/src/schema/model/User.graphql:

type User {
  id: String
  firstName: String
  lastName: String
  points: [Points]
}

Next, create a graphql-api/src/schema/controller/PointsController.graphql with queries and mutations:

type Query {
  points: [Points]
  pointsGet(id: Int): Points
  users: [User]
}

type Mutation {
  pointsSave(id: Int, date: Date, exercise: Int, diet: Int, alcohol: Int, notes: String): Points
  pointsDelete(id: Int): Boolean
}

Now that your data has GraphQL metadata create entities that will be managed by TypeORM. Change src/entity/User.ts to have the following code that allows points to be associated with a user.

import { Column, Entity, OneToMany, PrimaryColumn } from 'typeorm';
import { Points } from './Points';

@Entity()
export class User {

  @PrimaryColumn()
  id: string;

  @Column()
  firstName: string;

  @Column()
  lastName: string;

  @OneToMany(() => Points, points => points.user)
  points: Points[];
}

In the same src/entity directory, create a Points.ts class with the following code.

import { Entity, PrimaryGeneratedColumn, Column, ManyToOne } from 'typeorm';
import { User } from './User';

@Entity()
export class Points {

  @PrimaryGeneratedColumn()
  id: number;

  @Column({ type: 'timestamp', default: () => 'CURRENT_TIMESTAMP'})
  date: Date;

  @Column()
  exercise: number;

  @Column()
  diet: number;

  @Column()
  alcohol: number;

  @Column()
  notes: string;

  @ManyToOne(() => User, user => user.points, { cascade: ["insert"] })
  user: User|null;
}

Note the cascade: ["insert"] option on the @ManyToOne annotation above. This option will automatically insert a user if it’s present on the entity. Create src/controller/PointsController.ts to handle converting the data from your GraphQL queries and mutations.

import { Controller, Mutation, Query } from 'vesper';
import { EntityManager } from 'typeorm';
import { Points } from '../entity/Points';

@Controller()
export class PointsController {

  constructor(private entityManager: EntityManager) {
  }

  // serves "points: [Points]" requests
  @Query()
  points() {
    return this.entityManager.find(Points);
  }

  // serves "pointsGet(id: Int): Points" requests
  @Query()
  pointsGet({id}) {
    return this.entityManager.findOne(Points, id);
  }

  // serves "pointsSave(id: Int, date: Date, exercise: Int, diet: Int, alcohol: Int, notes: String): Points" requests
  @Mutation()
  pointsSave(args) {
    const points = this.entityManager.create(Points, args);
    return this.entityManager.save(Points, points);
  }

  // serves "pointsDelete(id: Int): Boolean" requests
  @Mutation()
  async pointsDelete({id}) {
    await this.entityManager.remove(Points, {id: id});
    return true;
  }
}

Change src/index.ts to use Vesper’s bootstrap() to configure everything.

import { bootstrap } from 'vesper';
import { PointsController } from './controller/PointsController';
import { Points } from './entity/Points';
import { User } from './entity/User';

bootstrap({
  port: 4000,
  controllers: [
    PointsController
  ],
  entities: [
    Points,
    User
  ],
  schemas: [
    __dirname + '/schema/**/*.graphql'
  ],
  cors: true
}).then(() => {
  console.log('Your app is up and running on http://localhost:4000. ' +
    'You can use playground in development mode on http://localhost:4000/playground');
}).catch(error => {
  console.error(error.stack ? error.stack : error);
});

This code tells Vesper to register controllers, entities, GraphQL schemas, to run on port 4000, and to enable CORS (cross-origin resource sharing).

Start your API using npm start and navigate to http://localhost:4000/playground. In the left pane, enter the following mutation and press the play button. You might try typing the code below so you can experience the code completion that GraphQL provides you.

mutation {
  pointsSave(exercise:1, diet:1, alcohol:1, notes:"Hello World") {
    id
    date
    exercise
    diet
    alcohol
    notes
  }
}

Your result should look similar to mine.

GraphQL Playground

You can click the “SCHEMA” tab on the right to see the available queries and mutations. Pretty slick, eh?!

You can use the following points query to verify that data is in your database.

query {
  points {id date exercise diet notes}
}

Fix Dates

You might notice that the date returned from pointsSave and the points query is in a format the might be difficult for a JavaScript client to understand. You can fix that, install graphql-iso-date.

npm i graphql-iso-date@3.5.0

Then, add an import in src/index.ts and configure custom resolvers for the various date types. This example only uses Date, but it’s helpful to know the other options.

import { GraphQLDate, GraphQLDateTime, GraphQLTime } from 'graphql-iso-date';

bootstrap({
  ...
  // https://github.com/vesper-framework/vesper/issues/4
  customResolvers: {
    Date: GraphQLDate,
    Time: GraphQLTime,
    DateTime: GraphQLDateTime
  },
  ...
});

Now running the points query will return a more client-friendly result.

{
  "data": {
    "points": [
      {
        "id": 1,
        "date": "2018-06-04",
        "exercise": 1,
        "diet": 1,
        "notes": "Hello World"
      }
    ]
  }
}

You’ve written an API with GraphQL and TypeScript in about 20 minutes. How cool is that?! There’s still work to do though. In the next sections, you’ll create a React client for this API and add authentication with OIDC. Adding authentication will give you the ability to get the user’s information and associate a user with their points.

Get Started with React

One of the quickest ways to get started with React is to use Create React App. Install the latest release using the command below.

npm i -g create-react-app@1.1.4

Navigate to the directory where you created your GraphQL API and create a React client.

cd health-tracker
create-react-app react-client

Install the dependencies you’ll need to talk to integrate Apollo Client with React, as well as Bootstrap and reactstrap.

npm i apollo-boost@0.1.7 react-apollo@2.1.4 graphql-tag@2.9.2 graphql@0.13.2

Configure Apollo Client for Your API

Open react-client/src/App.js and import ApolloClient from apollo-boost and add the endpoint to your GraphQL API.

import ApolloClient from 'apollo-boost';

const client = new ApolloClient({
  uri: "http://localhost:4000/graphql"
});

That’s it! With only three lines of code, your app is ready to start fetching data. You can prove it by importing the gql function from graphql-tag. This will parse your query string and turn it into a query document.

import gql from 'graphql-tag';

class App extends Component {

  componentDidMount() {
    client.query({
      query: gql`
        {
          points {
            id date exercise diet alcohol notes
          }
        }
      `
    })
    .then(result => console.log(result));
  }
...
}

Make sure to open your browser’s developer tools so you can see the data after making this change. You could modify the console.log() to use this.setState({points: results.data.points}), but then you’d have to initialize the default state in the constructor. But there’s an easier way: you can use ApolloProvider and Query components from react-apollo!

Below is a modified version of react-client/src/App.js that uses these components.

import React, { Component } from 'react';
import logo from './logo.svg';
import './App.css';
import ApolloClient from 'apollo-boost';
import gql from 'graphql-tag';
import { ApolloProvider, Query } from 'react-apollo';
const client = new ApolloClient({
  uri: "http://localhost:4000/graphql"
});

class App extends Component {

  render() {
    return (
      <ApolloProvider client={client}>
        <div className="App">
          <header className="App-header">
            <img src={logo} className="App-logo" alt="logo" />
            <h1 className="App-title">Welcome to React</h1>
          </header>
          <p className="App-intro">
            To get started, edit <code>src/App.js</code> and save to reload.
          </p>
          <Query query={gql`
            {
              points {id date exercise diet alcohol notes}
            }
          `}>
            {({loading, error, data}) => {
              if (loading) return <p>Loading...</p>;
              if (error) return <p>Error: {error}</p>;
              return data.points.map(p => {
                return <div key={p.id}>
                  <p>Date: {p.date}</p>
                  <p>Points: {p.exercise + p.diet + p.alcohol}</p>
                  <p>Notes: {p.notes}</p>
                </div>
              })
            }}
          </Query>
        </div>
      </ApolloProvider>
    );
  }
}

export default App;

You’ve built a GraphQL API and a React UI that talks to it - excellent work! However, there’s still more to do. In the next sections, I’ll show you how to add authentication to React, verify JWTs with Vesper, and add CRUD functionality to the UI. CRUD functionality already exists in the API thanks to the mutations you wrote earlier.

Add Authentication for React with OpenID Connect

You’ll need to configure React to use Okta for authentication. You’ll need to create an OIDC app in Okta for that.

Log in to your Okta Developer account (or sign up if you don’t have an account) and navigate to Applications > Add Application. Click Single-Page App, click Next, and give the app a name you’ll remember. Change all instances of localhost:8080 to localhost:3000 and click Done. Your settings should be similar to the screenshot below.

OIDC App Settings

Okta’s React SDK allows you to integrate OIDC into a React application. To install, run the following commands:

npm i @okta/okta-react@1.0.2 react-router-dom@4.2.2

Okta’s React SDK depends on react-router, hence the reason for installing react-router-dom. Configuring routing in client/src/App.tsx is a common practice, so replace its code with the JavaScript below that sets up authentication with Okta.

import React, { Component } from 'react';
import { BrowserRouter as Router, Route } from 'react-router-dom';
import { ImplicitCallback, SecureRoute, Security } from '@okta/okta-react';
import Home from './Home';
import Login from './Login';
import Points from './Points';

function onAuthRequired({history}) {
  history.push('/login');
}

class App extends Component {
  render() {
    return (
      <Router>
        <Security issuer='https://{yourOktaDomain}/oauth2/default'
                  client_id='{clientId}'
                  redirect_uri={window.location.origin + '/implicit/callback'}
                  onAuthRequired={onAuthRequired}>
          <Route path='/' exact={true} component={Home}/>
          <SecureRoute path='/points' component={Points}/>
          <Route path='/login' render={() => <Login baseUrl='https://{yourOktaDomain}'/>}/>
          <Route path='/implicit/callback' component={ImplicitCallback}/>
        </Security>
      </Router>
    );
  }
}

export default App;

Make sure to replace {yourOktaDomain} and {clientId} in the code above. You can find both values in the Okta Developer Console.

The code in App.js references two components that don’t exist yet: Home, Login, and Points. Create src/Home.js with the following code. This component renders the default route, provides a Login button, and links to your points and logout after you’ve logged in.

import React, { Component } from 'react';
import { withAuth } from '@okta/okta-react';
import { Button, Container } from 'reactstrap';
import AppNavbar from './AppNavbar';
import { Link } from 'react-router-dom';

export default withAuth(class Home extends Component {
  constructor(props) {
    super(props);
    this.state = {authenticated: null, userinfo: null, isOpen: false};
    this.checkAuthentication = this.checkAuthentication.bind(this);
    this.checkAuthentication();
    this.login = this.login.bind(this);
    this.logout = this.logout.bind(this);
  }

  async checkAuthentication() {
    const authenticated = await this.props.auth.isAuthenticated();
    if (authenticated !== this.state.authenticated) {
      if (authenticated && !this.state.userinfo) {
        const userinfo = await this.props.auth.getUser();
        this.setState({authenticated, userinfo});
      } else {
        this.setState({authenticated});
      }
    }
  }

  async componentDidMount() {
    this.checkAuthentication();
  }

  async componentDidUpdate() {
    this.checkAuthentication();
  }

  async login() {
    this.props.auth.login('/');
  }

  async logout() {
    this.props.auth.logout('/');
    this.setState({authenticated: null, userinfo: null});
  }

  render() {
    if (this.state.authenticated === null) return null;
    const button = this.state.authenticated ?
        <div>
          <Button color="link"><Link to="/points">Manage Points</Link></Button><br/>
          <Button color="link" onClick={this.logout}>Logout</Button>
        </div>:
      <Button color="primary" onClick={this.login}>Login</Button>;

    const message = this.state.userinfo ?
      <p>Hello, {this.state.userinfo.given_name}!</p> :
      <p>Please log in to manage your points.</p>;

    return (
      <div>
        <AppNavbar/>
        <Container fluid>
          {message}
          {button}
        </Container>
      </div>
    );
  }
});

This component uses <Container/> and <Button/> from reactstrap. Install reactstrap, so everything compiles. It depends on Bootstrap, so include it too.

npm i reactstrap@6.1.0 bootstrap@4.1.1

Add Bootstrap’s CSS file as an import in src/index.js.

The post Build a Health Tracking App with React, GraphQL, and User Authentication appeared first on SitePoint.

Build a Simple REST API with Node and OAuth 2.0

$
0
0

This article was originally published on the Okta developer blog. Thank you for supporting the partners who make SitePoint possible.

JavaScript is used everywhere on the web - nearly every web page will include at least some JavaScript, and even if it doesn’t, your browser probably has some sort of extension that injects bits of JavaScript code on to the page anyway. It’s hard to avoid in 2018.

JavaScript can also be used outside the context of a browser, for anything from hosting a web server to controlling an RC car or running a full-fledged operating system. Sometimes you want a couple of servers to talk to each other, whether on a local network or over the internet.

Today, I’ll show you how to create a REST API using Node.js, and secure it with OAuth 2.0 to prevent unwarranted requests. REST APIs are all over the web, but without the proper tools require a ton of boilerplate code. I’ll show you how to use a couple of amazing tools that make it all a breeze, including Okta to implement the Client Credentials Flow, which securely connects two machines together without the context of a user.

Build Your Node Server

Setting up a web server in Node is quite simple using the Express JavaScript library. Make a new folder that will contain your server.

$ mkdir rest-api

Node uses a package.json to manage dependencies and define your project. To create one, use npm init, which will ask you some questions to help you initialize the project. For now, you can use standard JS to enforce a coding standard, and use that as the tests.

$ cd rest-api

$ npm init
This utility will walk you through creating a package.json file.
It only covers the most common items, and tries to guess sensible defaults.

See `npm help json` for definitive documentation on these fields
and exactly what they do.

Use `npm install <pkg>` afterwards to install a package and
save it as a dependency in the package.json file.

Press ^C at any time to quit.
package name: (rest-api)
version: (1.0.0)
description: A parts catalog
entry point: (index.js)
test command: standard
git repository:
keywords:
author:
license: (ISC)
About to write to /Users/Braden/code/rest-api/package.json:

{
  "name": "rest-api",
  "version": "1.0.0",
  "description": "A parts catalog",
  "main": "index.js",
  "scripts": {
    "test": "standard"
  },
  "author": "",
  "license": "ISC"
}


Is this OK? (yes)

The default entry point is index.js, so you should create a new file by that name. The following code will get you a really basic server that doesn’t really do anything but listens on port 3000 by default.

index.js

const express = require('express')
const bodyParser = require('body-parser')
const { promisify } = require('util')

const app = express()
app.use(bodyParser.json())

const startServer = async () => {
  const port = process.env.SERVER_PORT || 3000
  await promisify(app.listen).bind(app)(port)
  console.log(`Listening on port ${port}`)
}

startServer()

The promisify function of util lets you take a function that expects a callback and instead will return a Promise, which is the new standard as far as handling asynchronous code. This also lets us use the relatively new async/await syntax and make our code look much prettier.

In order for this to work, you need to install the dependencies that you require at the top of the file. Add them using npm install. This will automatically save some metadata to your package.json file and install them locally in a node_modules folder.

Note: You should never commit node_modules to source control because it tends to become bloated quickly, and the package-lock.json file will keep track of the exact versions you used to that if you install this on another machine they get the same code.

$ npm install express@4.16.3 util@0.11.0

For some quick linting, install standard as a dev dependency, then run it to make sure your code is up to par.

$ npm install --save-dev standard@11.0.1
$ npm test

> rest-api@1.0.0 test /Users/bmk/code/okta/apps/rest-api
> standard

If all is well, you shouldn’t see any output past the > standard line. If there’s an error, it might look like this:

$ npm test

> rest-api@1.0.0 test /Users/bmk/code/okta/apps/rest-api
> standard

standard: Use JavaScript Standard Style (https://standardjs.com)
standard: Run `standard --fix` to automatically fix some problems.
  /Users/Braden/code/rest-api/index.js:3:7: Expected consistent spacing
  /Users/Braden/code/rest-api/index.js:3:18: Unexpected trailing comma.
  /Users/Braden/code/rest-api/index.js:3:18: A space is required after ','.
  /Users/Braden/code/rest-api/index.js:3:38: Extra semicolon.
npm ERR! Test failed.  See above for more details.

Now that your code is ready and you have installed your dependencies, you can run your server with node . (the . says to look at the current directory, and then checks your package.json file to see that the main file to use in this directory is index.js):

$ node .

Listening on port 3000

To test that it’s working, you can use the curl command. There are no endpoints yet, so express will return an error:

$ curl localhost:3000 -i
HTTP/1.1 404 Not Found
X-Powered-By: Express
Content-Security-Policy: default-src 'self'
X-Content-Type-Options: nosniff
Content-Type: text/html; charset=utf-8
Content-Length: 139
Date: Thu, 16 Aug 2018 01:34:53 GMT
Connection: keep-alive

<!DOCTYPE html>
<html lang="en">
<head>
<meta charset="utf-8">
<title>Error</title>
</head>
<body>
<pre>Cannot GET /</pre>
</body>
</html>

Even though it says it’s an error, that’s good. You haven’t set up any endpoints yet, so the only thing for Express to return is a 404 error. If your server wasn’t running at all, you’d get an error like this:

$ curl localhost:3000 -i
curl: (7) Failed to connect to localhost port 3000: Connection refused

Build Your REST API with Express, Sequelize, and Epilogue

Now that you have a working Express server, you can add a REST API. This is actually much simpler than you might think. The easiest way I’ve seen is by using Sequelize to define your database schema, and Epilogue to create some REST API endpoints with near-zero boilerplate.

You’ll need to add those dependencies to your project. Sequelize also needs to know how to communicate with the database. For now, use SQLite as it will get us up and running quickly.

npm install sequelize@4.38.0 epilogue@0.7.1 sqlite3@4.0.2

Create a new file database.js with the following code. I’ll explain each part in more detail below.

database.js

const Sequelize = require('sequelize')
const epilogue = require('epilogue')

const database = new Sequelize({
  dialect: 'sqlite',
  storage: './test.sqlite',
  operatorsAliases: false
})

const Part = database.define('parts', {
  partNumber: Sequelize.STRING,
  modelNumber: Sequelize.STRING,
  name: Sequelize.STRING,
  description: Sequelize.TEXT
})

const initializeDatabase = async (app) => {
  epilogue.initialize({ app, sequelize: database })

  epilogue.resource({
    model: Part,
    endpoints: ['/parts', '/parts/:id']
  })

  await database.sync()
}

module.exports = initializeDatabase

Now you just need to import that file into your main app and run the initialization function. Make the following additions to your index.js file.

index.js

@@ -2,10 +2,14 @@ const express = require('express')
 const bodyParser = require('body-parser')
 const { promisify } = require('util')

+const initializeDatabase = require('./database')
+
 const app = express()
 app.use(bodyParser.json())

 const startServer = async () => {
+  await initializeDatabase(app)
+
   const port = process.env.SERVER_PORT || 3000
   await promisify(app.listen).bind(app)(port)
   console.log(`Listening on port ${port}`)

You can now test for syntax errors and run the app if everything seems good:

$ npm test && node .

> rest-api@1.0.0 test /Users/bmk/code/okta/apps/rest-api
> standard

Executing (default): CREATE TABLE IF NOT EXISTS `parts` (`id` INTEGER PRIMARY KEY AUTOINCREMENT, `partNumber` VARCHAR(255), `modelNu
mber` VARCHAR(255), `name` VARCHAR(255), `description` TEXT, `createdAt` DATETIME NOT NULL, `updatedAt` DATETIME NOT NULL);
Executing (default): PRAGMA INDEX_LIST(`parts`)
Listening on port 3000

In another terminal, you can test that this is actually working (to format the JSON response I use a json CLI, installed globally using npm install --global json):

$ curl localhost:3000/parts
[]

$ curl localhost:3000/parts -X POST -d '{
  "partNumber": "abc-123",
  "modelNumber": "xyz-789",
  "name": "Alphabet Soup",
  "description": "Soup with letters and numbers in it"
}' -H 'content-type: application/json' -s0 | json
{
  "id": 1,
  "partNumber": "abc-123",
  "modelNumber": "xyz-789",
  "name": "Alphabet Soup",
  "description": "Soup with letters and numbers in it",
  "updatedAt": "2018-08-16T02:22:09.446Z",
  "createdAt": "2018-08-16T02:22:09.446Z"
}

$ curl localhost:3000/parts -s0 | json
[
  {
    "id": 1,
    "partNumber": "abc-123",
    "modelNumber": "xyz-789",
    "name": "Alphabet Soup",
    "description": "Soup with letters and numbers in it",
    "createdAt": "2018-08-16T02:22:09.446Z",
    "updatedAt": "2018-08-16T02:22:09.446Z"
  }
]

What’s Going On Here?

Feel free to skip this section if you followed along with all that, but I did promise an explanation.

The Sequelize function creates a database. This is where you configure details, such as what dialect of SQL to use. For now, use SQLite to get up and running quickly.

const database = new Sequelize({
  dialect: 'sqlite',
  storage: './test.sqlite',
  operatorsAliases: false
})

Once you’ve created the database, you can define the schema for it using database.define for each table. Create a table called parts with a few useful fields to keep track of parts. By default, Sequelize also automatically creates and updates id, createdAt, and updatedAt fields when you create or update a row.

const Part = database.define('parts', {
  partNumber: Sequelize.STRING,
  modelNumber: Sequelize.STRING,
  name: Sequelize.STRING,
  description: Sequelize.TEXT
})

Epilogue requires access to your Express app in order to add endpoints. However, app is defined in another file. One way to deal with this is to export a function that takes the app and does something with it. In the other file when we import this script, you would run it like initializeDatabase(app).

Epilogue needs to initialize with both the app and the database. You then define which REST endpoints you would like to use. The resource function will include endpoints for the GET, POST, PUT, and DELETE verbs, mostly automagically.

To actually create the database, you need to run database.sync(), which returns a Promise. You’ll want to wait until it’s finished before starting your server.

The module.exports command says that the initializeDatabase function can be imported from another file.

const initializeDatabase = async (app) => {
  epilogue.initialize({ app, sequelize: database })

  epilogue.resource({
    model: Part,
    endpoints: ['/parts', '/parts/:id']
  })

  await database.sync()
}

module.exports = initializeDatabase

Secure Your Node + Express REST API with OAuth 2.0

Now that you have a REST API up and running, imagine you’d like a specific application to use this from a remote location. If you host this on the internet as is, then anybody can add, modify, or remove parts at their will.

To avoid this, you can use the OAuth 2.0 Client Credentials Flow. This is a way of letting two servers communicate with each other, without the context of a user. The two servers must agree ahead of time to use a third-party authorization server. Assume there are two servers, A and B, and an authorization server. Server A is hosting the REST API, and Server B would like to access the API.

  • Server B sends a secret key to the authorization server to prove who they are and asks for a temporary token.
  • Server B then consumes the REST API as usual but sends the token along with the request.
  • Server A asks the authorization server for some metadata that can be used to verify tokens.
  • Server A verifies the Server B’s request.
    • If it’s valid, a successful response is sent and Server B is happy.
    • If the token is invalid, an error message is sent instead, and no sensitive information is leaked.

Create an Authorization Server

This is where Okta comes into play. Okta can act as an authorization server to allow you to secure your data. You’re probably asking yourself “Why Okta? Well, it’s pretty cool to build a REST app, but it’s even cooler to build a secure one. To achieve that, you’ll want to add authentication so users have to log in before viewing/modifying groups. At Okta, our goal is to make identity management a lot easier, more secure, and more scalable than what you’re used to. Okta is a cloud service that allows developers to create, edit, and securely store user accounts and user account data, and connect them with one or multiple applications. Our API enables you to:

If you don’t already have one, sign up for a forever-free developer account, and let’s get started!

After creating your account, log in to your developer console, navigate to API, then to the Authorization Servers tab. Click on the link to your default server.

From this Settings tab, copy the Issuer field. You’ll need to save this somewhere that your Node app can read. In your project, create a file named .env that looks like this:

.env

ISSUER=https://{yourOktaDomain}/oauth2/default

The value for ISSUER should be the value from the Settings page’s Issuer URI field.

Higlighting the issuer URL.

Note: As a general rule, you should not store this .env file in source control. This allows multiple projects to use the same source code without needing a separate fork. It also makes sure that your secure information is not public (especially if you’re publishing your code as open source).

Next, navigate to the Scopes tab. Click the Add Scope button and create a scope for your REST API. You’ll need to give it a name (e.g. parts_manager) and you can give it a description if you like.

Add scope screenshot.

You should add the scope name to your .env file as well so your code can access it.

.env

ISSUER=https://{yourOktaDomain}/oauth2/default
SCOPE=parts_manager

Now you need to create a client. Navigate to Applications, then click Add Application. Select Service, then click Next. Enter a name for your service, (e.g. Parts Manager), then click Done.

The post Build a Simple REST API with Node and OAuth 2.0 appeared first on SitePoint.

Secure a Node API with OAuth 2.0 Client Credentials

$
0
0

This article was originally published on the Okta developer blog. Thank you for supporting the partners who make SitePoint possible.

Securing server-to-server API services can be tricky. OAuth 2.0 is an excellent way to offload user authentication to another service, but what if there is no user to authenticate? In this article, I’ll show you how you can use OAuth 2.0 outside the context of a user, in what is also known as the Client Credentials Flow.

Instead of storing and managing API keys for your clients (other servers), you can use a third-party service to manage authorization for you. The way this works is that an API client sends a request to an OAuth server asking for an API token. That token is then sent from the API client to your API service along with their request. Once you have the client’s token, you can verify its validity without needing to store any information about the client.

Client Credentials Flow

How the Client Credentials Flow Verification Works

One way to verify tokens you receive to your API service is to forward the token to the OAuth server to ask if it is valid. The downside to this method is each API request sent to your server requires a request sent to the OAuth server as well, which increases the time it takes for you to respond to your client. An alternative is to use something called local validation, a strategy popularized by JSON Web Tokens (JWT). A JWT contains your claims (client data) in unencrypted, machine-readable JSON.

When using the local validation pattern to validate an API token (JWT), you can use math to validate that:

The token your API is receiving hasn’t been tampered with The token your API is receiving hasn’t expired That certain pieces of JSON data encoded in the token are what you expect them to be

How is that secure? you might be wondering. JWTs contain three parts: a header, a payload, and a signature. The header and payload are simple base64 encoded strings, which can easily be decrypted and read. The signature uses an algorithm listed in the header, along with a private key, to create a hash of the header and payload. The hash can’t be recreated without the private key, but it can be verified with a public key.

In a way, this is like a driver’s license or a passport. It’s quite difficult to forge, but it’s very easy for somebody to look at it and see your name, date of birth, and other information. You can scan the barcode, test it with a black light, or look for watermarks to help verify its validity.

While similar in concept, a valid JWT would actually be far more difficult to forge. Someone with enough skill can create a convincing driver’s license, but without the private key it could take a modern computer years to brute force a valid JWT signature. Tokens should also have an expiration. While configurable, a solid default is one hour. This means a client would need to request a new token every 60 minutes if it needs to make a new request to your API server. This is an extra layer of security in case your token is compromised. Who knows? Maybe there’s a quantum computer out there that can recreate the signature within a couple hours.

Now that you understand the basics of the OAuth 2.0 client credentials flow works, let’s build a Node API that uses Client Credentials and Okta.

What is Okta?

In short, we make identity management easier, more secure, and more scalable than what you’re used to. Okta is an API service that allows you to create, edit, and securely store user accounts and user account data, and connect them with one or more applications. Our API enables you to:

Register for a forever-free developer account, and when you’re done, come back to learn more about building secure APIs in Node!

Create a Basic Node API

In order to get started, I’ll show you how to create a basic API in Node. Node keeps a list of dependencies along with other metadata in a file called package.json.

Assuming you have Node installed already, create a new folder for your API server. You can then use npm to generate a package.json for you. The command npm init will prompt you for some information, but you can just keep hitting Enter to stick to the defaults.

$ mkdir client-credentials-flow
$ cd client-credentials-flow
$ git init
$ npm init

The quickest way to get an API server up and running in Node is by using Express. You can add Express as a dependency with the command npm install express@4.16.3 --save. This creates a folder called node_modules where express and anything it depends on are downloaded, and your app can then use those. To make development go faster, you can also add a dev dependency called nodemon, which will restart your server whenever you make code changes. To add a dev-dependency, use the -D flag: npm install -D nodemon@1.17.5.

When building Node apps, you usually want to ignore storing the node_modules folder in your git repo. You can do that by adding node_modules to your .gitignore file.

echo node_modules >> .gitignore

Package managers will also include a file (e.g. package-lock.json or yarn.lock) so that when you download the node_modules on another machine (with npm install or yarn), the same version gets downloaded. This helps prevent any inconsistencies between servers, and keeps you from wondering why something works on your machine, but not in production. Make sure to commit that file to your git repo as well:

$ git add .
$ git commit -m "Adding package files."

You can also add scripts to your package.json folder to run these commands. Create a start script with the command node . (the . tells it to run the script listed in your package.json as main, which by default is index.js. You’ll also want to create a dev script with the command nodemon *.js node .. Command line dependencies, like nodemon, are in the path when running inside a node script. You can now run these commands with npm start or npm run dev. Your package.json file should now look something like this:

package.json

{
  "name": "client-credentials-flow",
  "version": "1.0.0",
  "description": "",
  "main": "index.js",
  "scripts": {
    "dev": "nodemon *.js node .",
    "start": "node .",
    "test": "echo \"Error: no test specified\" && exit 1"
  },
  "author": "",
  "license": "ISC",
  "dependencies": {
    "express": "^4.16.3"
  },
  "devDependencies": {
    "nodemon": "^1.17.5"
  }
}

Now for the most basic “Hello World” express app:

index.js

const express = require('express')
const app = express()

app.get('/', (req, res) => res.send('Hello World!'))

const port = process.env.PORT || 3000
app.listen(port, () => console.log(`Listening on port ${port}`))

That’s it! To start it, type npm run dev in a terminal window. You can leave this running while we make changes, and it will automatically restart to reflect new changes. Now go to http://localhost:3000 in your browser (or on the command line with curl http://localhost:3000) and you should see Hello World! echoed back.

Register with an OAuth 2.0 Provider for Your Node API

Now to secure the app. This is where you need to set up an OAuth 2.0 service. Okta is a cloud-based service that allows developers to easily and securely store OAuth 2.0 tokens, user accounts, and user data, then connect them with one or multiple applications. Okta also provides libraries for many languages, including Node, to make their API very easy for a developer to integrate into a huge variety of apps.

You can use Okta to quickly and easily set up server-to-server authentication. If you don’t already have an account, sign up for a free Okta Developer account. Once you register, you’ll be given a unique Okta Org URL (e.g. https://{yourOktaDomain}) and an email to activate your new account.

You’ll need two parts in order to make client-to-server authentication work: an authorization server, and a test client/application.

Create an Authorization Server

The authorization server is where clients can request a token to use on your API server. Inside the Okta dashboard, click on the API tab in the header, then select the Authorization Servers tab. Click Add Authorization Server, then give your server a useful name and description. The Audience should be an absolute path for the server that will be consuming the tokens.

Add Authorization Server

Once you create the authorization server, you will need a scope for your clients to access. Click the Scopes tab and add a scope. You can have many of these, which can help define what parts of the API are being used, or even who is using it.

Add Scope

Now that you have a scope, you also need to specify some rules to say who has access to it. Click the Access Policies tab and create a new policy. For now, just allow access to All clients. Then click Add Rule and give it a name. Since this is only for client credentials, remove the other grant types for acting on behalf of a user (Authorization Code, Implicit, and Resource Owner Password) so the only grant type is Client Credentials. Aside from that, just use the default settings for now.

Add Rule

Back on the Settings tab, take note of the Issuer. This is the address clients will use to request a token, and what your API server will use to verify that those tokens are valid.

Create a Test Client

In your Okta dashboard, click on Applications in the top header. Applications are also known as clients, so this is where you can create a test client. Click Add Application and choose Service (Machine-to-Machine). The only information it needs is a name, so you can use something like Test Client. This will give you the credentials for your client (in this testing case, that would be you).

Client Credentials

Secure your Node API

You now have all the pieces of the puzzle to make it so only authenticated users get the beloved “Hello World” welcome message, and everybody else gets an error.

Safely Store Your Credentials

You’ll want to store your credentials safely. One way of doing this is to keep a file locally that isn’t stored in git (especially useful if your code is open source, but still a good thing to do regardless). This also lets you use the same code for multiple applications (e.g. dev and production environments).

The post Secure a Node API with OAuth 2.0 Client Credentials appeared first on SitePoint.

Build a Basic CRUD App with Angular and Node

$
0
0

This article was originally published on the Okta developer blog. Thank you for supporting the partners who make SitePoint possible.

In recent years, single page applications (SPAs) have become more and more popular. A SPA is a website that consists of just one page. That lone page acts as a container for a JavaScript application. The JavaScript is responsible for obtaining the content and rendering it within the container. The content is typically obtained from a web service and RESTful APIs have become the go-to choice in many situations. The part of the application making up the SPA is commonly known as the client or front-end, while the part responsible for the REST API is known as the server or back-end. In this tutorial, you will be developing a simple Angular single page app with a REST backend, based on Node and Express.

You’ll be using Angular as it follows the MVC pattern and cleanly separates the View from the Models. It is straightforward to create HTML templates that are dynamically filled with data and automatically updated whenever the data changes. I have come to love this framework because it is very powerful, has a huge community and excellent documentation.

For the server, you will be using Node with Express. Express is a framework that makes it easy to create REST APIs by allowing to define code that runs for different requests on the server. Additional services can be plugged in globally, or depending on the request. There are a number of frameworks that build on top of Express and automate the task of turning your database models into an API. This tutorial will not make use of any of these in order to keep this focused.

Angular encourages the use of TypeScript. TypeScript adds typing information to JavaScript and, in my opinion, is the future of developing large scale applications in JavaScript. For this reason, you will be developing both client and server using TypeScript.

Here are the libraries you’ll be using for the client and the server:

  • Angular: The framework used to build the client application
  • Okta for Authorisation: A plugin that manages single sign-on authorization using Okta, both on the client and the server
  • Angular Material: An angular plugin that provides out-of-the-box Material Design
  • Node: The actual server running the JavaScript code
  • Express: A routing library for responding to server requests and building REST APIs
  • TypeORM: A database ORM library for TypeScript

Start Your Basic Angular Client Application

Let’s get started by implementing a basic client using Angular. The goal is to develop a product catalog which lets you manage products, their prices, and their stock levels. At the end of this section, you will have a simple application consisting of a top bar and two views, Home and Products. The Products view will not yet have any content and nothing will be password protected. This will be covered in the following sections.

To start you will need to install Angular. I will assume that you already have Node installed on your system and you can use the npm command. Type the following command into a terminal.

npm install -g @angular/cli@7.0.2

Depending on your system, you might need to run this command using sudo because it will install the package globally. The angular-cli package provides the ng command that is used to manage Angular applications. Once installed go to a directory of your choice and create your first Angular application using the following command.

ng new MyAngularClient

Using Angular 7, this will prompt you with two queries. The first asks you if you want to include routing. Answer yes to this. The second query relates to the type of style sheets you want to use. Leave this at the default CSS.

ng new will create a new directory called MyAngularClient and populate it with an application skeleton. Let’s take a bit of time to look at some of the files that the previous command created. At the src directory of the app, you will find a file index.html that is the main page of the application. It doesn’t contain much and simply plays the role of a container. You will also see a style.css file. This contains the global style sheet that is applied throughout the application. If you browse through the folders you might notice a directory src/app containing five files.

app-routing.module.ts
app.component.css
app.component.html
app.component.ts
app.component.spec.ts
app.module.ts

These files define the main application component that will be inserted into the index.html. Here is a short description of each of the files:

  • app.component.css file contains the style sheets of the main app component. Styles can be defined locally for each component
  • app.component.html contains the HTML template of the component
  • app.component.ts file contains the code controlling the view
  • app.module.ts defines which modules your app will use
  • app-routing.module.ts is set up to define the routes for your application
  • app.component.spec.ts contains a skeleton for unit testing the app component

I will not be covering testing in this tutorial, but in real life applications, you should make use of this feature. Before you can get started, you will need to install a few more packages. These will help you to quickly create a nicely designed responsive layout. Navigate to the base directory of the client, MyAngularClient, and type the following command.

npm i @angular/material@7.0.2 @angular/cdk@7.0.2 @angular/animations@7.0.1 @angular/flex-layout@7.0.0-beta.19

The @angular/material and @angular/cdk libraries provide components based on Google’s Material Design, @angular/animations is used to provide smooth transitions, and @angular/flex-layout gives you the tools to make your design responsive.

Next, create the HTML template for the app component. Open src/app/app.component.html and replace the content with the following.

<mat-toolbar color="primary" class="expanded-toolbar">
  <button mat-button routerLink="/">{{title}}</button>

  <div fxLayout="row" fxShow="false" fxShow.gt-sm>
    <button mat-button routerLink="/"><mat-icon>home</mat-icon></button>
    <button mat-button routerLink="/products">Products</button>
    <button mat-button *ngIf="!isAuthenticated" (click)="login()"> Login </button>
    <button mat-button *ngIf="isAuthenticated" (click)="logout()"> Logout </button>
  </div>
  <button mat-button [mat-menu-trigger-for]="menu" fxHide="false" fxHide.gt-sm>
    <mat-icon>menu</mat-icon>
  </button>
</mat-toolbar>
<mat-menu x-position="before" #menu="matMenu">
  <button mat-menu-item routerLink="/"><mat-icon>home</mat-icon> Home</button>
  <button mat-menu-item routerLink="/products">Products</button>;
  <button mat-menu-item *ngIf="!isAuthenticated" (click)="login()"> Login </button>
  <button mat-menu-item *ngIf="isAuthenticated" (click)="logout()"> Logout </button>
</mat-menu>
<router-outlet></router-outlet>

The mat-toolbar contains the material design toolbar, whereas router-outlet is the container that will be filled by the router. The app.component.ts file should be edited to contain the following.

import { Component } from '@angular/core';

@Component({
  selector: 'app-root',
  templateUrl: './app.component.html',
  styleUrls: ['./app.component.css']
})
export class AppComponent {
  public title = 'My Angular App';
  public isAuthenticated: boolean;

  constructor() {
    this.isAuthenticated = false;
  }

  login() {
  }

  logout() {
  }
}

This is the controller for the app component. You can see that it contains a property called isAuthenticated together with two methods login and logout. At the moment these don’t do anything. They will be implemented in the next section which covers user authentication with Okta. Now define all the modules you will be using. Replace the contents of app.module.ts with the code below:

import { BrowserModule } from '@angular/platform-browser';
import { NgModule } from '@angular/core';
import { BrowserAnimationsModule } from '@angular/platform-browser/animations';
import { FlexLayoutModule } from '@angular/flex-layout';
import {
  MatButtonModule,
  MatDividerModule,
  MatIconModule,
  MatMenuModule,
  MatProgressSpinnerModule,
  MatTableModule,
  MatToolbarModule
} from '@angular/material';
import { HttpClientModule } from '@angular/common/http';
import { FormsModule } from '@angular/forms';

import { AppRoutingModule } from './app-routing.module';
import { AppComponent } from './app.component';

@NgModule({
  declarations: [
    AppComponent
  ],
  imports: [
    AppRoutingModule,
    BrowserModule,
    BrowserAnimationsModule,
    HttpClientModule,
    FlexLayoutModule,
    MatToolbarModule,
    MatMenuModule,
    MatIconModule,
    MatButtonModule,
    MatTableModule,
    MatDividerModule,
    MatProgressSpinnerModule,
    FormsModule,
  ],
  providers: [],
  bootstrap: [AppComponent]
})
export class AppModule { }

Notice all the material design modules. The @angular/material library requires you to import a module for each type of component you wish to use in your app. Starting with Angular 7, the default application skeleton contains a separate file called app-routing.module.ts. Edit this to declare the following routes.

import { NgModule } from '@angular/core';
import { Routes, RouterModule } from '@angular/router';
import { ProductsComponent } from './products/products.component';
import { HomeComponent } from './home/home.component';

const routes: Routes = [
  {
    path: '',
    component: HomeComponent
  },
  {
    path: 'products',
    component: ProductsComponent
  }
];

@NgModule({
  imports: [RouterModule.forRoot(routes)],
  exports: [RouterModule]
})
export class AppRoutingModule { }

This defines two routes corresponding to the root path and to the products path. It also attaches the HomeComponent and the ProductsComponent to these routes. Create these components now. In the base directory of the Angular client, type the following commands.

ng generate component Products
ng generate component Home

This creates html, css, ts, and spec.ts files for each component. It also updates app.module.ts to declare the new components. Open up home.component.html in the src/app/home directory and paste the following content.

<div class="hero">
  <div>
    <h1>Hello World</h1>
    <p class="lead">This is the homepage of your Angular app</p>
  </div>
</div>

Include some styling in the home.component.css file too.

.hero {
  text-align: center;
  height: 90vh;
  display: flex;
  flex-direction: column;
  justify-content: center;
  font-family: sans-serif;
}

Leave the ProductsComponent empty for now. This will be implemented once you have created the back-end REST server and are able to fill it with some data. To make everything look beautiful only two little tasks remain. Copy the following styles into src/style.css

@import "~@angular/material/prebuilt-themes/deeppurple-amber.css";

body {
  margin: 0;
  font-family: sans-serif;
}

.expanded-toolbar {
  justify-content: space-between;
}

h1 {
  text-align: center;
}

Finally, in order to render the Material Design Icons, add one line inside the <head> tags of the index.html file.

<link href="https://fonts.googleapis.com/icon?family=Material+Icons" rel="stylesheet">

You are now ready to fire up the Angular server and see what you have achieved so far. In the base directory of the client app, type the following command.

ng serve

Then open your browser and navigate to http://localhost:4200.

Add Authentication to Your Node + Angular App

If you have ever developed web applications from scratch you will know how much work is involved just to allow users to register, verify, log on and log out of your application. Using Okta this process can be greatly simplified. To start off, you will need a developer account with Okta.

developer.okta.com

In your browser, navigate to developer.okta.com and click on Create Free Account and enter your details.

Start building on Okta

Once you are done you will be taken to your developer dashboard. Click on the Add Application button to create a new application.

Add Application

Start by creating a new single page application. Choose Single Page App and click Next.

Create new Single Page App

On the next page, you will need to edit the default settings. Make sure that the port number is 4200. This is the default port for Angular applications.

My Angular App

That’s it. You should now see a Client ID which you will need to paste into your TypeScript code.

To implement authentication into the client, install the Okta library for Angular.

npm install @okta/okta-angular@1.0.7 --save-exact

In app.module.ts import the OktaAuthModule.

import { OktaAuthModule } from '@okta/okta-angular';

In the list of imports of the app module, add:

OktaAuthModule.initAuth({
  issuer: 'https://{yourOktaDomain}/oauth2/default',
  redirectUri: 'http://localhost:4200/implicit/callback',
  clientId: '{YourClientId}'
})

Here yourOktaDomain should be replaced by the development domain you see in your browser when you navigate to your Okta dashboard. YourClientId has to be replaced by the client ID that you obtained when registering your application. The code above makes the Okta Authentication Module available in your application. Use it in app.component.ts, and import the service.

import { OktaAuthService } from '@okta/okta-angular';

Modify the constructor to inject the service and subscribe to it.

constructor(public oktaAuth: OktaAuthService) {
  this.oktaAuth.$authenticationState.subscribe(
    (isAuthenticated: boolean) => this.isAuthenticated = isAuthenticated
  );
}

Now, any changes in the authentication status will be reflected in the isAuthenticated property. You will still need to initialize it when the component is loaded. Create a ngOnInit method and add implements OnInit to your class definition

import { Component, OnInit } from '@angular/core';
...
export class AppComponent implements OnInit {
  ...
  async ngOnInit() {
    this.isAuthenticated = await this.oktaAuth.isAuthenticated();
  }
}

Finally, implement the login and logout method to react to the user interface and log the user in or out.

login() {
  this.oktaAuth.loginRedirect();
}

logout() {
  this.oktaAuth.logout('/');
}

In the routing module, you need to register the route that will be used for the login request. Open app-routing.module.ts and import OktaCallbackComponent and OktaAuthGuard.

import { OktaCallbackComponent, OktaAuthGuard } from '@okta/okta-angular';

Add another route to the routes array.

{
  path: 'implicit/callback',
  component: OktaCallbackComponent
}

This will allow the user to log in using the Login button. To protect the Products route from unauthorized access, add the following line to the products route.

{
  path: 'products',
  component: ProductsComponent,
  canActivate: [OktaAuthGuard]
}

That’s all there is to it. Now, when a user tries to access the Products view, they will be redirected to the Okta login page. Once logged on, the user will be redirected back to the Products view.

Implement a Node REST API

The next step is to implement a server based on Node and Express that will store product information. This will use a number of smaller libraries to make your life easier. To develop in TypeScript, you’ll need typescript and tsc. For the database abstraction layer, you will be using TypeORM. This is a convenient library that injects behavior into TypeScript classes and turns them into database models. Create a new directory to contain your server application, then run the following command in it.

npm init

Answer all the questions, then run:

npm install --save-exact express@4.16.4 @types/express@4.16.0 @okta/jwt-verifier@0.0.14 express-bearer-token@2.2.0 tsc@1.20150623.0 typescript@3.1.3 typeorm@0.2.8 sqlite3@4.0.3 cors@2.8.4 @types/cors@2.8.4

I will not cover all these libraries in detail, but you will see that @okta/jwt-verifier is used to verify JSON Web Tokens and authenticate them.

In order to make TypeScript work, create a file tsconfig.json and paste in the following content.

The post Build a Basic CRUD App with Angular and Node appeared first on SitePoint.

How to Create and Verify JWTs with Node

$
0
0

This article was originally published on the Okta developer blog. Thank you for supporting the partners who make SitePoint possible.

Authentication on the internet has evolved quite a bit over the years. There are many ways to do it, but what worked well enough in the 90s doesn’t quite cut it today. In this tutorial, I’ll briefly cover some older, simpler forms of authentication, then show you how a more modern and more secure approach. By the end of this post, you’ll be able to create and verify JWTs yourself in Node. I’ll also show you how you can leverage Okta to do it all for you behind the scenes.

Traditionally, the simplest way to do authorization is with a username and password. This is called Basic Authorization and is done by just sending username:password as an encoded string that can be decoded by anybody looking. You could think of that string as a “token”. The problem is, you’re sending your password with every request. You could also send your username and password a single time, and let the server create a session ID for you. The client would then send that ID along with every request instead of a username and password. This method works as well, but it can be a hassle for the client to store and maintain sessions, especially for large sets of users.

The third method for managing authorization is via JSON Web Tokens, or JWTs. JWTs have become the de facto standard over the last few years. A JWT makes a set of claims, (e.g. “I’m Abe Froman, the Sausage King of Chicago”) that can be verified. Like Basic Authorization, the claims can be read by anybody. Unlike Basic Auth, however, you wouldn’t be sharing your password with anyone listening in. Instead, it’s all about trust.

Trust, but Verify… Your JWTs

it must be true

OK, maybe don’t believe everything you read on the internet. You might be wondering how someone can just make some claims and expect the server to believe them. When you make a claim using a JWT, it’s signed off by a server that has a secret key. The server reading the key can easily verify that the claim is valid, even without knowing the secret that was used. However, it would be nearly impossible for someone to modify the claims and make sure the signature was valid without having access to that secret key.

Why Use a JWT?

Using a JWT allows a server to offload authentication to a 3rd party they trust. As long as you trust the 3rd party, you can let them ensure that the user is who they say they are. That 3rd party will then create a JWT to be passed to your server, with whatever information is necessary. Typically this includes at least the user’s user id (standardly referred to as sub for “subject”), the “issuer” (iss) of the token, and the “expiration time” (exp). There are quite a few standardized claims, but you can really put any JSON you want in a claim. Just remember the more info you include, the longer the token will be.

Build a Simple Node App

To create and verify your own JWTs, you’ll first need to set up a Node server (well, you don’t have to, but that’s what I’ll be teaching you today). To get started, run the following commands to set up a new project:

mkdir fun-with-jwts
cd fun-with-jwts
npm init -y
npm install express@4.16.4
npm install -D nodemon@1.18.6

Next, create a new file index.js that will contain a super simple node server. There are three endpoints in here, that are just stubbed with TODOs as notes for what to implement.

The /create endpoint will require basic authorization to log you in. If you were writing a real OAuth server, you would probably use something other than Basic Auth. You would also need to look up the user in a database and make sure they provided the right password. To keep things simple for the demo, I’ve just hard-coded a single username and password here, so we can focus on the JWT functionality.

The /verify endpoint takes a JWT as a parameter to be decoded.

const express = require('express')
const app = express()
const port = process.env.PORT || 3000

app.get('/create', (req, res) => {
  if (req.headers.authorization !== 'Basic QXp1cmVEaWFtb25kOmh1bnRlcjI=') {
    res.set('WWW-Authenticate', 'Basic realm="401"')
    res.status(401).send('Try user: AzureDiamond, password: hunter2')
    return
  }

  res.send('TODO: create a JWT')
})

app.get('/verify/:token', (req, res) => {
  res.send(`TODO: verify this JWT: ${req.params.token}`)
})

app.get('/', (req, res) => res.send('TODO: use Okta for auth'))

app.listen(port, () => console.log(`JWT server listening on port ${port}!`))

You can now run the server by typing node_modules/.bin/nodemon .. This will start a server on port 3000 and will restart automatically as you make changes to your source code. You can access it by going to http://localhost:3000 in your browser. To hit the different endpoints, you’ll need to change the URL to http://localhost:3000/create or http://localhost:3000/verify/asdf. If you prefer to work in the command line, you can use curl to hit all those endpoints:

$ curl localhost:3000
TODO: use Okta for auth

$ curl localhost:3000/create
Try user: AzureDiamond, password: hunter2

$ curl AzureDiamond:hunter2@localhost:3000/create
TODO: create a JWT

$ curl localhost:3000/verify/asdf
TODO: verify this JWT: asdf

Create JSON Web Tokens in Your Node App

A JSON Web Token has three parts. The header, the payload, and the signature, separated by .s.

The header is a base64 encoded JSON object specifying which algorithm to use and the type of the token.

The payload is also a base64 encoded JSON object containing pretty much anything you want. Typically it will at least contain an expiration timestamp and some identifying information.

The signature hashes the header, the payload, and a secret key together using the algorithm specified in the header.

There are a number of tools out there to create JWTs for various languages. For Node, one simple one is njwt. To add it to your project, run

npm install njwt@0.4.0

Now replace the res.send('TODO: create a JWT') line in index.js with the following:

  const jwt = require('njwt')
  const claims = { iss: 'fun-with-jwts', sub: 'AzureDiamond' }
  const token = jwt.create(claims, 'top-secret-phrase')
  token.setExpiration(new Date().getTime() + 60*1000)
  res.send(token.compact())

Feel free to mess around with the payload. With the setExpiration() function above, the token will expire in one minute, which will let you see what happens when it expires, without having to wait too long.

To test this out and get a token, log in via the /create endpoint. Again, you can go to your browser at http://localhost:3000/create, or use curl:

$ curl AzureDiamond:hunter2@localhost:3000/create
eyJhbGciOiJIUzI1NiIsInR5cCI6IkpXVCJ9.eyJoZWxsbyI6IndvcmxkISIsIm51bWJlciI6MC41MzgyNzE0MTk3Nzg5NDc4LCJpYXQiOjE1NDIxMDQ0NDgsImV4cCI6MTU0MjEwNDUwOCwiaXNzIjoiZnVuLXdpdGgtand0cyIsInN1YiI6IkF6dXJlRGlhbW9uZCJ9.LRVmeIzAYk5WbDoKfSTYwPx5iW0omuB76Qud-xR8We4

Verify JSON Web Tokens in Your Node App

Well, that looks a bit like gibberish. You can see there are two .s in the JWT, separating the header, payload, and signature, but it’s not human readable. The next step is to write something to decode that string into something that makes a little more legible.

Replace the line containing TODO: verify this JWT with the following:

  const jwt = require('njwt')
  const { token } = req.params
  jwt.verify(token, 'top-secret-phrase', (err, verifiedJwt) => {
    if(err){
      res.send(err.message)
    }else{
      res.send(verifiedJwt)
    }
  })

In the route /verify/:token, the :token part tells express that you want to read that section of the URL in as a param, so you can get it on req.params.token. You can then use njwt to try to verify the token. If it fails, that could mean a number of things, like the token was malformed or it has expired.

Back on your website, or in curl, create another token using http://localhost:3000/create. Then copy and paste that into the URL so you have http://localhost:3000/verify/eyJhb...R8We4. You should get something like the following:

{
  "header": { "typ": "JWT", "alg": "HS256" },
  "body": {
    "iss": "fun-with-jwts",
    "sub": "AzureDiamond",
    "jti": "3668a38b-d25d-47ee-8da2-19a36d51e3da",
    "iat": 1542146783,
    "exp": 1542146843
  }
}

If you wait a minute and try again, you’ll instead get jwt expired.

Add OIDC Middleware to Your Node App to Handle JWT Functionality

Well, that wasn’t so bad. But I sure glossed over a lot of details. That top-secret-phrase isn’t really very top secret. How do you make sure you have a secure one and it’s not easy to find? What about all the other JWT options? How do you actually store that in a browser? What’s the optimal expiration time for a token?

This is where Okta comes in to play. Rather than dealing with all this yourself, you can leverage Okta’s cloud service to handle it all for you. After a couple minutes of setup, you can stop thinking about how to make your app secure and just focus on what makes it unique.

Why Auth with Okta?

Okta is a cloud service that allows developers to create, edit, and securely store user accounts and user account data, and connect them with one or multiple applications. Our API enables you to:

If you don’t already have one, sign up for a forever-free developer account.

Create an Okta Server

You’re going to need to save some information to use in your app. Create a new file named .env. In it, enter your Okta organization URL.

The post How to Create and Verify JWTs with Node appeared first on SitePoint.

How to Use TypeScript to Build a Node API with Express

$
0
0

Like it or not, JavaScript has been helping developers power the Internet since 1995. In that time, JavaScript usage has grown from small user experience enhancements to complex full-stack applications using Node.js on the server and one of many frameworks on the client such as Angular, React, or Vue.

Today, building JavaScript applications at scale remains a challenge. More and more teams are turning to TypeScript to supplement their JavaScript projects.

Node.js server applications can benefit from using TypeScript, as well. The goal of this tutorial is to show you how to build a new Node.js application using TypeScript and Express.

The Case for TypeScript

As a web developer, I long ago stopped resisting JavaScript, and have grown to appreciate its flexibility and ubiquity. Language features added to ES2015 and beyond have significantly improved its utility and reduced common frustrations of writing applications.

However, larger JavaScript projects demand tools such as ESLint to catch common mistakes, and greater discipline to saturate the code base with useful tests. As with any software project, a healthy team culture that includes a peer review process can improve quality and guard against issues that can creep into a project.

The primary benefits of using TypeScript are to catch more errors before they go into production and make it easier to work with your code base.

TypeScript is not a different language. It’s a flexible superset of JavaScript with ways to describe optional data types. All “standard” and valid JavaScript is also valid TypeScript. You can dial in as much or little as you desire.

As soon as you add the TypeScript compiler or a TypeScript plugin to your favorite code editor, there are immediate safety and productivity benefits. TypeScript can alert you to misspelled functions and properties, detect passing the wrong types of arguments or the wrong number of arguments to functions, and provide smarter autocomplete suggestions.

Build a Guitar Inventory Application with TypeScript and Node.js

Among guitar players, there’s a joke everyone should understand.

Q: “How many guitars do you need?”

A: “n + 1. Always one more.”

In this tutorial, you are going to create a new Node.js application to keep track of an inventory of guitars. In a nutshell, this tutorial uses Node.js with Express, EJS, and PostgreSQL on the backend, Vue, Materialize, and Axios on the frontend, Okta for account registration and authorization, and TypeScript to govern the JavaScripts!

Guitar Inventory Demo

Create Your Node.js Project

Open up a terminal (Mac/Linux) or a command prompt (Windows) and type the following command:

node --version

If you get an error, or the version of Node.js you have is less than version 8, you’ll need to install Node.js. On Mac or Linux, I recommend you first install nvm and use nvm to install Node.js. On Windows, I recommend you use Chocolatey.

After ensuring you have a recent version of Node.js installed, create a folder for your project.

mkdir guitar-inventory
cd guitar-inventory

Use npm to initialize a package.json file.

npm init -y

Hello, world!

In this sample application, Express is used to serve web pages and implement an API. Dependencies are installed using npm. Add Express to your project with the following command.

npm install express

Next, open the project in your editor of choice.

If you don’t already have a favorite code editor, I use and recommend Visual Studio Code. VS Code has exceptional support for JavaScript and Node.js, such as smart code completing and debugging, and there’s a vast library of free extensions contributed by the community.

Create a folder named src. In this folder, create a file named index.js. Open the file and add the following JavaScript.

const express = require( "express" );
const app = express();
const port = 8080; // default port to listen

// define a route handler for the default home page
app.get( "/", ( req, res ) => {
    res.send( "Hello world!" );
} );

// start the Express server
app.listen( port, () => {
    console.log( `server started at http://localhost:${ port }` );
} );

Next, update package.json to instruct npm on how to run your application. Change the main property value to point to src/index.js, and add a start script to the scripts object.

  "main": "src/index.js",
  "scripts": {
    "start": "node .",
    "test": "echo \"Error: no test specified\" && exit 1"
  },

Now, from the terminal or command line, you can launch the application.

npm run start

If all goes well, you should see this message written to the console.

server started at http://localhost:8080

Launch your browser and navigate to http://localhost:8080. You should see the text “Hello world!”

Hello World

Note: To stop the web application, you can go back to the terminal or command prompt and press CTRL+C.

Set Up Your Node.js Project to Use TypeScript

The first step is to add the TypeScript compiler. You can install the compiler as a developer dependency using the --save-dev flag.

npm install --save-dev typescript

The next step is to add a tsconfig.json file. This file instructs TypeScript how to compile (transpile) your TypeScript code into plain JavaScript.

Create a file named tsconfig.json in the root folder of your project, and add the following configuration.

{
    "compilerOptions": {
        "module": "commonjs",
        "esModuleInterop": true,
        "target": "es6",
        "noImplicitAny": true,
        "moduleResolution": "node",
        "sourceMap": true,
        "outDir": "dist",
        "baseUrl": ".",
        "paths": {
            "*": [
                "node_modules/*"
            ]
        }
    },
    "include": [
        "src/**/*"
    ]
}

Based on this tsconfig.json file, the TypeScript compiler will (attempt to) compile any files ending with .ts it finds in the src folder, and store the results in a folder named dist. Node.js uses the CommonJS module system, so the value for the module setting is commonjs. Also, the target version of JavaScript is ES6 (ES2015), which is compatible with modern versions of Node.js.

It’s also a great idea to add tslint and create a tslint.json file that instructs TypeScript how to lint your code. If you’re not familiar with linting, it is a code analysis tool to alert you to potential problems in your code beyond syntax issues.

Install tslint as a developer dependency.

npm install --save-dev typescript tslint

Next, create a new file in the root folder named tslint.json file and add the following configuration.

{
    "defaultSeverity": "error",
    "extends": [
        "tslint:recommended"
    ],
    "jsRules": {},
    "rules": {
        "trailing-comma": [ false ]
    },
    "rulesDirectory": []
}

Next, update your package.json to change main to point to the new dist folder created by the TypeScript compiler. Also, add a couple of scripts to execute TSLint and the TypeScript compiler just before starting the Node.js server.

  "main": "dist/index.js",
  "scripts": {
    "prebuild": "tslint -c tslint.json -p tsconfig.json --fix",
    "build": "tsc",
    "prestart": "npm run build",
    "start": "node .",
    "test": "echo \"Error: no test specified\" && exit 1"
  },

Finally, change the extension of the src/index.js file from .js to .ts, the TypeScript extension, and run the start script.

npm run start

Note: You can run TSLint and the TypeScript compiler without starting the Node.js server using npm run build.

TypeScript errors

Oh no! Right away, you may see some errors logged to the console like these.

ERROR: /Users/reverentgeek/Projects/guitar-inventory/src/index.ts[12, 5]: Calls to 'console.log' are not allowed.

src/index.ts:1:17 - error TS2580: Cannot find name 'require'. Do you need to install type definitions for node? Try `npm i @types/node`.

1 const express = require( "express" );
                  ~~~~~~~

src/index.ts:6:17 - error TS7006: Parameter 'req' implicitly has an 'any' type.

6 app.get( "/", ( req, res ) => {
                  ~~~

The two most common errors you may see are syntax errors and missing type information. TSLint considers using console.log to be an issue for production code. The best solution is to replace uses of console.log with a logging framework such as winston. For now, add the following comment to src/index.ts to disable the rule.

app.listen( port, () => {
    // tslint:disable-next-line:no-console
    console.log( `server started at http://localhost:${ port }` );
} );

TypeScript prefers to use the import module syntax over require, so you’ll start by changing the first line in src/index.ts from:

const express = require( "express" );

to:

import express from "express";

Getting the right types

To assist TypeScript developers, library authors and community contributors publish companion libraries called TypeScript declaration files. Declaration files are published to the DefinitelyTyped open source repository, or sometimes found in the original JavaScript library itself.

Update your project so that TypeScript can use the type declarations for Node.js and Express.

npm install --save-dev @types/node @types/express

Next, rerun the start script and verify there are no more errors.

npm run start

Build a Better User Interface with Materialize and EJS

Your Node.js application is off to a great start, but perhaps not the best looking, yet. This step adds Materialize, a modern CSS framework based on Google’s Material Design, and Embedded JavaScript Templates (EJS), an HTML template language for Express. Materialize and EJS are a good foundation for a much better UI.

First, install EJS as a dependency.

npm install ejs

Next, make a new folder under /src named views. In the /src/views folder, create a file named index.ejs. Add the following code to /src/views/index.ejs.

<!DOCTYPE html>
<html>
<head>
    <meta charset="utf-8" />
    <meta http-equiv="X-UA-Compatible" content="IE=edge">
    <title>Guitar Inventory</title>
    <meta name="viewport" content="width=device-width, initial-scale=1">
    <link rel="stylesheet" href="https://cdnjs.cloudflare.com/ajax/libs/materialize/1.0.0/css/materialize.min.css">
    <link rel="stylesheet" href="https://fonts.googleapis.com/icon?family=Material+Icons">
</head>
<body>
    <div class="container">
        <h1 class="header">Guitar Inventory</h1>
        <a class="btn" href="/guitars"><i class="material-icons right">arrow_forward</i>Get started!</a>
    </div>
</body>
</html>

Update /src/index.ts with the following code.

import express from "express";
import path from "path";
const app = express();
const port = 8080; // default port to listen

// Configure Express to use EJS
app.set( "views", path.join( __dirname, "views" ) );
app.set( "view engine", "ejs" );

// define a route handler for the default home page
app.get( "/", ( req, res ) => {
    // render the index template
    res.render( "index" );
} );

// start the express server
app.listen( port, () => {
    // tslint:disable-next-line:no-console
    console.log( `server started at http://localhost:${ port }` );
} );

Add an asset build script for Typescript

The TypeScript compiler does the work of generating the JavaScript files and copies them to the dist folder. However, it does not copy the other types of files the project needs to run, such as the EJS view templates. To accomplish this, create a build script that copies all the other files to the dist folder.

Install the needed modules and TypeScript declarations using these commands.

npm install --save-dev ts-node shelljs fs-extra nodemon rimraf npm-run-all
npm install --save-dev @types/fs-extra @types/shelljs

Here is a quick overview of the modules you just installed.

  1. ts-node. Use to run TypeScript files directly.
  2. shelljs. Use to execute shell commands such as to copy files and remove directories.
  3. fs-extra. A module that extends the Node.js file system (fs) module with features such as reading and writing JSON files.
  4. rimraf. Use to recursively remove folders.
  5. npm-run-all. Use to execute multiple npm scripts sequentially or in parallel.
  6. nodemon. A handy tool for running Node.js in a development environment. Nodemon watches files for changes and automatically restarts the Node.js application when changes are detected. No more stopping and restarting Node.js!

Make a new folder in the root of the project named tools. Create a file in the tools folder named copyAssets.ts. Copy the following code into this file.

import * as shell from "shelljs";

// Copy all the view templates
shell.cp( "-R", "src/views", "dist/" );

Update npm scripts

Update the scripts in package.json to the following code.

  "scripts": {
    "clean": "rimraf dist/*",
    "copy-assets": "ts-node tools/copyAssets",
    "lint": "tslint -c tslint.json -p tsconfig.json --fix",
    "tsc": "tsc",
    "build": "npm-run-all clean lint tsc copy-assets",
    "dev:start": "npm-run-all build start",
    "dev": "nodemon --watch src -e ts,ejs --exec npm run dev:start",
    "start": "node .",
    "test": "echo \"Error: no test specified\" && exit 1"
  },

Note: If you are not familiar with using npm scripts, they can be very powerful and useful to any Node.js project. Scripts can be chained together in several ways. One way to chain scripts together is to use the pre and post prefixes. For example, if you have one script labeled start and another labeled prestart, executing npm run start at the terminal will first run prestart, and only after it successfully finishes does start run.

Now run the application and navigate to http://localhost:8080.

npm run dev

Guitar Inventory home page

The home page is starting to look better! Of course, the Get Started button leads to a disappointing error message. No worries! The fix for that is coming soon!

A Better Way to Manage Configuration Settings in Node.js

Node.js applications typically use environment variables for configuration. However, managing environment variables can be a chore. A popular module for managing application configuration data is dotenv.

Install dotenv as a project dependency.

npm install dotenv
npm install --save-dev @types/dotenv

Create a file named .env in the root folder of the project, and add the following code.

# Set to production when deploying to production
NODE_ENV=development

# Node.js server configuration
SERVER_PORT=8080

Note: When using a source control system such as git, do not add the .env file to source control. Each environment requires a custom .env file. It is recommended you document the values expected in the .env file in the project README or a separate .env.sample file.

Now, update src/index.ts to use dotenv to configure the application server port value.

import dotenv from "dotenv";
import express from "express";
import path from "path";

// initialize configuration
dotenv.config();

// port is now available to the Node.js runtime 
// as if it were an environment variable
const port = process.env.SERVER_PORT;

const app = express();

// Configure Express to use EJS
app.set( "views", path.join( __dirname, "views" ) );
app.set( "view engine", "ejs" );

// define a route handler for the default home page
app.get( "/", ( req, res ) => {
    // render the index template
    res.render( "index" );
} );

// start the express server
app.listen( port, () => {
    // tslint:disable-next-line:no-console
    console.log( `server started at http://localhost:${ port }` );
} );

You will use the .env for much more configuration information as the project grows.

Easily Add Authentication to Node and Express

Adding user registration and login (authentication) to any application is not a trivial task. The good news is Okta makes this step very easy. To begin, create a free developer account with Okta. First, navigate to developer.okta.com and click the Create Free Account button, or click the Sign Up button.

Sign up for free account

After creating your account, click the Applications link at the top, and then click Add Application.

Create application

Next, choose a Web Application and click Next.

Create a web application

Enter a name for your application, such as Guitar Inventory. Verify the port number is the same as configured for your local web application. Then, click Done to finish creating the application.

Application settings

Copy and paste the following code into your .env file.

# Okta configuration
OKTA_ORG_URL=https://{yourOktaDomain}
OKTA_CLIENT_ID={yourClientId}
OKTA_CLIENT_SECRET={yourClientSecret}

In the Okta application console, click on your new application’s General tab, and find near the bottom of the page a section titled “Client Credentials.” Copy the Client ID and Client secret values and paste them into your .env file to replace {yourClientId} and {yourClientSecret}, respectively.

Client credentials

Enable self-service registration

One of the great features of Okta is allowing users of your application to sign up for an account. By default, this feature is disabled, but you can easily enable it. First, click on the Users menu and select Registration.

User registration

  1. Click on the Edit button.
  2. Change Self-service registration to Enabled.
  3. Click the Save button at the bottom of the form.

Enable self-registration

Secure your Node.js application

The last step to securing your Node.js application is to configure Express to use the Okta OpenId Connect (OIDC) middleware.

npm install @okta/oidc-middleware express-session
npm install --save-dev @types/express-session

Next, update your .env file to add a HOST_URL and SESSION_SECRET value. You may change the SESSION_SECRET value to any string you wish.

# Node.js server configuration
SERVER_PORT=8080
HOST_URL=http://localhost:8080
SESSION_SECRET=MySuperCoolAndAwesomeSecretForSigningSessionCookies

Create a folder under src named middleware. Add a file to the src/middleware folder named sessionAuth.ts. Add the following code to src/middleware/sessionAuth.ts.

import { ExpressOIDC } from "@okta/oidc-middleware";
import session from "express-session";

export const register = ( app: any ) => {
    // Create the OIDC client
    const oidc = new ExpressOIDC( {
        client_id: process.env.OKTA_CLIENT_ID,
        client_secret: process.env.OKTA_CLIENT_SECRET,
        issuer: `${ process.env.OKTA_ORG_URL }/oauth2/default`,
        redirect_uri: `${ process.env.HOST_URL }/authorization-code/callback`,
        scope: "openid profile"
    } );

    // Configure Express to use authentication sessions
    app.use( session( {
        resave: true,
        saveUninitialized: false,
        secret: process.env.SESSION_SECRET
    } ) );

    // Configure Express to use the OIDC client router
    app.use( oidc.router );

    // add the OIDC client to the app.locals
    app.locals.oidc = oidc;
};

At this point, if you are using a code editor like VS Code, you may see TypeScript complaining about the @okta/oidc-middleware module. At the time of this writing, this module does not yet have an official TypeScript declaration file. For now, create a file in the src folder named global.d.ts and add the following code.

declare module "@okta/oidc-middleware";

Refactor routes

As the application grows, you will add many more routes. It is a good idea to define all the routes in one area of the project. Make a new folder under src named routes. Add a new file to src/routes named index.ts. Then, add the following code to this new file.

import * as express from "express";

export const register = ( app: express.Application ) => {
    const oidc = app.locals.oidc;

    // define a route handler for the default home page
    app.get( "/", ( req: any, res ) => {
        res.render( "index" );
    } );

    // define a secure route handler for the login page that redirects to /guitars
    app.get( "/login", oidc.ensureAuthenticated(), ( req, res ) => {
        res.redirect( "/guitars" );
    } );

    // define a route to handle logout
    app.get( "/logout", ( req: any, res ) => {
        req.logout();
        res.redirect( "/" );
    } );

    // define a secure route handler for the guitars page
    app.get( "/guitars", oidc.ensureAuthenticated(), ( req: any, res ) => {
        res.render( "guitars" );
    } );
};

Next, update src/index.ts to use the sessionAuth and routes modules you created.

import dotenv from "dotenv";
import express from "express";
import path from "path";
import * as sessionAuth from "./middleware/sessionAuth";
import * as routes from "./routes";

// initialize configuration
dotenv.config();

// port is now available to the Node.js runtime
// as if it were an environment variable
const port = process.env.SERVER_PORT;

const app = express();

// Configure Express to use EJS
app.set( "views", path.join( __dirname, "views" ) );
app.set( "view engine", "ejs" );

// Configure session auth
sessionAuth.register( app );

// Configure routes
routes.register( app );

// start the express server
app.listen( port, () => {
    // tslint:disable-next-line:no-console
    console.log( `server started at http://localhost:${ port }` );
} );

Next, create a new file for the guitar list view template at src/views/guitars.ejs and enter the following HTML.

<!DOCTYPE html>
<html>
<head>
    <meta charset="utf-8" />
    <meta http-equiv="X-UA-Compatible" content="IE=edge">
    <title>Guitar Inventory</title>
    <meta name="viewport" content="width=device-width, initial-scale=1">
    <link rel="stylesheet" href="https://cdnjs.cloudflare.com/ajax/libs/materialize/1.0.0/css/materialize.min.css">
    <link rel="stylesheet" href="https://fonts.googleapis.com/icon?family=Material+Icons">
</head>
<body>
    <div class="container">
        <h1 class="header">Guitar Inventory</h1>
        <p>Your future list of guitars!</p>
    </div>
</body>
</html>

Finally, run the application.

npm run dev

Note: To verify authentication is working as expected, open a new browser or use a private/incognito browser window.

Click the Get Started button. If everything goes well, log in with your Okta account, and Okta should automatically redirect you back to the “Guitar List” page!

Okta login

Add a Navigation Menu to Your Node + Typescript App

With authentication working, you can take advantage of the user profile information returned from Okta. The OIDC middleware automatically attaches a userContext object and an isAuthenticated() function to every request. This userContext has a userinfo property that contains information that looks like the following object.

{ 
  sub: '00abc12defg3hij4k5l6',
  name: 'First Last',
  locale: 'en-US',
  preferred_username: 'account@company.com',
  given_name: 'First',
  family_name: 'Last',
  zoneinfo: 'America/Los_Angeles',
  updated_at: 1539283620 
}

The first step is get the user profile object and pass it to the views as data. Update the src/routes/index.ts with the following code.

import * as express from "express";

export const register = ( app: express.Application ) => {
    const oidc = app.locals.oidc;

    // define a route handler for the default home page
    app.get( "/", ( req: any, res ) => {
        const user = req.userContext ? req.userContext.userinfo : null;
        res.render( "index", { isAuthenticated: req.isAuthenticated(), user } );
    } );

    // define a secure route handler for the login page that redirects to /guitars
    app.get( "/login", oidc.ensureAuthenticated(), ( req, res ) => {
        res.redirect( "/guitars" );
    } );

    // define a route to handle logout
    app.get( "/logout", ( req: any, res ) => {
        req.logout();
        res.redirect( "/" );
    } );

    // define a secure route handler for the guitars page
    app.get( "/guitars", oidc.ensureAuthenticated(), ( req: any, res ) => {
        const user = req.userContext ? req.userContext.userinfo : null;
        res.render( "guitars", { isAuthenticated: req.isAuthenticated(), user } );
    } );
};

Make a new folder under src/views named partials. Create a new file in this folder named nav.ejs. Add the following code to src/views/partials/nav.ejs.

<nav>
    <div class="nav-wrapper">
        <a href="/" class="brand-logo"><% if ( user ) { %><%= user.name %>'s <% } %>Guitar Inventory</a>
        <ul id="nav-mobile" class="right hide-on-med-and-down">
            <li><a href="/guitars">My Guitars</a></li>
            <% if ( isAuthenticated ) { %>
            <li><a href="/logout">Logout</a></li>
            <% } %>
            <% if ( !isAuthenticated ) { %>
            <li><a href="/login">Login</a></li>
            <% } %>
        </ul>
    </div>
</nav>

Modify the src/views/index.ejs and src/views/guitars.ejs files. Immediately following the <body> tag, insert the following code.

<body>
    <% include partials/nav %>

With these changes in place, your application now has a navigation menu at the top that changes based on the login status of the user.

Navigation

Create an API with Node and PostgreSQL

The next step is to add the API to the Guitar Inventory application. However, before moving on, you need a way to store data.

Create a PostgreSQL database

This tutorial uses PostgreSQL. To make things easier, use Docker to set up an instance of PostgreSQL. If you don’t already have Docker installed, you can follow the install guide.

Once you have Docker installed, run the following command to download the latest PostgreSQL container.

docker pull postgres:latest

Now, run this command to create an instance of a PostgreSQL database server. Feel free to change the administrator password value.

docker run -d --name guitar-db -p 5432:5432 -e 'POSTGRES_PASSWORD=p@ssw0rd42' postgres

Note: If you already have PostgreSQL installed locally, you will need to change the -p parameter to map port 5432 to a different port that does not conflict with your existing instance of PostgreSQL.

Here is a quick explanation of the previous Docker parameters.

  • -d - This launches the container in daemon mode, so it runs in the background.
  • -name - This gives your Docker container a friendly name, which is useful for stopping and starting containers.
  • -p - This maps the host (your computer) port 5432 to the container’s port 5432. PostgreSQL, by default, listens for connections on TCP port 5432.
  • -e - This sets an environment variable in the container. In this example, the administrator password is p@ssw0rd42. You can change this value to any password you desire.
  • postgres - This final parameter tells Docker to use the postgres image.

Note: If you restart your computer, may need to restart the Docker container. You can do that using the docker start guitar-db command.

Install the PostgreSQL client module and type declarations using the following commands.

npm install pg pg-promise
npm install --save-dev @types/pg

Database configuration settings

Add the following settings to the end of the .env file.

# Postgres configuration
PGHOST=localhost
PGUSER=postgres
PGDATABASE=postgres
PGPASSWORD=p@ssw0rd42
PGPORT=5432

Note: If you changed the database administrator password, be sure to replace the default p@ssw0rd42 with that password in this file.

Add a database build script

You need a build script to initialize the PostgreSQL database. This script should read in a .pgsql file and execute the SQL commands against the local database.

In the tools folder, create two files: initdb.ts and initdb.pgsql. Copy and paste the following code into initdb.ts.

The post How to Use TypeScript to Build a Node API with Express appeared first on SitePoint.
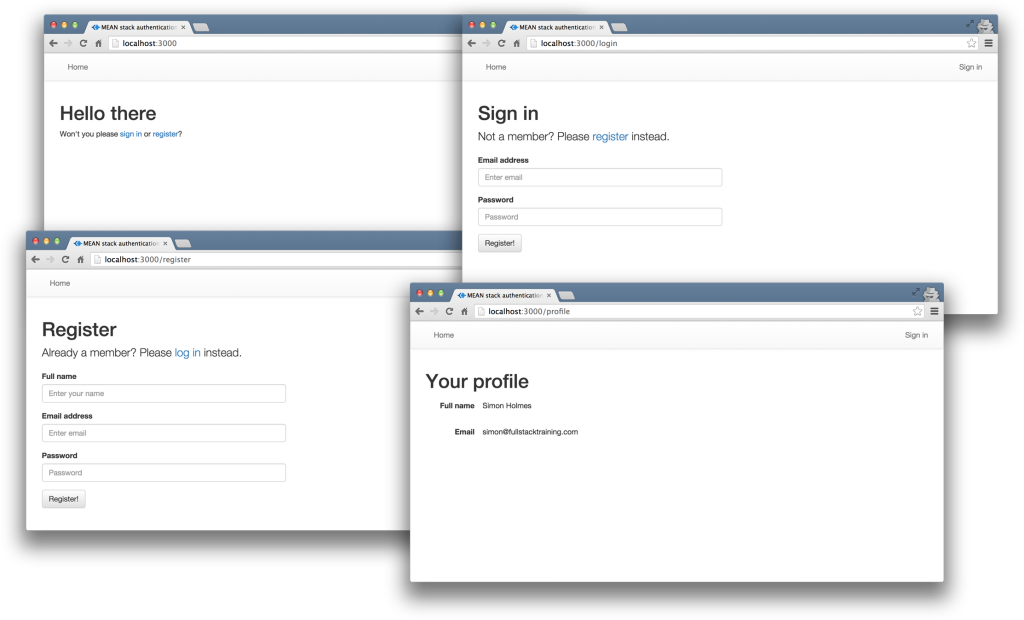
Build Your First Router in Node with Express

$
0
0
Serverless Development with Node.js AWS Lambda and MongoDB Atlas

This article was originally published on the Okta developer blog. Thank you for supporting the partners who make SitePoint possible.

If you’ve done any web development with Node in the last few years, you’ve probably used Express. Even if you haven’t used it directly, many frameworks meant to make web development even simpler are still built on Express.

One of the key features in Express is the ability to create routes. An infinite combination of URLs can hit the same Express server, and routes are how you can determine which URLs run what piece of code. You can have parameters and wildcards so that you don’t have to explicitly state each endpoint.

In this tutorial, I’ll walk you through creating a server and teach you all you need to know about routes in Express.

What is a Route in Express?

Routes determine what data should be delivered given any URL. Let’s take the most basic file server as an example. Say you have a file structure of:

The post Build Your First Router in Node with Express appeared first on SitePoint.
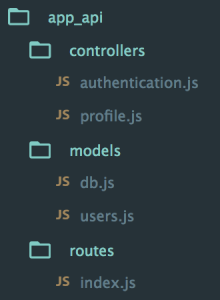

10 Must-have VS Code Extensions for JavaScript Developers

$
0
0
10 Must-have VS Code Extensions for JavaScript Developers

In this article, I’ll focus on a list of must-have VS Code extensions for JavaScript developers.

Visual Studio Code is undoubtedly the most popular lightweight code editor today. It does borrow heavily from other popular code editors, mostly Sublime Text and Atom. However, its success mainly comes from its ability to provide better performance and stability. In addition, it also provides much needed features like IntelliSense, which were only available in full-sized IDEs like Eclipse or Visual Studio 2017.

The power of VS Code no doubt comes from the marketplace. Thanks to the wonderful open-source community, the editor is now capable of supporting almost every programming language, framework and development technology. Support for a library or framework comes in various ways, which mainly includes snippets, syntax highlighting, Emmet and IntelliSense features for that specific technology.

This article was updated in March 2019 to reflect the current state of the VS Code extensions ecosystem.

The post 10 Must-have VS Code Extensions for JavaScript Developers appeared first on SitePoint.

Create an Automated Scoreboard that Senses Your Score with a Raspberry Pi

$
0
0
Patrick Catanzariti using his mini-basketball loop with scoreboard

On an impulse just before Christmas, I bought myself an NBA "over-the-door" mini basketball hoop. I wasn't sure what I'd do with it, but having a basketball hoop for my office seemed like a good move. In the end I decided to experiment and bring some connectivity to it by hooking it up to a Raspberry Pi to give it a scoreboard display. Here's how that went, with step-by-step instructions if you'd like to try to adapt and improve upon it!

This tutorial isn't intended to be used as a step-by-step "do exactly as I did" style guide — my hope is that you'll take this concept and use it for all sorts of other ideas. Add a virtual scoreboard that counts how often people come into your office. Or go with a different sport (maybe a mini soccer goal tracker?). Or use an entirely different sensor but track hits on it visually with a Raspberry Pi! There are so many potential applications of this technique. Try stuff and let me know how you go!

What You'll Need

In order to be able to follow along and make something similar, here's a list of the parts I used (or their equivalent for the things I had around my lab already):

One thing to note — if you don't have a 7 inch display for your Pi, you could display the score on a nearby computer monitor too. Any device on your local network with a web browser and a screen would work!

The Code

Want to skip to downloading the code? It's available on GitHub here.

What I put together

I hung my new basketball hoop up on a door with an ultrasonic sensor attached to the hoop to track when a ball goes into the hoop. Underneath is a Raspberry Pi powered scoreboard — I'd actually recommend finding longer cables so you can connect it outside of basketball falling range.

[caption id="attachment_171361" align="aligncenter" width="1024"]Patrick Catanzariti using his mini-basketball loop with scoreboard Me testing out my connected scoreboard — with a customised Suns themed interface![/caption]

I'll go over why everything is as it is below — along with some suggestions for those who might want to improve upon this base!

Languages we'll be using

  • JavaScript - In order to follow along, you'll need a knowledge of the basics, but we won't have lines upon lines of code, things are actually pretty simple in the JS side of things.
  • Node.js - A basic knowledge of how to run npm and Node is needed to run our scoreboard server.

Setting up our Raspberry Pi

If you are completely new to the Raspberry Pi and haven't set anything up yet, never fear! There are many guides out there for setting things up and it's nice and straightforward. The Raspberry Pi foundation have a step by step guide for installing the Raspbian operating system using the NOOBS operating system manager. You'll want to make sure the operating system is running before you get onto any of the other steps.

Touchscreen setup

I put together my connected scoreboard using a Raspberry Pi 3 with touchscreen. My touchscreen and case were already put together and screwed down tight as I've used this Pi 3 before for other projects, however if you are starting from scratch — it isn't too hard to connect up. Newer shipments (like mine) actually have a bunch of it already assembled, with the adapter board already screwed onto the LCD screen, if that's the case, half the steps are already complete! Instructions on how to assemble the screen are available online:

Case setup

When it comes to putting the case around the LCD screen and Raspberry Pi, that process is also quite easy with the case I have. I already had mine together, however the general steps for this are:

  • Make sure you've already got your microUSB card inside the Raspberry Pi and are happy with how it's running! Annoyingly with a lot of cases, you can't get the card out once the case is in place. My case linked above is one of those... so make sure the card is all good before you lose access to it!
  • Place the Pi with screen into place inside the case
  • Arrange the ribbon cables and cables coming from the GPIO so they aren't in the way
  • Make sure the holes for your USB ports and such are on the correct side of the bulkier part of the case and line up nicely.
  • Once everything is lined up nicely, screw in the four screws to put it all together!
  • Turn it on! If you find that the screen comes up upside down, don't worry, it's a side effect of the case manufacturers lining up the power to come out of the top. When I mounted my scoreboard though, I mounted it with the power coming out of the bottom, so this wasn't an issue for me. If it is an issue for you:
    • Run sudo nano /boot/config.txt to open the config for the Pi
    • Then add lcd_rotate=2 to the end, this will rotate the screen around.
    • Press Ctrl X and the Ctrl Y to save your changes.
    • Restart your Pi and when it loads back up it should be the right way around!

Running Node.js on our Raspberry Pi

Conveniently, Raspbian has Node installed by default! However, it is a rather old version of Node. You can check which version is installed on your Pi by opening up the Terminal and typing in:

node -v

I've got version 8.15.0 installed on my Pi. You can upgrade by running the following commands:


sudo su -
apt-get remove nodered -y
apt-get remove nodejs nodejs-legacy -y
apt-get remove npm -y
curl -sL https://deb.nodesource.com/setup_5.x | sudo bash -
apt-get install nodejs -y

After running all of those, if you type in that version command again, you should see a better version:

node -v

You can also check npm is installed correctly by running:

npm -v

With node running on our device, we're ready to get a scoreboard Node server running!

The post Create an Automated Scoreboard that Senses Your Score with a Raspberry Pi appeared first on SitePoint.

A Beginner’s Guide to npm — the Node Package Manager

$
0
0

Node.js makes it possible to write applications in JavaScript on the server. It's built on the V8 JavaScript runtime and written in C++ — so it's fast. Originally, it was intended as a server environment for applications, but developers started using it to create tools to aid them in local task automation. Since then, a whole new ecosystem of Node-based tools (such as Grunt, Gulp and Webpack) has evolved to transform the face of front-end development.

This popular article was updated on 08.06.2017 to reflect the current state of npm, as well as the changes introduced by the release of version 5.

To make use of these tools (or packages) in Node.js we need to be able to install and manage them in a useful way. This is where npm, the Node package manager, comes in. It installs the packages you want to use and provides a useful interface to work with them.

In this article I'm going to look at the basics of working with npm. I will show you how to install packages in local and global mode, as well as delete, update and install a certain version of a package. I'll also show you how to work with package.json to manage a project's dependencies. If you're more of a video person, why not sign up for SitePoint Premium and watch our free screencast: What is npm and How Can I Use It?.

But before we can start using npm, we first have to install Node.js on our system. Let's do that now...

Installing Node.js

Head to the Node.js download page and grab the version you need. There are Windows and Mac installers available, as well as pre-compiled Linux binaries and source code. For Linux, you can also install Node via the package manager, as outlined here.

For this tutorial we are going to use v6.10.3 Stable. At the time of writing, this is the current Long Term Support (LTS) version of Node.

Tip: You might also consider installing Node using a version manager. This negates the permissions issue raised in the next section.

Let's see where node was installed and check the version.

$ which node
/usr/bin/node
$ node --version
v6.10.3

To verify that your installation was successful let's give Node's REPL a try.

$ node
> console.log('Node is running');
Node is running
> .help
.break Sometimes you get stuck, this gets you out
.clear Alias for .break
.exit  Exit the repl
.help  Show repl options
.load  Load JS from a file into the REPL session
.save  Save all evaluated commands in this REPL session to a file
> .exit

The Node.js installation worked, so we can now focus our attention on npm, which was included in the install.

$ which npm
/usr/bin/npm
$ npm --version
3.10.10

Node Packaged Modules

npm can install packages in local or global mode. In local mode it installs the package in a node_modules folder in your parent working directory. This location is owned by the current user. Global packages are installed in {prefix}/lib/node_modules/ which is owned by root (where {prefix} is usually /usr/ or /usr/local). This means you would have to use sudo to install packages globally, which could cause permission errors when resolving third-party dependencies, as well as being a security concern. Lets change that:

Parcel delivery company
Time to manage those packages

Changing the Location of Global Packages

Let's see what output npm config gives us.

$ npm config list
; cli configs
user-agent = "npm/3.10.10 node/v6.10.3 linux x64"

; userconfig /home/sitepoint/.npmrc
prefix = "/home/sitepoint/.node_modules_global"

; node bin location = /usr/bin/nodejs
; cwd = /home/sitepoint
; HOME = /home/sitepoint
; "npm config ls -l" to show all defaults.

This gives us information about our install. For now it's important to get the current global location.

$ npm config get prefix
/usr

This is the prefix we want to change, so as to install global packages in our home directory. To do that create a new directory in your home folder.

$ cd ~ && mkdir .node_modules_global
$ npm config set prefix=$HOME/.node_modules_global

With this simple configuration change, we have altered the location to which global Node packages are installed. This also creates a .npmrc file in our home directory.

$ npm config get prefix
/home/sitepoint/.node_modules_global
$ cat .npmrc
prefix=/home/sitepoint/.node_modules_global

We still have npm installed in a location owned by root. But because we changed our global package location we can take advantage of that. We need to install npm again, but this time in the new user-owned location. This will also install the latest version of npm.

$ npm install npm --global
└─┬ npm@5.0.2
  ├── abbrev@1.1.0
  ├── ansi-regex@2.1.1
....
├── wrappy@1.0.2
└── write-file-atomic@2.1.0

Finally, we need to add .node_modules_global/bin to our $PATH environment variable, so that we can run global packages from the command line. Do this by appending the following line to your .profile, .bash_profileor .bashrc and restarting your terminal.

export PATH="$HOME/.node_modules_global/bin:$PATH"

Now our .node_modules_global/bin will be found first and the correct version of npm will be used.

$ which npm
/home/sitepoint/.node_modules_global/bin/npm
$ npm --version
5.0.2

The post A Beginner’s Guide to npm — the Node Package Manager appeared first on SitePoint.

Optimize the Performance of a Vue App with Async Components

$
0
0
Optimize the Performance of a Vue App with Async Components

Single-page applications sometimes cop a little flack for their slow initial load. This is because traditionally, the server will send a large bundle of JavaScript to the client, which must be downloaded and parsed before anything is displayed on the screen. As you can imagine, as your app grows in size, this can become more and more problematic.

Luckily, when building a Vue application using Vue CLI (which uses webpack under the hood), there are a number of measures one can take to counteract this. In this article, I’ll demonstrate how make use of both asynchronous components and webpack’s code-splitting functionality to load in parts of the page after the app’s initial render. This will keep the initial load time to a minimum and give your app a snappier feel.

To follow this tutorial, you need a basic understanding of Vue.js and optionally Node.js.

Async Components

Before we dive into creating asynchronous components, let’s take a look at how we normally load a component. To do so, we’ll use a very simple message component:

<!-- Message.vue -->
<template>
  <h1>New message!</h1>
</template>

Now that we’ve created our component, let’s load it into our App.vue file and display it. We can just import the component and add it to the components option so we can use it in our template:

<!-- App.vue -->
<template>
  <div>
    <message></message>
  </div>
</template>

<script>
import Message from "./Message";
export default {
  components: {
    Message
  }
};
</script>

But what happens now? The Message component will be loaded whenever the application is loaded, so it’s included in the initial load.

This might not sound like a huge problem for a simple app, but consider something more complex like a web store. Imagine that a user adds items to a basket, then wants to check out, so clicks the checkout button which renders a box with all details of the selected items. Using the above method, this checkout box will be included in the initial bundle, although we only need the component when the user clicks the checkout button. It’s even possible that the user navigates through the website without ever clicking the checkout button, meaning that it doesn’t make sense to waste resources on loading this potentially unused component.

To improve the efficiency of the application, we can combine both lazy loading and code splitting techniques.

Lazy loading is all about delaying the initial load of a component. You can see lazy loading in action on sites like medium.com, where the images are loaded in just before they’re required. This is useful, as we don’t have to waste resources loading all the images for a particular post up front, as the reader might skip the article halfway down.

The code splitting feature webpack provides allows you to split your code into various bundles that can then be loaded on demand or in parallel at a later point in time. It can be used to load specific pieces of code only when they’re required or used.

Dynamic Imports

Luckily, Vue caters for this scenario using something called dynamic imports. This feature introduces a new function-like form of import that will return a Promise containing the requested (Vue) component. As the import is a function receiving a string, we can do powerful things like loading modules using expressions. Dynamic imports have been available in Chrome since version 61. More information about them can be found on the Google Developers website.

The code splitting is taken care of by bundlers like webpack, Rollup or Parcel, which understand the dynamic import syntax and create a separate file for each dynamically imported module. We’ll see this later on in our console’s network tab. But first, let’s take a look at the difference between a static and dynamic import:

// static import
import Message from "./Message";

// dynamic import
import("./Message").then(Message => {
  // Message module is available here...
});

Now, let’s apply this knowledge to our Message component, and we’ll get an App.vue component that looks like this:

<!-- App.vue -->
<template>
  <div>
    <message></message>
  </div>
</template>

<script>
import Message from "./Message";
export default {
  components: {
    Message: () => import("./Message")
  }
};
</script>

As you can see, the import() function will resolve a Promise that returns the component, meaning that we’ve successfully loaded our component asynchronously. If you take a look in your devtools’ network tab, you’ll notice a file called 0.js that contains your asynchronous component.

Code splitting webpack

Conditionally Loading Async Components

Now that we have a handle on asynchronous components, let’s truly harvest their power by only loading them when they’re really needed. In the previous section of this article, I explained the use case of a checkout box that’s only loaded when the user hits the checkout button. Let’s build that out.

Project Setup

If you don’t have Vue CLI installed, you should grab that now:

npm i -g @vue/cli

Next, use the CLI to create a new project, selecting the default preset when prompted:

vue create my-store

Change into the project directory, then install the ant-design-vue library, which we’ll be using for styling:

cd my-store
npm i ant-design-vue

Next, import the Ant Design library in src/main.js:

import 'ant-design-vue/dist/antd.css'

Finally, create two new components in src/comonents, Checkout.vue and Items.vue:

touch src/components/{Checkout.vue,Items.vue}

The post Optimize the Performance of a Vue App with Async Components appeared first on SitePoint.

An Introduction to Gulp.js

$
0
0
Gulp

Developers spend precious little time coding. Even if we ignore irritating meetings, much of the job involves basic tasks which can sap your working day:

  • generating HTML from templates and content files
  • compressing new and modified images
  • compiling Sass to CSS code
  • removing console and debugger statements from scripts
  • transpiling ES6 to cross-browser–compatible ES5 code
  • code linting and validation
  • concatenating and minifying CSS and JavaScript files
  • deploying files to development, staging and production servers.

Tasks must be repeated every time you make a change. You may start with good intentions, but the most infallible developer will forget to compress an image or two. Over time, pre-production tasks become increasingly arduous and time-consuming; you'll dread the inevitable content and template changes. It's mind-numbing, repetitive work. Wouldn’t it be better to spend your time on more profitable jobs?

If so, you need a task runner or build process.

That Sounds Scarily Complicated!

Creating a build process will take time. It's more complex than performing each task manually, but over the long term, you’ll save hours of effort, reduce human error and save your sanity. Adopt a pragmatic approach:

  • Automate the most frustrating tasks first.
  • Try not to over-complicate your build process. An hour or two is more than enough for the initial setup.
  • Choose task runner software and stick with it for a while. Don't switch to another option on a whim.

Some of the tools and concepts may be new to you, but take a deep breath and concentrate on one thing at a time.

Task Runners: the Options

Build tools such as GNU Make have been available for decades, but web-specific task runners are a relatively new phenomenon. The first to achieve critical mass was Grunt — a Node.js task runner which used plugins controlled (originally) by a JSON configuration file. Grunt was hugely successful, but there were a number of issues:

  1. Grunt required plugins for basic functionality such as file watching.
  2. Grunt plugins often performed multiple tasks, which made customisation more awkward.
  3. JSON configuration could become unwieldy for all but the most basic tasks.
  4. Tasks could run slowly because Grunt saved files between every processing step.

Many issues were addressed in later editions, but Gulp had already arrived and offered a number of improvements:

  1. Features such as file watching were built in.
  2. Gulp plugins were (mostly) designed to do a single job.
  3. Gulp used JavaScript configuration code that was less verbose, easier to read, simpler to modify, and provided better flexibility.
  4. Gulp was faster because it uses Node.js streams to pass data through a series of piped plugins. Files were only written at the end of the task.

Of course, Gulp itself isn't perfect, and new task runners such as Broccoli.js, Brunch and webpack have also been competing for developer attention. More recently, npm itself has been touted as a simpler option. All have their pros and cons, but Gulp remains the favorite and is currently used by more than 40% of web developers.

Gulp requires Node.js, but while some JavaScript knowledge is beneficial, developers from all web programming faiths will find it useful.

What About Gulp 4?

This tutorial describes how to use Gulp 3 — the most recent release version at the time of writing. Gulp 4 has been in development for some time but remains a beta product. It's possible to use or switch to Gulp 4, but I recommend sticking with version 3 until the final release.

Step 1: Install Node.js

Node.js can be downloaded for Windows, macOS and Linux from nodejs.org/download/. There are various options for installing from binaries, package managers and docker images, and full instructions are available.

Note for Windows users: Node.js and Gulp run on Windows, but some plugins may not install or run if they depend on native Linux binaries such as image compression libraries. One option for Windows 10 users is the new bash command-line, which solves many issues.

Once installed, open a command prompt and enter:

node -v

This reveals the version number. You're about to make heavy use of npm — the Node.js package manager which is used to install modules. Examine its version number:

npm -v

Note for Linux users: Node.js modules can be installed globally so they’re available throughout your system. However, most users will not have permission to write to the global directories unless npm commands are prefixed with sudo. There are a number of options to fix npm permissions and tools such as nvm can help, but I often change the default directory. For example, on Ubuntu/Debian-based platforms:

cd ~
mkdir .node_modules_global
npm config set prefix=$HOME/.node_modules_global
npm install npm -g

Then add the following line to the end of ~/.bashrc:

export PATH="$HOME/.node_modules_global/bin:$PATH"

Finally, update with this:

source ~/.bashrc

Step 2: Install Gulp Globally

Install Gulp command-line interface globally so the gulp command can be run from any project folder:

npm install gulp-cli -g

Verify Gulp has installed with this:

gulp -v

Step 3: Configure Your Project

Note for Node.js projects: you can skip this step if you already have a package.json configuration file.

Presume you have a new or pre-existing project in the folder project1. Navigate to this folder and initialize it with npm:

cd project1
npm init

You’ll be asked a series of questions. Enter a value or hit Return to accept defaults. A package.json file will be created on completion which stores your npm configuration settings.

Note for Git users: Node.js installs modules to a node_modules folder. You should add this to your .gitignore file to ensure they’re not committed to your repository. When deploying the project to another PC, you can run npm install to restore them.

For the remainder of this article, we'll presume your project folder contains the following sub-folders:

src folder: preprocessed source files

This contains further sub-folders:

  • html - HTML source files and templates
  • images — the original uncompressed images
  • js — multiple preprocessed script files
  • scss — multiple preprocessed Sass .scss files

build folder: compiled/processed files

Gulp will create files and create sub-folders as necessary:

  • html — compiled static HTML files
  • images — compressed images
  • js — a single concatenated and minified JavaScript file
  • css — a single compiled and minified CSS file

Your project will almost certainly be different but this structure is used for the examples below.

Tip: If you're on a Unix-based system and you just want to follow along with the tutorial, you can recreate the folder structure with the following command:

mkdir -p src/{html,images,js,scss} build/{html,images,js,css}

Step 4: Install Gulp Locally

You can now install Gulp in your project folder using the command:

npm install gulp --save-dev

This installs Gulp as a development dependency and the "devDependencies" section of package.json is updated accordingly. We’ll presume Gulp and all plugins are development dependencies for the remainder of this tutorial.

Alternative Deployment Options

Development dependencies are not installed when the NODE_ENV environment variable is set to production on your operating system. You would normally do this on your live server with the Mac/Linux command:

export NODE_ENV=production

Or on Windows:

set NODE_ENV=production

This tutorial presumes your assets will be compiled to the build folder and committed to your Git repository or uploaded directly to the server. However, it may be preferable to build assets on the live server if you want to change the way they are created. For example, HTML, CSS and JavaScript files are minified on production but not development environments. In that case, use the --save option for Gulp and all plugins, i.e.

npm install gulp --save

This sets Gulp as an application dependency in the "dependencies" section of package.json. It will be installed when you enter npm install and can be run wherever the project is deployed. You can remove the build folder from your repository since the files can be created on any platform when required.

Step 4: Create a Gulp Configuration File

Create a new gulpfile.js configuration file in the root of your project folder. Add some basic code to get started:

// Gulp.js configuration
var
  // modules
  gulp = require('gulp'),

  // development mode?
  devBuild = (process.env.NODE_ENV !== 'production'),

  // folders
  folder = {
    src: 'src/',
    build: 'build/'
  }
;

This references the Gulp module, sets a devBuild variable to true when running in development (or non-production mode) and defines the source and build folder locations.

ES6 note: ES5-compatible JavaScript code is provided in this tutorial. This will work for all versions of Gulp and Node.js with or without the --harmony flag. Most ES6 features are supported in Node 6 and above so feel free to use arrow functions, let, const, etc. if you're using a recent version.

gulpfile.js won't do anything yet because you need to …

Step 5: Create Gulp Tasks

On its own, Gulp does nothing. You must:

  1. install Gulp plugins, and
  2. write tasks which utilize those plugins to do something useful.

It's possible to write your own plugins but, since almost 3,000 are available, it's unlikely you'll ever need to. You can search using Gulp's own directory at gulpjs.com/plugins/, on npmjs.com, or search "gulp something" to harness the mighty power of Google.

Gulp provides three primary task methods:

  • gulp.task — defines a new task with a name, optional array of dependencies and a function.
  • gulp.src — sets the folder where source files are located.
  • gulp.dest — sets the destination folder where build files will be placed.

Any number of plugin calls are set with pipe between the .src and .dest.

The post An Introduction to Gulp.js appeared first on SitePoint.

Viewing all 225 articles
Browse latest View live