The MEAN stack comprises advanced technologies used to develop both the server-side and the client-side of a web application in a JavaScript environment. The components of the MEAN stack include the MongoDB database, Express.js (a web framework), Angular (a front-end framework), and the Node.js runtime environment. Taking control of the MEAN stack and familiarizing different JavaScript technologies during the process will help you in becoming a full-stack JavaScript developer.
JavaScript’s sphere of influence has dramatically grown over the years and with that growth, there’s an ongoing desire to keep up with the latest trends in programming. New technologies have emerged and existing technologies have been rewritten from the ground up (I’m looking at you, Angular).
This tutorial intends to create the MEAN application from scratch and serve as an update to the original MEAN stack tutorial. If you’re familiar with MEAN and want to get started with the coding, you can skip to the overview section.
Introduction to the MEAN Stack
Node.js - Node.js is a server-side runtime environment built on top of Chrome's V8 JavaScript engine. Node.js is based on an event-driven architecture that runs on a single thread and a non-blocking IO. These design choices allow you to build real-time web applications in JavaScript that scale well.
Express.js - Express is a minimalistic yet robust web application framework for Node.js. Express.js uses middleware functions to handle HTTP requests and then either return a response or pass on the parameters to another middleware. Application-level, router-level, and error-handling middlewares are available in Express.js.
MongoDB - MongoDB is a document-oriented database program where the documents are stored in a flexible JSON-like format. Being an NoSQL database program, MongoDB relieves you from the tabular jargon of the relational database.
Angular - Angular is an application framework developed by Google for building interactive Single Page Applications. Angular, originally AngularJS, was rewritten from scratch to shift to a Component-based architecture from the age old MVC framework. Angular recommends the use of TypeScript which, in my opinion, is a good idea because it enhances the development workflow.
Now that we’re acquainted with the pieces of the MEAN puzzle, let’s see how we can fit them together, shall we?
Overview
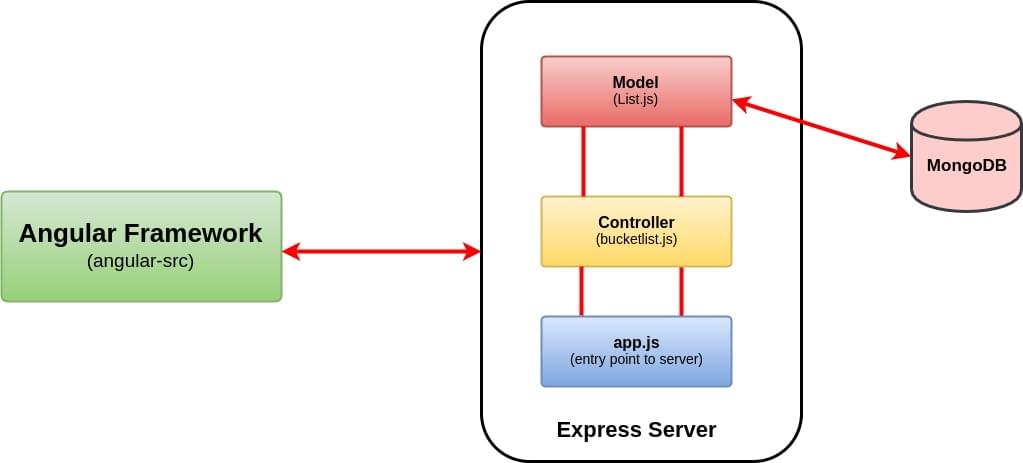
Here’s a high-level overview of our application.
![High-level overview of our MEAN stack application]()
We’ll be building an Awesome Bucket List Application from the ground up without using any boilerplate template. The front end will include a form that accepts your bucket list items and a view that updates and renders the whole bucket list in real time.
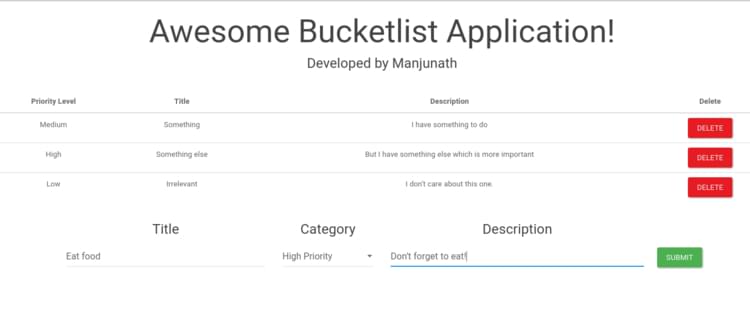
Any update to the view will be interpreted as an event and this will initiate an HTTP request. The server will process the request, update/fetch the MongoDB if necessary, and then return a JSON object. The front end will use this to update our view. By the end of this tutorial, you should have a bucket list application that looks like this.
![Screenshot of the bucket list application that we are going to build]()
The entire code for the Bucket List application is available on GitHub.
Prerequisites
First things first, you need to have Node.js and MongoDB installed to get started. If you’re entirely new to Node, I would recommend reading the Beginner’s Guide to Node to get things rolling. Likewise, setting up MongoDB is easy and you can check out their documentation for installation instructions specific to your platform.
$ node -v
# v8.0.0
Start the mongo daemon service using the command.
sudo service mongod start
To install the latest version of Angular, I would recommend using Angular CLI. It offers everything you need to build and deploy your Angular application. If you’re not familiar with the Angular CLI yet, make sure you check out The Ultimate Angular CLI Reference.
npm install -g @angular/cli
Create a new directory for our bucket list project. That’s where both the front-end and the back-end code will go.
mkdir awesome-bucketlist
cd awesome-bucketlist
Creating the Backend Using Express.js and MongoDB
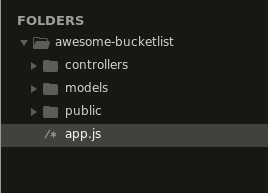
Express doesn’t impose any structural constraints on your web application. You can place the entire application code in a single file and get it to work, theoretically. However, your codebase would be a complete mess. Instead, we’re going to do this the MVC way (Model, View, and Controller)—minus the view part.
MVC is an architectural pattern that separates your models (the back end) and views (the UI) from the controller (everything in between), hence MVC. Since Angular will take care of the front end for us, we’ll have three directories, one for models and another one for controllers, and a public directory where we’ll place the compiled angular code.
In addition to this, we’ll create an app.js file that will serve as the entry point for running the Express server.
![Directory structure of MEAN stack]()
Although using a model and controller architecture to build something trivial like our bucket list application might seem essentially unnecessary, this will be helpful in building apps that are easier to maintain and refactor.
Initializing npm
We’re missing a package.json file for our back end. Type in npm init and, after you’ve answered the questions, you should have a package.json made for you.
We’ll declare our dependencies inside the package.json file. For this project we’ll need the following modules:
- express: Express module for the web server
- mongoose: A popular library for MongoDB
- bodyparser: Parses the body of the incoming requests and makes it available under req.body
- cors: CORS middleware enables cross-origin access control to our web server.
I’ve also added a start script so that we can start our server using npm start.
{
  "name": "awesome-bucketlist",
  "version": "1.0.0",
  "description": "A simple bucketlist app using MEAN stack",
  "main": "app.js",
  "scripts": {
    "start": "node app"
  },

//The ~ is used to match the most recent minor version (without any breaking changes)

 "dependencies": {
    "express": "~4.15.3",
    "mongoose": "~4.11.0",
    "cors": "~2.8.3",
    "body-parser": "~1.17.2"
  },

  "author": "",
  "license": "ISC"
}
Now run npm install and that should take care of installing the dependencies.
Filling in app.js
First, we require all of the dependencies that we installed in the previous step.
// We’ll declare all our dependencies here
const express = require('express');
const path = require('path');
const bodyParser = require('body-parser');
const cors = require('cors');
const mongoose = require('mongoose');
//Initialize our app variable
const app = express();
//Declaring Port
const port = 3000;
As you can see, we’ve also initialized the app variable and declared the port number. The app object gets instantiated on the creation of the Express web server. We can now load middleware into our Express server by specifying them with app.use().
//Middleware for CORS
app.use(cors());

//Middleware for bodyparsing using both json and urlencoding
app.use(bodyParser.urlencoded({extended:true}));
app.use(bodyParser.json());

/*express.static is a built in middleware function to serve static files.
 We are telling express server public folder is the place to look for the static files
*/
app.use(express.static(path.join(__dirname, 'public')));
The app object can understand routes too.
app.get('/', (req,res) => {
    res.send("Invalid page");
})
Here, the get method invoked on the app corresponds to the GET HTTP method. It takes two parameters, the first being the path or route for which the middleware function should be applied.
The second is the actual middleware itself, and it typically takes three arguments: the req argument corresponds to the HTTP Request; the res argument corresponds to the HTTP Response; and next is an optional callback argument that should be invoked if there are other subsequent middlewares that follow this one. We haven’t used next here since the res.send() ends the request–response cycle.
Add this line towards the end to make our app listen to the port that we had declared earlier.
//Listen to port 3000
app.listen(port, () => {
    console.log(`Starting the server at port ${port}`);
});
npm start should get our basic server up and running.
By default, npm doesn’t monitor your files/directories for any changes, and you have to manually restart the server every time you’ve updated your code. I recommend using nodemon to monitor your files and automatically restart the server when any changes are detected. If you don't explicitly state which script to run, nodemon will run the file associated with the main property in your package.json.
npm install -g nodemon
nodemon
We’re nearly done with our app.js file. What’s left to do? We need to
- connect our server to the database
- create a controller, which we can then import to our
app.js.
Setting up mongoose
Setting up and connecting a database is straightforward with MongoDB. First, create a config directory and a file named database.js to store our configuration data. Export the database URI using module.exports.
// 27017 is the default port number.
module.exports = {
    database: 'mongodb://localhost:27017/bucketlist'
}
And establish a connection with the database in app.js using mongoose.connect().
// Connect mongoose to our database
const config = require('./config/database');
mongoose.connect(config.database);
“But what about creating the bucket list database?”, you may ask. The database will be created automatically when you insert a document into a new collection on that database.
Working on the controller and the model
Now let’s move on to create our bucket list controller. Create a bucketlist.jsfile inside the controller directory. We also need to route all the /bucketlist requests to our bucketlist controller (in app.js).
const bucketlist = require('./controllers/bucketlist');

//Routing all HTTP requests to /bucketlist to bucketlist controller
app.use('/bucketlist',bucketlist);
Here’s the final version of our app.js file.
// We’ll declare all our dependencies here
const express = require('express');
const path = require('path');
const bodyParser = require('body-parser');
const cors = require('cors');
const mongoose = require('mongoose');
const config = require('./config/database');
const bucketlist = require('./controllers/bucketlist');
//Connect mongoose to our database
mongoose.connect(config.database);
//Declaring Port
const port = 3000;
//Initialize our app variable
const app = express();
//Middleware for CORS
app.use(cors());
//Middlewares for bodyparsing using both json and urlencoding
app.use(bodyParser.urlencoded({extended:true}));
app.use(bodyParser.json());
/*express.static is a built in middleware function to serve static files.
We are telling express server public folder is the place to look for the static files
*/
app.use(express.static(path.join(__dirname, 'public')));
app.get('/', (req,res) => {
    res.send("Invalid page");
})
//Routing all HTTP requests to /bucketlist to bucketlist controller
app.use('/bucketlist',bucketlist);
//Listen to port 3000
app.listen(port, () => {
    console.log(`Starting the server at port ${port}`);
});
As previously highlighted in the overview, our awesome bucket list app will have routes to handle HTTP requests with GET, POST, and DELETE methods. Here’s a bare-bones controller with routes defined for the GET, POST, and DELETE methods.
//Require the express package and use express.Router()
const express = require('express');
const router = express.Router();

//GET HTTP method to /bucketlist
router.get('/',(req,res) => {
    res.send("GET");
});

//POST HTTP method to /bucketlist

router.post('/', (req,res,next) => {
    res.send("POST");

});

//DELETE HTTP method to /bucketlist. Here, we pass in a params which is the object id.
router.delete('/:id', (req,res,next)=> {
    res.send("DELETE");

})

module.exports = router;
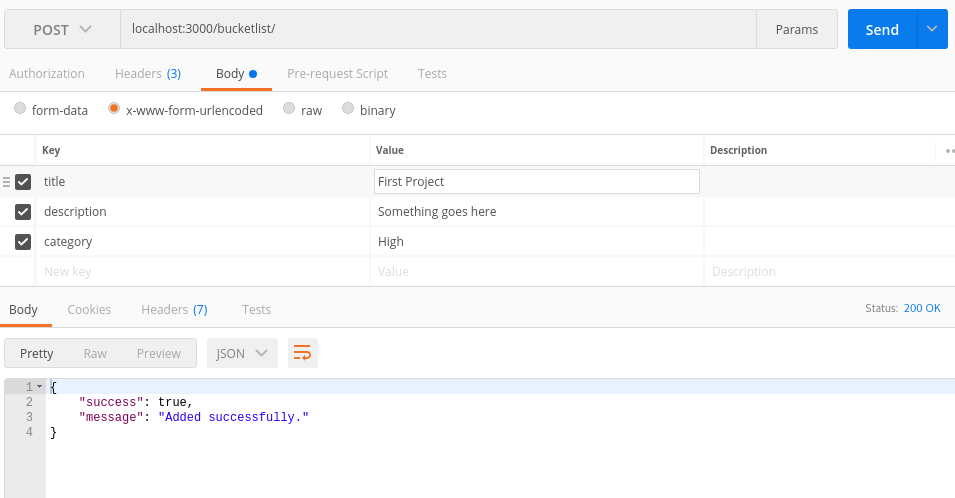
I’d recommend using Postman app or something similar to test your server API. Postman has a powerful GUI platform to make your API development faster and easier. Try a GET request on http://localhost:3000/bucketlist and see whether you get the intended response.
And as obvious as it seems, our application lacks a model. At the moment, our app doesn’t have a mechanism to send data to and retrieve data from our database.
Create a list.js model for our application and define the bucket list Schema as follows:
//Require mongoose package
const mongoose = require('mongoose');

//Define BucketlistSchema with title, description and category
const BucketlistSchema = mongoose.Schema({
    title: {
        type: String,
        required: true
    },
    description: String,
    category: {
        type: String,
        required: true,
        enum: ['High', 'Medium', 'Low']
    }
});
When working with mongoose, you have to first define a Schema. We have defined a BucketlistSchema with three different keys (title, category, and description). Each key and its associated SchemaType defines a property in our MongoDB document. If you’re wondering about the lack of an id field, it's because we’ll be using the default _id that will be created by Mongoose.
Mongoose assigns each of your schemas an _id field by default if one is not passed into the Schema constructor. The type assigned is an ObjectId to coincide with MongoDB's default behavior.
You can read more about it in the Mongoose Documentation
However, to use our Schema definition we need to convert our BucketlistSchema to a model and export it using module.exports. The first argument of mongoose.model is the name of the collection that will be used to store the data in MongoDB.
const BucketList = module.exports = mongoose.model('BucketList', BucketlistSchema );
Apart from the schema, we can also host database queries inside our BucketList model and export them as methods.
//BucketList.find() returns all the lists
module.exports.getAllLists = (callback) => {
    BucketList.find(callback);
}
Here we invoke the BucketList.find method which queries the database and returns the BucketList collection. Since a callback function is used, the result will be passed over to the callback.
Let’s fill in the middleware corresponding to the GET method to see how this fits together.
const bucketlist = require('../models/List');

//GET HTTP method to /bucketlist
router.get('/',(req,res) => {
    bucketlist.getAllLists((err, lists)=> {
        if(err) {
            res.json({success:false, message: `Failed to load all lists. Error: ${err}`});
        }
        else {
            res.write(JSON.stringify({success: true, lists:lists},null,2));
            res.end();

    }
    });
});
We’ve invoked the getAllLists method and the callback takes two arguments, error and result.
All callbacks in Mongoose use the pattern: callback(error, result). If an error occurs executing the query, the error parameter will contain an error document, and result will be null. If the query is successful, the error parameter will be null, and the result will be populated with the results of the query.
-- MongoDB Documentation
Similarly, let’s add the methods for inserting a new list and deleting an existing list from our model.
//newList.save is used to insert the document into MongoDB
module.exports.addList = (newList, callback) => {
    newList.save(callback);
}

//Here we need to pass an id parameter to BUcketList.remove
module.exports.deleteListById = (id, callback) => {
    let query = {_id: id};
    BucketList.remove(query, callback);
}
We now need to update our controller’s middleware for POST and DELETE also.
//POST HTTP method to /bucketlist

router.post('/', (req,res,next) => {
    let newList = new bucketlist({
        title: req.body.title,
        description: req.body.description,
        category: req.body.category
    });
    bucketlist.addList(newList,(err, list) => {
        if(err) {
            res.json({success: false, message: `Failed to create a new list. Error: ${err}`});

        }
        else
            res.json({success:true, message: "Added successfully."});

    });
});

//DELETE HTTP method to /bucketlist. Here, we pass in a param which is the object id.

router.delete('/:id', (req,res,next)=> {
  //access the parameter which is the id of the item to be deleted
    let id = req.params.id;
  //Call the model method deleteListById
    bucketlist.deleteListById(id,(err,list) => {
        if(err) {
            res.json({success:false, message: `Failed to delete the list. Error: ${err}`});
        }
        else if(list) {
            res.json({success:true, message: "Deleted successfully"});
        }
        else
            res.json({success:false});
    })
});
With this, we have a working server API that lets us create, view, and delete the bucket list. You can confirm that everything is working as intended by using Postman.
![POST HTTP request using Postman]()
We’ll now move on to the front end of the application using Angular.
Continue reading %MEAN Stack: Build an App with Angular 2+ and the Angular CLI%


 This article is a practical introduction to using Node.js. We’re going to go over installing Node.js, learn about npm, and then we’re going to build a Node.js module and jump right in to initializing a web server. Feel free to follow along at home as you read!