Quantcast
Channel: Node.js – SitePoint
Viewing all 225 articles
Browse latest View live

WebAssembly Is Overdue: Thoughts on JavaScript for Large Projects

$
0
0

[special]At Auth0, most of our software is developed using JavaScript. We make heavy use of the language both on the front and the back-end.[/special]

In this article, we'll take a look at JavaScript's usefulness as a general purpose language and give a brief run down of its development, from conception to the present day. I'll also interview some senior Auth0 developers on the ups and downs of using JavaScript at scale, and finally look at how WebAssembly has the potential to complete the picture and transform the language into a full-blown development platform.

JavaScript as a General Purpose Language

What may seem obvious to young developers today was not so clear in the past: can JavaScript be considered a general purpose language? I think we can safely agree the answer to this question today is “yes”. But JavaScript is not exactly young: it was born in 1995, more than 20 years ago!

For over 15 years, JavaScript gained little traction outside the web, where it was mainly used for front-end development. Many developers considered JavaScript little more than the necessary tool to realize their dreams of ever more interactive and responsive websites. It should come as no surprise that even today JavaScript has no portable module system across all common browsers (although import/export statements are part of the latest spec). So, in a sense, JavaScript development slowly picked up as more and more developers found ways to expand its use.

Some people would argue that being able to do something does not mean it should be done. When it comes to programming languages, I find this a bit harsh. As developers, we tend to acquire certain tastes and style. Some developers favor classic, procedural languages and some fall in love with the functional paradigm, while others find middle-ground or kitchen-sink languages fit them like a glove. Who’s to say JavaScript, even in its past forms, was not the right tool for them?

A Short Look at JavaScript Progress throughout the Years

JavaScript began its life as a glue language for the web. The creators of Netscape Navigator (a major web browser in the 90s) thought a language that designers and part-time programmers could use would make the web much more dynamic. So in 1995 they brought Brendan Eich on board. Eich's task was to create a Scheme-like language for the browser. If you’re not familiar with Scheme, it’s a very simple language from the Lisp family. As with all Lisps, Scheme has very little syntax, making it easy to pick up.

However, things were not so smooth. At the same time, Sun Microsystems was pushing for Java to become integrated into web browsers. Competition from Microsoft and their own technologies was not helping either. So, JavaScript had to be developed hastily. What’s more, the rise of Java made Netscape want their new language to act as a complement to it.

Eich was forced to come up with a prototype as soon as possible; some claim it was done in a matter of weeks. The result was a dynamic language with syntax similar to Java but with a very different philosophy. For starters, the object model in this new language was entirely different from the Simula-derived Java object model. This initial prototype of a language was known as Mocha, and later as LiveScript.

LiveScript was quickly renamed JavaScript just as it was launched, for marketing reasons. Java was on the rise, and having “Java” in the name could spark additional interest in the language.

This initial release was the first version of JavaScript and a surprising amount of what is known as JavaScript today was available in it. In particular, the object model—prototype based—and many of the functional aspects of the language—semantics of closures, asynchronous nature of the API—were set in stone. Unfortunately, so were many of the quirks resulting from its rushed development.

This version, although powerful in many aspects, was missing notable features that are helpful when developing ever greater systems. Exceptions are one example.

The next few versions of JavaScript were concerned with making it widely available. One of the first steps taken to achieve this was to make it into a standard. Thus a standardization effort began through ECMA, and later through ISO. ECMAScript, which was the name adopted after standardization, was very similar to the first versions of JavaScript included in Netscape Navigator. It was not until ECMAScript 3 or JavaScript 1.5 in 1999 that most of JavaScript as we know and use it today was finalized. This version included exception handling, instanceof, all common control mechanisms (do/while, switch), eval and most built-in functions and objects (Array, Object, etc.).

A dark period began after that for JavaScript. Competing groups had different ideas for JavaScript's development. Some advocated for advanced features such as modules, a kind of static typing, and class-based object-oriented programming. Others thought this was too much. A proposal for ECMAScript 4 was made and implementers started integrating some features in their engines. Unfortunately, the community never settled on which features to include. Microsoft was also working on JScript, an implementation of JavaScript with extensions. As a result, ECMAScript 4 was abandoned.

It was not until 2005 that JavaScript development started to pick up. Refinements to ECMAScript 3 were made. Several other features (let, generators, iterators) were developed outside the standard. The turmoil caused by the failed ECMAScript 4 specification settled and in 2009 it was agreed that the refinements to ECMAScript 3 were to be renamed ECMAScript 5. A path for future development was defined and many of the features proposed for version 4 started being reevaluated.

The current version of the standard, ECMAScript 7 (a.k.a 2016) includes some features that were slated for version 4 such as classes and import/export statements. These features are intended to make JavaScript more palatable for medium and large system development. This was the rationale behind ECMAScript 4 after all. But is JavaScript living up to this promise?

Let's take a look at a not-so-objective rundown of JavaScript features.

Language Features: The Good

Syntactic familiarity

The C family of languages share vast mindshare. C, C++, Java, C# and JavaScript combined probably outnumber all other languages in use. Although it probably is the cause of many of JavaScript quirks, making JavaScript a C-like language in syntax made it simpler for existing developers to pick up. This helps even today, as C-like languages still dominate the development landscape.

An inexperienced developer can easily start writing JavaScript code after taking a look or two at common examples:

function test(a, b, c) {
  a.doStuff(b.property, c);
  return a.property;
}

Asynchronous nature

Perhaps the biggest shock for new developers coming into JavaScript is the way everything is asynchronous by nature. This takes some time getting used to but makes complete sense if you consider how JavaScript was conceived: as a simple way to integrate programmable logic into web-pages. And when it comes to this, two things need to be considered: non-blocking behavior is essential, and shared memory is too complex.

The solution: callbacks and closures.

Continue reading %WebAssembly Is Overdue: Thoughts on JavaScript for Large Projects%


10 Node.js Best Practices: Enlightenment from the Node Gurus

$
0
0

In my previous article 10 Tips to Become a Better Node Developer I introduced 10 Node.js best practices you could apply to your code today. This post continues in that vein with a further 10 best practices to help you take your Node skills to the next level. This is what we're going to cover:

  1. Use npm scripts — Stop writing bash scripts when you can organize them better with npm scripts and Node. E.g., npm run build, start and test. npm scripts are like the single source of truth when Node developers look at a new project.
  2. Use env vars — Utilize process.env.NODE_ENV by setting it to development, or production. Some frameworks will use this variable too, so play by the convention.
  3. Understand the event loopsetImmediate() is not immediate while nextTick() is not next. Use setImmediate() or setTimeout() to offload CPU-intensive tasks to the next event loop cycle.
  4. Use functional inheritance — Avoid getting into mindless debates and a brain-draining trap of debugging and understanding prototypal inheritance or classes by just using functional inheritance like some of the most prolific Node contributors do.
  5. Name things appropriately — Give meaningful names which will serve as a documentation. Also, please no uppercase filenames, use a dash if needed. Uppercase in filenames not just look strange but can cause cross-platform issues.
  6. Consider using CoffeeScript — ES6/7 is pathetic addition which was born out of 6 years of meetings when we already had a better JavaScript called CoffeeScript. Use it if you want ship code faster and stop wasting time debating var/const/let, semi-colons, class and other arguments.
  7. Provide native code — When using transpilers, commit native JS code (result of the builds) so your projects can run without the builds
  8. Use gzip — Duh! npm i compression -S and sane logging — not too much not to little depending on the environment. npm i morgan -S
  9. Scale up — Start thinking about clustering and having stateless services from day one of your Node development. Use pm2 or strongloop's cluster control
  10. Cache requests — Get maximum juice out of your Node servers by hiding them behind a static file server such as nginx and/or request level cache like Varnish Cache and CDN caching.

So let's bisect and take a look at each one of them individually. Shall we?

Use npm Scripts

It's almost a standard now to create npm scripts for builds, tests, and most importantly to start the app. This is the first place Node developers look at when they encounter a new Node project. Some people (1, 2, 3, 4) have even ditched Grunt, Gulp and the likes for the more low-level but more dependable npm script. I can totally understand their argument. Considering that npm scripts have pre and post hooks, you can get to a very sophisticated level of automation:

"scripts": {
  "preinstall": "node prepare.js",
  "postintall": "node clean.js",
  "build": "webpack",
  "postbuild": "node index.js",
   "postversion": "npm publish"
}

Often times when developing for the front-end, you want to run two or more watch processes to re-build your code. For example, one for webpack and another for nodemon. You can do this with && since the first command won't release the prompt. However, there's a handy module called concurrently which can spawn multiple processes and run them at the same time.

Also, install dev command line tools such as webpack, nodemon, gulp, Mocha, etc. locally to avoid conflicts. You can point to ./node_modules/.bin/mocha for example or add this line to your bash/zsh profile (PATH!):

export PATH="./node_modules/.bin:$PATH"

Use Env Vars

Utilize environment variables even for the early stages of a project to ensure there's no leakage of sensitive info, and just to build the code properly from the beginning. Moreover, some libraries and frameworks (I know Express does it for sure) will pull in info like NODE_ENV to modify their behavior. Set it to production. Set your MONGO_URI and API_KEY values as well. You can create a shell file (e.g. start.sh) and add it to .gitignore:

NODE_ENV=production MONGO_URL=mongo://localhost:27017/accounts API_KEY=lolz nodemon index.js

Nodemon also has a config file where you can put your env vars (example):

{
  "env": {
    "NODE_ENV": "production",
    "MONGO_URL": "mongo://localhost:27017/accounts"
  }
}

Continue reading %10 Node.js Best Practices: Enlightenment from the Node Gurus%

An Introduction to Gulp.js

$
0
0

Developers spend precious little time coding. Even if we ignore irritating meetings, much of the job involves basic tasks which can sap your working day:

  • generating HTML from templates and content files
  • compressing new and modified images
  • compiling Sass to CSS code
  • removing console and debugger statements from scripts
  • transpiling ES6 to cross-browser-compatible ES5 code
  • code linting and validation
  • concatenating and minifying CSS and JavaScript files
  • deploying files to development, staging and production servers

Tasks must be repeated every time you make a change. You may start with good intentions but the most infallible developer will forget to compress an image or two. Over time, pre-production tasks become increasingly arduous and time-consuming; you'll dread the inevitable content and template changes. It's mind-numbing, repetitive work. Would it be better to spend your time on more profitable jobs?

If so, you need a task runner or build process.

That Sounds Scarily Complicated!

Creating a build process will take time. It's more complex than performing each task manually but, over the long-term, you will save hours of effort, reduce human error and save your sanity. Adopt a pragmatic approach:

  • automate the most frustrating tasks first
  • try not to over-complicate your build process; an hour or two is more than enough for the initial set-up
  • choose task runner software and stick with it for a while. Don't switch to another option on a whim.

Some of the tools and concepts may be new to you but take a deep breath and concentrate on one thing at a time.

Task Runners: the Options

Build tools such as GNU Make have been available for decades but web-specific task runners are a relatively new phenomenon. The first to achieve critical mass was Grunt - a Node.js task runner which used plug-ins controlled (originally) by a JSON configuration file. Grunt was hugely successful but there were a number of issues:

  1. Grunt required plug-ins for basic functionality such as file watching.
  2. Grunt plug-ins often performed multiple tasks which made customisation more awkward.
  3. JSON configuration could become unwieldy for all but the most basic tasks.
  4. Tasks could run slowly because Grunt saved files between every processing step.

Many issues were addressed in later editions but Gulp had already arrived and offered a number of improvements:

  1. Features such as file watching were built-in.
  2. Gulp plug-ins were (mostly) designed to do a single job.
  3. Gulp used JavaScript configuration code which was less verbose, easier to read, simpler to modify, and provided better flexibility.
  4. Gulp was faster because it uses Node.js streams to pass data through a series of piped plug-ins. Files were only written at the end of the task.

Of course, Gulp itself isn't perfect and new task runners such as Broccoli.js, Brunch and webpack have also been competing for developer attention. More recently, npm itself has been touted as a simpler option. All have their pros and cons, but Gulp remains the favorite and is currently used by more than 40% of web developers.

Gulp requires Node.js but, while some JavaScript knowledge is beneficial, developers from all web programming faiths will find it useful.

What About Gulp 4?

This tutorial describes how to use Gulp 3 - the most recent release version at the time of writing. Gulp 4 has been in development for some time but remains a beta product. It's possible to use or switch to Gulp 4 but I recommend sticking with version 3 until the final release.

Step 1: Install Node.js

Node.js can be downloaded for Windows, Mac and Linux from nodejs.org/download/. There are various options for installing from binaries, package managers and docker images - full instructions are available.

Note for Windows users: Node.js and Gulp run on Windows but some plug-ins may not install or run if they depend on native Linux binaries such as image compression libraries. One option for Windows 10 users is the new bash command-line; this solves many issues but is a beta product and could introduce alternative problems.

Once installed, open a command prompt and enter:

node -v

to reveal the version number. You're about to make heavy use of npm - the Node.js package manager which is used to install modules. Examine its version number:

npm -v

Note for Linux users: Node.js modules can be installed globally so they are available throughout your system. However, most users will not have permission to write to the global directories unless npm commands are prefixed with sudo. There are a number of options to fix npm permissions and tools such as nvm can help but I often change the default directory, e.g. on Ubuntu/Debian-based platforms:

cd ~
mkdir .node_modules_global
npm config set prefix=$HOME/.node_modules_global
npm install npm -g

Then add the following line to the end of ~/.bashrc:

export PATH="$HOME/.node_modules_global/bin:$PATH"

and update with:

source ~/.bashrc

Step 2: Install Gulp Globally

Install Gulp command-line interface globally so the gulp command can be run from any project folder:

npm install gulp-cli -g

Verify Gulp has installed with:

gulp -v

Step 3: Configure Your Project

Note for Node.js projects: you can skip this step if you already have a package.json configuration file.

Presume you have a new or pre-existing project in the folder project1. Navigate to this folder and initialize it with npm:

cd project1
npm init

You will be asked a series of questions - enter a value or hit Return to accept defaults. A package.json file will be created on completion which stores your npm configuration settings.

Note for Git users: Node.js installs modules to a node_modules folder. You should add this to your .gitignore file to ensure they are not committed to your repository. When deploying the project to another PC, you can run npm install to restore them.

For the remainder of this article we'll presume your project folder contains the following sub-folders:

src folder: pre-processed source files

This contains further sub-folders:

  • html - HTML source files and templates
  • images — the original uncompressed images
  • js — multiple pre-processed script files
  • scss — multiple pre-processed Sass .scss files

build folder: compiled/processed files

Gulp will create files and create sub-folders as necessary:

  • html - compiled static HTML files
  • images — compressed images
  • js — a single concatenated and minified JavaScript file
  • css — a single compiled and minified CSS file

Your project will almost certainly be different but this structure is used for the examples below.

Tip: If you're on a Unix-based system and you just want to follow along with the tutorial, you can recreate the folder structure with the following command:

mkdir -p src/{html,images,js,scss} build/{html,images,js,css}

Step 4: Install Gulp Locally

You can now install Gulp in your project folder using the command:

npm install gulp --save-dev

This installs Gulp as a development dependency and the "devDependencies" section of package.json is updated accordingly. We will presume Gulp and all plug-ins are development dependencies for the remainder of this tutorial.

Alternative Deployment Options

Development dependencies are not installed when the NODE_ENV environment variable is set to production on your operating system. You would normally do this on your live server with the Mac/Linux command:

export NODE_ENV=production

Or on Windows:

set NODE_ENV=production

This tutorial presumes your assets will be compiled to the build folder and committed to your Git repository or uploaded directly to the server. However, it may be preferable to build assets on the live server if you want to change the way they are created, e.g. HTML, CSS and JavaScript files are minified on production but not development environments. In that case, use the --save option for Gulp and all plug-ins, i.e.

npm install gulp --save

This sets Gulp as an application dependency in the "dependencies" section of package.json. It will be installed when you enter npm install and can be run wherever the project is deployed. You can remove the build folder from your repository since the files can be created on any platform when required.

Step 4: Create a Gulp Configuration File

Create a new gulpfile.js configuration file in the root of your project folder. Add some basic code to get started:

// Gulp.js configuration
var
  // modules
  gulp = require('gulp'),

  // development mode?
  devBuild = (process.env.NODE_ENV !== 'production'),

  // folders
  folder = {
    src: 'src/',
    build: 'build/'
  }
;

This references the Gulp module, sets a devBuild variable to true when running in development (or non-production mode) and defines the source and build folder locations.

ES6 note: ES5-compatible JavaScript code is provided in this tutorial. This will work for all versions of Gulp and Node.js with or without the --harmony flag. Most ES6 features are supported in Node 6 and above so feel free to use arrow functions, let, const, etc. if you're using a recent version.

gulpfile.js won't do anything yet because you need to...

Step 5: Create Gulp Tasks

On it's own, Gulp does nothing. You must:

Continue reading %An Introduction to Gulp.js%

Introducing: Chatbots with Our First Mini Course

$
0
0

Most of you who visit SitePoint are on a quest to learn. When we run into a problem, we quickly search for a solution. If we’re not familiar enough with a web topic, or want to expand our knowledge in a particular skill set or tool, we look for quick lessons to teach us more. We’re always researching.

With increasing time constraints, it can be hard finding time to work/study, eat, socialize, and sleep. There’s no wonder we tend to put our bookmarked 2-6 hour course on the backburner. We get it.

That’s why we’re happy to introduce Mini Courses, it’s a shorter course especially made for your quick breaks.

What Makes Mini Courses Different from Courses?

Apart from it being shorter, you’ll also notice that mini-courses are a lot more focused, and really explore a topic, skipping the fundamental basics of web development.

Continue reading %Introducing: Chatbots with Our First Mini Course%

Building a Facebook Chat Bot with Node and Heroku

$
0
0

A man and his Facebook chat bot, sat on the sofa watching Metropolis on a large TV

At last year's f8 conference, Facebook launched the Messenger Platform, giving developers the ability to create bots that could have a conversation with people on Messenger or from a Facebook Page. With bots, app owners can better engage with their users by providing personalized and interactive communication that can scale for the masses. Since the launch, businesses and app owners have shown great interest in the chat bots. Just three months after the announcement, there was an estimated 11,000 bots built on the platform.

Businesses and app owners aren't the only ones benefiting from chatbots. Users of these bots can enjoy a myriad of services such as:

The current interest in and appeal of chatbots is obvious and as the technology in artificial intelligence improves, the bots will get better at interacting with users.

In this article, we'll look at how to create a Facebook chat bot that can interact with users via Messenger on behalf of a Facebook Page. We'll build a bot that gives the user different details regarding a movie that they specified.

Do I Need to Know AI to Build a Bot?

Being skilled in AI will certainly help, especially in building sophisticated bots, but is not required. You can certainly build a bot without knowing machine learning.

There are two types of bots you can build. One is based on a set of rules and the other uses machine learning. The former is limited in the interactions it can offer. It can only respond to specific commands. This is the type of bot we'll be building.

With bots that use machine learning, you get better interaction with the user. The user can interact with the bot in a more natural way as they would in a human to human interaction, as opposed to just using commands. The bot also gets smarter as it learns from the conversations it has with people. We'll leave building this type of bot for a future article. Machine learning knowledge will not be necessary, though. Lucky for us, there are services such as wit.ai and Api.ai that enable developers to integrate machine learning (specifically Natural Language Processing - NLP) into their apps.

Getting Started

You can download the code for the completed demo app here.

For your chat bot to communicate with Facebook users, we'll need to set up a server that will receive, process and send back messages. The server will make use of the Facebook Graph API for this. The Graph API is the primary way to get data in and out of Facebook's platform. The server must have an endpoint URL that is accessible from Facebook's servers, therefore deploying the web application on your local machine won't work, you have to put it online. Also, as of version 2.5 of the Graph API, new subscriptions to the service have to use a secure HTTPS callback URL. In the tutorial, we'll deploy the app to Heroku as all default appname.herokuapp.com domains are already SSL-enabled. We'll use Node.js to build the web application.

To get started, first make sure Node is installed on your computer. You can check this by typing node -v in the Terminal. If installed, it will output the version number. Then install the Heroku Command Line Interface (CLI). We'll use this later to push the app to Heroku. Use heroku --version to verify that the CLI is installed.

Create the project directory and initialize a package.json file with the following commands.

$ mkdir spbot
$ cd spbot
$ npm init

Follow the prompts to set your preferences for the project.

After the package.json file has been generated, open it and add a start property to the scripts object. This lets Heroku know what command to execute to start the app. During project setup, I defined app.js as the entry point of the app, thus I'm using node app.js as the value of start. Change this according to your project's settings.

{
  "name": "spbot",
  "version": "1.0.0",
  "description": "SPBot Server",
  "main": "app.js",
  "scripts": {
    "test": "echo \"Error: no test specified\" && exit 1",
    "start": "node app.js"
  },
  "author": "Joyce Echessa",
  "license": "ISC"
}

Install the following Node packages.

$ npm install express request body-parser mongoose --save

Create a .gitignore file in your project's root directory and include the node_modules folder, to prevent it from being committed.

node_modules

In your project's root directory, create a file labeled app.js (or index.js, if you went with the default name). Modify it as shown:

var express = require("express");
var request = require("request");
var bodyParser = require("body-parser");

var app = express();
app.use(bodyParser.urlencoded({extended: false}));
app.use(bodyParser.json());
app.listen((process.env.PORT || 5000));

// Server index page
app.get("/", function (req, res) {
  res.send("Deployed!");
});

// Facebook Webhook
// Used for verification
app.get("/webhook", function (req, res) {
  if (req.query["hub.verify_token"] === "this_is_my_token") {
    console.log("Verified webhook");
    res.status(200).send(req.query["hub.challenge"]);
  } else {
    console.error("Verification failed. The tokens do not match.");
    res.sendStatus(403);
  }
});

The first GET handler will be for our own testing - to know if the app has been successfully deployed. The second GET handler is the endpoint that Facebook will use to verify the app. The code should look for the verify_token and respond with the challenge sent in the verification request.

You can paste your own token into the code. Such data is best saved in an environment variable, which we'll do shortly after we create a project on Heroku.

Deploying to Heroku

For the Facebook platform to connect with our backend application, we first need to put it online.

Create a Git repository and commit the project's files with the following commands:

$ git init
$ git add .
$ git commit -m "Initial commit"

Register for a free Heroku account if you don't already have one.

From your terminal, login to Heroku and create an application.

$ heroku login
$ heroku create
$ git push heroku master
$ heroku open

On running the heroku open command, the link to the running app will be opened in your default browser. If everything went well, you will get a page with the text Deployed! on it.

Creating Environment Variables

Before we continue, let's create an environment variable on Heroku to hold the app's Verify Token.

Open your Heroku Dashboard and select the app that you just deployed. Go to the app's Settings and click on the Reveal Config Vars button. Enter VERIFICATION_TOKEN as the Key and your token as the Value and click Add.

Create Heroku Config Var

In your code, modify your token string ("this_is_my_token") to process.env.VERIFICATION_TOKEN. Commit your changes and push them to Heroku.

Create a Facebook Page and App

With the server up and running, we'll now create a Facebook app and the Page it will be associated with. You can create a new Page or use an existing one.

To create a Facebook Page, log in to Facebook and head over to Create a Page. Select a Page Type from the given options. I chose Entertainment.

Screenshot of the Create a Page options, showing the six different types of page

Then select a Category and Name for the Page.

Screenshot of the dropdown menu prompting for a category and page name

Ater clicking on Get Started, the Page will be created and you will be asked for more details regarding your app (description, website, profile picture, target audience, e.t.c). You can skip these setup steps for now.

screenshot of the newly created Facebook page

To create a Facebook App, head over to the Add a New App page and click on the basic setup link below the other platform choices.

Screenshot of the 'Add a New App' page, prompting to select a platform

Fill in the necessary details. Select Apps for Pages as the Category.

Screenshot of the 'Create a New App ID' form

On clicking Create App ID, the app's dashboard will be opened.

Screenshot of the App Dashboard

From the Product Setup on the right, click on Get Started in the Messenger section. You will then be taken to the Messenger Settings page shown below.

Screenshot of the Facebook Messenger Settings page

To receive messages and other events sent by Messenger users, the app should enable webhooks integration. We'll do this next. Webhooks (formerly Real Time Updates) let you subscribe to changes you want to track and receive updates in real time without having to call the API.

In the Webhooks section, click Setup Webhooks

Enter a callback URL where the updates will be sent (the endpoint URL defined in the backend app i.e. <your-app-url>/webhook), enter a Verify Token (the token used in the backend app, i.e. the value stored in process.env.VERIFICATION_TOKEN) and check all the checkboxes. These specify which events the app will be subscribed to. We'll see what these do a little later on.

Webhook Settings

On successfully enabling webhooks, you should see Complete in the Webhooks section and a list of the events subscribed to. If you get an error, make sure you have entered the correct URL for the webhook endpoint (ending with /webhook) and also make sure the token used here is the same one you used in the Node app.

Continue reading %Building a Facebook Chat Bot with Node and Heroku%

Building a Microblog Using Node.js, Git and Markdown

$
0
0

A writer asleep on her desk, surrounded by components of her microblog

The word micro gets thrown around a lot in modern programming: micro-frameworks, micro-services, etc. To me, this means solving the problem at hand with no bloat. All while solving for a clean-cut single concern. This means focusing on the problem at hand and cutting unnecessary dependencies.

I feel Node follows the Goldilocks principle when it comes to the web. The set of APIs you get from low-level libraries is useful for building micro websites. These APIs are not too complex, nor too simple, but just right for building web solutions.

In this article, let’s explore building a microblog with Node, Git, and a few dependencies. The purpose of this app will be to serve static content from files committed to a repository. You will learn how to build and test an app, and gain insight into the process of delivering a solution. By the end, you will have a minimalist working blog app that you can build on.

The Main Ingredients for a Microblog

To build an awesome blog, first, you need a few ingredients:

  • A library to send HTTP messages
  • A repository to store blog posts
  • A unit test runner or library
  • A Markdown parser

To send an HTTP message, I choose Node, as this gives me just what I need to send a hypertext message from a server. The two modules of particular interest are http and fs.

The http module will create a Node HTTP server. The fs module will read a file. Node has the library to build a micro-blog using HTTP.

To store a repository of blog posts, I’ll pick Git instead of a full-fledged database. The reason for this, Git is already a repository of text documents with version control. This is just what I need to store blog post data. Freedom from adding a database as a dependency frees me from coding for a ton of problems.

I choose to store blog posts in Markdown format and parse them using marked. This gives me freedom towards the progressive enhancement of raw content if I decide to do this later. Markdown is a nice, lightweight alternative to plain HTML.

For unit tests, I choose the excellent test runner called roast.it. I’ll pick this alternative because it has no dependencies and solves my unit test needs. You could pick another test runner like taper, but it has about eight dependencies. What I like about roast.it is that it has no dependencies.

With this list of ingredients, I have all the dependencies I need to build a micro-blog.

Picking dependencies is not a trivial matter. I think the key is anything that is outside the immediate problem can become a dependency. For example, I am not building a test runner nor a data repository, so that gets appended to the list. Any given dependency must not swallow the solution and hold the code hostage. So, it makes sense to pick out lightweight components only.

This article assumes some familiarity with Node, npm and Git, as well as with various testing methodologies. I won't walk through every step involved in building the micro-blog, rather I'll focus on and discuss specific areas of the code. If you'd like to follow along at home, the code is up on GitHub and you can try out each code snippet as it’s shown.

Testing

Testing gives you confidence in your code and tightens the feedback loop. A feedback loop in programming is the time it takes between writing any new code and running it. In any web solution, this means jumping through many layers to get any feedback. For example, a browser, a web server, and even a database. As complexity increases, this can mean minutes or even an hour to get feedback. With unit tests, we drop those layers and get fast feedback. This keeps the focus on the problem at hand.

I like to start any solution by writing a quick unit test. This gets me in the mindset of writing tests for any new code. This is how you'd get up and running with roast.it.

Inside the package.json file, add:

"scripts": {
  "test": "node test/test.js"
},
"devDependencies": {
  "roast.it": "1.0.4"
}

The test.js file is where you bring in all unit tests and run them. For example, one can do:

var roast = require('roast.it');

roast.it('Is array empty', function isArrayEmpty() {
  var mock = [];

  return mock.length === 0;
});

roast.run();
roast.exit();

To run the test do npm install && npm test. What makes me happy is I no longer need to jump through hoops to test new code. This is what testing is all about: a happy coder gaining confidence and staying focused on the solution.

As you can see, the test runner expects a call to roast.it(strNameOfTest, callbackWithTest). The return at the end of each test must resolve to true for the test to pass. In a real-world app, you wouldn’t want to write all tests in a single file. To get around this, you can require unit tests in Node and put them in a different file. If you have a look at test.js in the micro-blog, you'll see this is exactly what I have done.

Tip: you run the tests using npm run test. This can be abbreviated to npm test or even npm t.

The Skeleton

The micro-blog will respond to client requests using Node. One effective way of doing this is through the http.CreateServer() Node API. This can be seen in the following excerpt from app.js:

/* app.js */
var http = require('http');
var port = process.env.port || 1337;

var app = http.createServer(function requestListener(req, res) {
  res.writeHead(200, { 'Content-Type': 'text/plain; charset=utf-8'});
  res.end('A simple micro blog website with no frills nor nonsense.');
});

app.listen(port);

console.log('Listening on http://localhost:' + port);

Run this via an npm script in package.json:

"scripts": {
  "start": "node app.js"
}

Now, http://localhost:1337/ becomes the default route and responds with a message back to the client. The idea is to add more routes that return other responses, like responding with blog post content.

Folder Structure

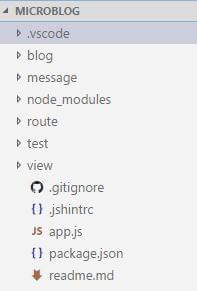
To frame the structure of the app, I’ve decided on these main sections:

The Micro-Blog Skeleton

I’ll use these folders to organize the code. Here's an overview of what each folder is for:

Continue reading %Building a Microblog Using Node.js, Git and Markdown%

How to Build and Structure a Node.js MVC Application

$
0
0

Inside the monitor a puppet manipulates on-screen windows and popups, controlling a Node.js MVC application.

[special]In a non-trivial application, the architecture is as important as the quality of the code itself. We can have well-written pieces of code, but if we don’t have a good organization, we will have a hard time as the complexity increases. There is no need to wait until the project is half-way done to start thinking about the architecture; the best time is before starting, using our goals as beacons for our choices.[/special]

Node.js doesn't have a de facto framework with strong opinions on architecture and code organization in the same way that Ruby has the Rails framework, for example. As such, it can be difficult to get started with building full web applications with Node.

In this article, we are going to build the basic functionality of a note-taking app using the MVC architecture. To accomplish this we are going to employ the Hapi.js framework for Node.js and SQLite as a database, using Sequelize.js, plus other small utilities to speed up our development. We are going to build the views using Pug, the templating language.

What is MVC?

Model-View-Controller (or MVC) is probably one of the most popular architectures for applications. As with a lot of other cool things in computer history, the MVC model was conceived at PARC for the Smalltalk language as a solution to the problem of organizing applications with graphical user interfaces. It was created for desktop applications, but since then, the idea has been adapted to other mediums including the web.

We can describe the MVC architecture in simple words:

Model: The part of our application that will deal with the database or any data-related functionality.

View: Everything the user will see. Basically the pages that we are going to send to the client.

Controller: The logic of our site, and the glue between models and views. Here we call our models to get the data, then we put that data on our views to be sent to the users.

Our application will allow us to publish, see, edit and delete plain-text notes. It won’t have other functionality, but because we will have a solid architecture already defined we won’t have big trouble adding things later.

You can check out the final application in the accompanying GitHub repository, so you get a general overview of the application structure.

Laying out the Foundation

The first step when building any Node.js application is to create a package.json file, which is going to contain all of our dependencies and scripts. Instead of creating this file manually, NPM can do the job for us using the init command:

npm init -y

After the process is complete will get a package.json file ready to use.

Note: If you're not familiar with these commands, checkout our Beginner's Guide to npm.

We are going to proceed to install Hapi.js—the framework of choice for this tutorial. It provides a good balance between simplicity, stability and feature availability that will work well for our use case (although there are other options that would also work just fine).

npm install --save hapi hoek

This command will download the latest version of Hapi.js and add it to our package.json file as a dependency. It will also download the Hoek utility library that will help us write shorter error handlers, among other things.

Now we can create our entry file; the web server that will start everything. Go ahead and create a server.js file in your application directory and all the following code to it:

'use strict';

const Hapi = require('hapi');
const Hoek = require('hoek');
const Settings = require('./settings');

const server = new Hapi.Server();
server.connection({ port: Settings.port });

server.route({
  method: 'GET',
  path: '/',
  handler: (request, reply) => {
    reply('Hello, world!');
  }
});

server.start((err) => {
  Hoek.assert(!err, err);

  console.log(`Server running at: ${server.info.uri}`);
});

This is going to be the foundation of our application.

First, we indicate that we are going to use strict mode, which is a common practice when using the Hapi.js framework.

Next, we include our dependencies and instantiate a new server object where we set the connection port to 3000 (the port can be any number above 1023 and below 65535.)

Our first route for our server will work as a test to see if everything is working, so a 'Hello, world!' message is enough for us. In each route, we have to define the HTTP method and path (URL) that it will respond to, and a handler, which is a function that will process the HTTP request. The handler function can take two arguments: request and reply. The first one contains information about the HTTP call, and the second will provide us with methods to handle our response to that call.

Finally, we start our server with the server.start method. As you can see, we can use Hoek to improve our error handling, making it shorter. This is completely optional, so feel free to omit it in your code, just be sure to handle any errors.

Storing Our Settings

It is good practice to store our configuration variables in a dedicated file. This file exports a JSON object containing our data, where each key is assigned from an environment variable—but without forgetting a fallback value.

In this file, we can also have different settings depending on our environment (e.g. development or production). For example, we can have an in-memory instance of SQLite for development purposes, but a real SQLite database file on production.

Selecting the settings depending on the current environment is quite simple. Since we also have an env variable in our file which will contain either development or production, we can do something like the following to get the database settings (for example):

const dbSettings = Settings[Settings.env].db;

So dbSettings will contain the setting of an in-memory database when the env variable is development, or will contain the path of a database file when the env variable is production.

Also, we can add support for a .env file, where we can store our environment variables locally for development purposes; this is accomplished using a package like dotenv for Node.js, which will read a .env file from the root of our project and automatically add the found values to the environment. You can find an example in the dotenv repository.

Note: If you decide to also use a .env file, make sure you install the package with npm install -s dotenv and add it to .gitignore so you don’t publish any sensitive information.

Our settings.js file will look like this:

// This will load our .env file and add the values to process.env,
// IMPORTANT: Omit this line if you don't want to use this functionality
require('dotenv').config({silent: true});

module.exports = {
  port: process.env.PORT || 3000,
  env: process.env.ENV || 'development',

  // Environment-dependent settings
  development: {
    db: {
      dialect: 'sqlite',
      storage: ':memory:'
    }
  },
  production: {
    db: {
      dialect: 'sqlite',
      storage: 'db/database.sqlite'
    }
  }
};

Now we can start our application by executing the following command and navigating to localhost:3000 in our web browser.

node server.js

Note: This project was tested on Node v6. If you get any errors, ensure you have an updated installation.

Defining the Routes

The definition of routes gives us an overview of the functionality supported by our application. To create our additional routes, we just have to replicate the structure of the route that we already have in our server.js file, changing the content of each one.

Let’s start by creating a new directory called lib in our project. Here we are going to include all the JS components. Inside lib, let’s create a routes.js file and add the following content:

'use strict';

module.exports = [
  // We are going to define our routes here
];

In this file, we will export an array of objects that contain each route of our application. To define the first route, add the following object to the array:

{
  method: 'GET',
  path: '/',
  handler: (request, reply) => {
    reply('All the notes will appear here');
  },
  config: {
    description: 'Gets all the notes available'
  }
},

Our first route is for the home page (/) and since it will only return information we assign it a GET method. For now, it will only give us the message All the notes will appear here, which we are going to change later for a controller function. The description field in the config section is only for documentation purposes.

Then, we create the four routes for our notes under the /note/ path. Since we are building a CRUD application, we will need one route for each action with the corresponding HTTP method.

Add the following definitions next to the previous route:

{
  method: 'POST',
  path: '/note',
  handler: (request, reply) => {
    reply('New note');
  },
  config: {
    description: 'Adds a new note'
  }
},
{
  method: 'GET',
  path: '/note/{slug}',
  handler: (request, reply) => {
    reply('This is a note');
  },
  config: {
    description: 'Gets the content of a note'
  }
},
{
  method: 'PUT',
  path: '/note/{slug}',
  handler: (request, reply) => {
    reply('Edit a note');
  },
  config: {
    description: 'Updates the selected note'
  }
},
{
  method: 'GET',
  path: '/note/{slug}/delete',
  handler: (request, reply) => {
    reply('This note no longer exists');
  },
  config: {
    description: 'Deletes the selected note'
  }
},

We have done the same as in the previous route definition, but this time we have changed the method to match the action we want to execute.

The only exception is the delete route. In this case, we are going to define it with the GET method rather than DELETE and add an extra /delete in the path. This way, we can call the delete action just by visiting the corresponding URL.

Continue reading %How to Build and Structure a Node.js MVC Application%

Debugging JavaScript with the Node Debugger

$
0
0

It’s a trap! You’ve spent a good amount of time making changes, nothing works. Perusing through the code shows no signs of errors. You go over the logic once, twice or thrice, and run it a few times more. Even unit tests can’t save you now, they too are failing. This feels like staring at an empty void without knowing what to do. You feel alone, in the dark, and starting to get pretty angry.

A natural response is to throw code quality out and litter everything that gets in the way. This means sprinkling a few print lines here and there and hope something works. This is shooting in pitch black and you know there isn’t much hope.

You think the darkness is your ally

Does this sound all too familiar? If you’ve ever written more than a few lines of JavaScript, you may have experienced this darkness. There will come a time when a scary program will leave you in an empty void. At some point, it is not smart to face peril alone with primitive tools and techniques. If you are not careful, you’ll find yourself wasting hours to identify trivial bugs.

The better approach is to equip yourself with good tooling. A good debugger shortens the feedback loop and makes you more effective. The good news is Node has a very good one out of the box. The Node debugger is versatile and works with any chunk of JavaScript.

Below are strategies that have saved me from wasting valuable time in JavaScript.

The Node CLI Debugger

The Node debugger command line is a useful tool. If you are ever in a bind and can’t access a fancy editor, for any reason, this will help. The tooling uses a TCP-based protocol to debug with the debugging client. The command line client accesses the process via a port and gives you a debugging session.

You run the tool with node debug myScript.js, notice the debug flag between the two. Here are a few commands I find you must memorize:

  • sb('myScript.js', 1) set a breakpoint on first line of your script
  • c continue the paused process until you hit a breakpoint
  • repl open the debugger’s Read-Eval-Print-Loop (REPL) for evaluation

Don’t Mind the Entry Point

When you set the initial breakpoint, one tip is that it's not necessary to set it at the entry point. Say myScript.js, for example, requires myOtherScript.js. The tool lets you set a breakpoint in myOtherScript.js although it is not the entry point.

For example:

// myScript.js
var otherScript = require('./myOtherScript');

var aDuck = otherScript();

Say that other script does:

// myOtherScript.js
module.exports = function myOtherScript() {
  var dabbler = {
    name: 'Dabbler',
    attributes: [
      { inSeaWater: false },
      { canDive: false }
    ]
  };

  return dabbler;
};

If myScript.js is the entry point, don’t worry. You can still set a breakpoint like this, for example, sb('myOtherScript.js', 10). The debugger does not care that the other module is not the entry point. Ignore the warning, if you see one, as long as the breakpoint is set right. The Node debugger may complain that the module hasn’t loaded yet.

Time for a Demo of Ducks

Time for a demo! Say you want to debug the following program:

function getAllDucks() {
  var ducks = { types: [
    {
      name: 'Dabbler',
      attributes: [
        { inSeaWater: false },
        { canDive: false }
      ]
    },
    {
      name: 'Eider',
      attributes: [
        { inSeaWater: true },
        { canDive: true }
      ]
    } ] };

  return ducks;
}

getAllDucks();

Using the CLI tooling, this is how you'd do a debugging session:

> node debug debuggingFun.js
> sb(18)
> c
> repl

Continue reading %Debugging JavaScript with the Node Debugger%


Easily Migrate Your Existing Users to Auth0

$
0
0

User migration is a dreaded, sometimes unavoidable task that is difficult for developers, inconvenient for users, and expensive for business owners. The need for migrating users from one service or platform to another can stem from any number of reasons: the identity provider you are currently using is shutting down, your organization no longer wishes to manage users themselves, a change in language or framework, and many other reasons.

Auth0 aims to provide the best authentication and identity management platform that is simple and easy for developers to work with. A key feature of the Auth0 platform is the ability to migrate users from any existing data source into Auth0 without inconveniencing users by requiring password changes.

In this tutorial, we’ll take a look at how to do just that. Stormpath is a company that provides authentication as a service and was recently acquired by Okta. Okta has announced that the Stormpath product will be shut down in August 2017 and customers have until then to find a new provider. Let’s see how we can easily migrate existing Stormpath users into Auth0.

User Migration Made Easy with Auth0

Auth0 allows customers to connect to any custom datastore using the custom database connection feature. This feature, as the name may suggest, allows Auth0 to validate user credentials that are stored outside of Auth0. The external data store can be a database such as MySQL, a service like Stormpath, or your own custom implementation. These external data sources are accessed via scripts written in the Auth0 dashboard. The custom database connection feature also allows developers to automatically import users logging in with custom database credentials into Auth0. This feature can be enabled with the flip of a switch.

To implement this feature in the context of migrating Stormpath users to Auth0, we’ll set up a custom database connection and connect it to an existing Stormpath account using the Stormpath API. When your users log in the first time, they will enter their existing Stormpath credentials and, if authenticated successfully, we will automatically migrate that user account from Stormpath into Auth0. Your users will not have to change their password or jump through any additional hoops and you can decide what data to port over from Stormpath. The next time the user logs in, Auth0 will detect that they have been migrated and authenticate them with their Auth0 account.

Migration diagram

To get started, first sign up for a free Auth0 account. We’ll assume that you already have an active Stormpath account with users you wish to migrate. Even if you are not using Stormpath, you can follow along with this tutorial and connect to a different datastore.

Setting up a Custom Database Connection with User Import Functionality

With your account created, let's set up a custom database connection. In your Auth0 management dashboard, navigate to the database connections section.

Create DB connection

Click on the Create DB Connection button to create a new database connection. You can name your connection anything you like. Leave all the default settings as is for now and click the Create button to create the connection.

Configure DB

Next, let's go into this database connection and connect it to our Stormpath account. Click on your newly created connection and navigate to the Custom Database tab. Flip the switch titled "Use my own database" and the Database Action Scripts section will now be enabled. This is where we will write our code to connect to your existing Stormpath user datastore.

We will need to write two scripts: Login and Get User. Login will proxy the login process and Get User will manage looking up accounts when a user attempts to reset their password.

Enable custom DB

With our custom database feature turned on, let's enable the import functionality. By default, the custom database connection will allow us to authenticate with an external database and will not import users to Auth0. If we want to migrate users from the external platform into Auth0 we'll need to simply toggle a switch. Go to the Settings tab of the connection and flip the switch titled "Import Users to Auth0" and you're done.

Import to Auth0

One final step we'll do before implementing our scripts is enabling this connection for our default client. Navigate to the Clients tab while you are in your database connection and flip the switch to enable this client for the Default Connection. If you already have an existing Auth0 account, the connection name may be different.

Enable connection

Login

The Login script is executed when a user attempts to sign in but their account is not found in the Auth0 database. Here we will implement the functionality to pass the user credentials provided to our Stormpath user data store and see if that user is valid. Auth0 provides templates for many common databases such as MongoDB, MySQL and SQL Server, as well as Stormpath. These templates provide a great starting point and you can customize them any way you want or write your own from scratch.

The Database Action Scripts run in a Webtask sandbox and are Node.js scripts. As our tutorial is focused on migrating Stormpath users to Auth0, the scripts shown below will be geared towards working with the Stormpath REST API, but if you are migrating users from a different provider, you would write your implementation here or use one of the other templates provided.

Let’s look at the Login script implementation to see how it works. We will utilize Stormpath's REST API to authenticate the user.

function login(username, password, callback) {
  // Replace the YOUR-STORMPATH-CLIENT-ID with your Stormpath ID
  var url = 'https://api.stormpath.com/v1/applications/{YOUR-STORMPATH-CLIENT-ID}/loginAttempts';
  // Add your Stormpath API Client ID and Secret
  var apiCredentials = {
    user : 'YOUR-STORMPATH-API-ID',
    password: 'YOUR-STORMPATH-API-SECRET'
  }

  // Stormpath requires the user credentials be passed in as a base64 encoded message
  var credentials = new Buffer(username + ':' + password).toString('base64');

  // Make a POST request to authenticate a user
  request({
    url: url,
    method: 'POST',
    auth: apiCredentials,
    json: {
      type: 'basic',
      // Passing in the base64 encoded credentials
      value: credentials
    }
  }, function (error, response, body) {
    // If response is successful we'll continue
    if (response.statusCode !== 200) return callback();
    // A successful response will return a URL to get the user information
    var accountUrl = body.account.href;

    // Make a second request to get the user info.
    request({
      url: accountUrl,
      auth: apiCredentials,
      json: true
    }, function (errorUserInfo, responseUserInfo, bodyUserInfo) {
      // If we get a successful response, we'll process it
      if (responseUserInfo.statusCode !== 200) return callback();

      // To get the user identifier, we'll strip out the Stormpath API
      var id = bodyUserInfo.href.replace('https://api.stormpath.com/v1/accounts/', '');

      // Finally, we'll set the data we want to store in Auth0 and migrate the user
      return callback(null, {
        user_id : id,
        username: bodyUserInfo.username,
        email: bodyUserInfo.email,
        // We set the users email_verified to true as we assume if they were a valid
        // user in Stormpath, they have already verified their email
        // If this field is not set, the user will get an email asking them to verify
        // their account. You can decide how to handle this for your use case
        email_verified: true
        // Add any additional fields you would like to carry over from Stormpath
      });
    });
  });
}

Continue reading %Easily Migrate Your Existing Users to Auth0%

Create Your Own Yeoman-Style Scaffolding Tool with Caporal.js

$
0
0

Create Your Own Yeoman-Style Scaffolding Tool with Caporal.js

Starting a new project (especially as a JavaScript developer) can often be a repetitive and tedious process. For each new project, we normally need to add a package.json file, pull in some standard dependencies, configure them, create the correct directory structure, add various other files ... The list goes on.

But we're lazy developers, right? And luckily we can automate this. It doesn't require any special tools or strange languages — if you already know JavaScript, the process is actually quite simple.

In this tutorial, we are going to use Node.js to build a cross-platform command-line interface (CLI). This will allow us to quickly scaffold out a new project using a set of predefined templates. It will be completely extensible so that you can easily adapt it to your own needs and automate away the tedious parts of your workflow.

Why Roll Your Own?

Although there are plenty of similar tools for this task (such as Yeoman), by building our own we gain knowledge, experience and can make it totally customizable. You should always consider the idea of creating your tools over using existing ones, especially if you are trying to solve specialized problems. This might sound contrary to the common practice of always reusing software, but there are cases where implementing your own tool can be highly rewarding. Gaining knowledge is always helpful, but you can also come up with highly personalized and efficient tools, tailored especially to your needs.

Saying that, we won't be reinventing the wheel entirely. The CLI itself is going to be built using a library called Caporal.js. Internally it will also use prompt to ask for user data and shellJS that will provide us with some Unix tools right in our Node.js environment. I selected these libraries mostly because of their ease of use, but after finishing this tutorial, you'll be able to swap them out for alternatives that best fit your needs.

As ever, you can find the completed project on Github: https://github.com/sitepoint-editors/node-scaffolding-tool

Now let's get started ...

Up and Running with Caporal.js

First, create a new directory somewhere on your computer. It is recommended to have a dedicated directory for this project that can stay untouched for a long time since the final command will be called from there every time.

Once in the directory, create a package.json file with the following content:

{
  "name": "scaffold",
  "version": "1.0.0",
  "main": "index.js",
  "bin": {
    "scaffold": "index.js"
  },
  "dependencies": {
    "caporal": "^0.3.0",
    "colors": "^1.1.2",
    "prompt": "^1.0.0",
    "shelljs": "^0.7.7"
  }
}

This already includes everything we need. Now to install the packages execute npm install and all the marked dependencies will be available in our project. The versions of these packages are the latest at the time of writing. If newer versions become available in the meantime, you might consider updating them (paying attention to any API changes).

Note the scaffold value in bin. It indicates the name of our command and the file that is going to be called every time we enter that command in our terminal (index.js). Feel free to change this value as you need.

Building the Entry Point

The first component of our CLI is the index.js file which contains a list of commands, options and the respective functions that are going to be available to us. But before writing this file, let's start by defining what our CLI is going to do in a little more detail.

  • The main (and only) command is create, which allow us to create a project boilerplate of our choice.
  • The create command takes a mandatory template argument, that indicates which template we want to use.
  • It also takes a --variant option that allows us to select a specific variation of our template.
  • If no specific variant is supplied, it will use a default one (we will define this later).

Caporal.js allows us to define the above in a compact way. Let's add the following content to our index.js file:

#!/usr/bin/env node

const prog = require('caporal');

prog
  .version('1.0.0')
  .command('create', 'Create a new application')
  .argument('<template>', 'Template to use')
  .option('--variant <variant>', 'Which <variant> of the template is going to be created')
  .action((args, options, logger) => {
    console.log({
      args: args,
      options: options
    });
  });

prog.parse(process.argv);

The first line is a Shebang to indicate that this is a Node.js executable.

The shebang included here only works for Unix-like systems. Windows has no shebang support, so if you want to execute the file directly on Windows you will have to look for a workaround. Running the command via npm (explained at the end of this section) will work on all platforms.

Next, we include the Caporal.js package as prog and we start defining our program. Using the command function, we define the create command as the first parameter and a little description as the second one. This will be shown in the automatically-generated help option for our CLI (using --help).

Then, we chain the template argument inside the argument function, and because it is a required argument we wrap it inside angular brackets (< and >).

We can define the variant option by writing --variant <variant> inside the option function. It means that the option for our command is called --variant and the value will be stored in a variant variable.

Finally, in the action command we pass another function that will handle the current command. This callback will be called with three arguments:

  • passed arguments (args)
  • passed options (options)
  • a utility object to show things on screen (logger).

Continue reading %Create Your Own Yeoman-Style Scaffolding Tool with Caporal.js%

Tips and Tricks for Debugging Electron Applications

$
0
0

Tips and Tricks for Debugging an Electron Application is an excerpt from Electron in Action, a step-by-step guide to building desktop applications that run on Windows, OSX, and Linux.

If you'd like to follow along with the techniques demonstrated in this article, you can use the electron-quick-start demo to create a minimal Electron application:

git clone https://github.com/electron/electron-quick-start
cd electron-quick-start
npm install
npm start

If you'd like a refresher on Electron, then check out our tutorial: Create Cross-Platform Desktop Node Apps with Electron.


Imagine you have a new, shiny Electron app. Everything is going smoothly for you, but it probably won't be long before you need to debug some tricky situation. Being that Electron applications are based on Chrome, it's no surprise that we've access to the Chrome Developer Tools when building Electron applications.

Debugging Renderer Processes

Debugging the renderer proces using Chrome DevTools

Figure 1: The Chrome Developer Tools are available to us in the renderer process like they'd be in a browser-based application.

Debugging the renderer process is relatively straight-forward. Electron's default application menu provides a command for opening the Chrome Developer Tools in our application. You can create your own custom menu and eliminate this feature in the event that you'd prefer not to expose it your users.

Toggling the Chrome DevTools in an Electron app

Figure 2: Figure 2 The tools can be toggled on and off in the default menu provided by Electron.

Developer Tools can be accessed in two other ways. At any point, you can press Cmd + Opt + I on macOS or Ctrl + Shift + I on Windows or Linux. In addition, you can also trigger the Developer Tools programmatically.

The webContents property on BrowserWindow instances has a method called openDevTools(). This method, as you might as expect, opens the Developer Tools in the BrowserWindow it's called on.

app.on('ready', () => {
  mainWindow = new BrowserWindow();

  mainWindow.loadURL(`file://${__dirname}/index.html`);

  mainWindow.webContents.openDevTools();

  mainWindow.on('closed', () => {
    mainWindow = null;
  });
});

We can programmatically trigger the opening of the Developer Tools on the main window once it loads.

Continue reading %Tips and Tricks for Debugging Electron Applications%

How to Write Shell Scripts with JavaScript

$
0
0

This week I had to upgrade a client's website to use SSL. This wasn't a difficult task in itself — installing the certificate was just the click of a button — yet once I had made the switch, I was left with a lot of mixed content warnings. Part of fixing these meant that I had to go through the theme directory (it was a WordPress site) and identify all of the files in which assets were being included via HTTP.

Previously, I would have used a small Ruby script to automate this. Ruby was the first programming language I learned and is ideally suited to such tasks. However, we recently published an article on using Node to create a command-line interface. This article served to remind me that JavaScript has long since grown beyond the browser and can (amongst many other things) be used to great effect for desktop scripting.

In the rest of this post, I'll explain how to use JavaScript to recursively iterate over the files in a directory and to identify any occurrences of a specified string. I'll also offer a gentle introduction to writing shell scripts in JavaScript and put you on the road to writing your own.

Set Up

The only prerequisite here is Node.js. If you don't have this installed already, you can head over to their website and download one of the binaries. Alternatively, you can use a version manager such as nvm. We've got a tutorial on that here.

Getting Started

So where to begin? The first thing we need to do is iterate over all of the files in the theme directory. Luckily Node's native File System module comes with a readdir method we can use for that. It takes the directory path and a callback function as parameters. The callback gets two arguments (err and entries) where entries is an array of the names of the entries in the directory excluding . and .. — the current directory and the parent directory, respectively.

const fs = require('fs');

function buildTree(startPath) {
  fs.readdir(startPath, (err, entries) => {
    console.log(entries);
  });
}

buildTree('/home/jim/Desktop/theme');

If you're following along with this, save the above in a file named search_and_replace.js and run it from the command line using node search_and_replace.js. You'll also need to adjust the path to whichever directory you are using.

Adding Recursion

So far so good! The above script logs the directory's top level entries to the console, but my theme folder contained subdirectories which also had files that needed processing. That means that we need to iterate over the array of entries and have the function call itself for any directories it encounters.

To do this, we first need to work out if we are dealing with a directory. Luckily the File System module has a method for that, too: lstatSync. This returns an fs.Stats object, which itself has an isDirectory method. This method returns true or false accordingly.

Continue reading %How to Write Shell Scripts with JavaScript%

Build a CRUD App Using React, Redux and FeathersJS

$
0
0

Building a modern project requires splitting the logic into front-end and back-end code. The reason behind this move is to promote code re-usability. For example, we may need to build a native mobile application that accesses the back-end API. Or we may be developing a module that will be part of a large modular platform.

The popular way of building a server-side API is to use a library like Express or Restify. These libraries make creating RESTful routes easy. The problem with these libraries is that we will find ourselves writing a TON of REPEATING CODE. We will also need to write code for authorization and other middleware logic.

To escape this dilemma, we can use a framework like Loopback or Feathersjs to help us generate an API.

At the time of writing, Loopback has more GitHub stars and downloads than Feathers. Loopback is a great library for generating RESTful CRUD endpoints in a short period of time. However, it does have a slight learning curve and the documentation is not easy to get along with. It has stringent framework requirements. For example, all models must inherit one of its built-in model class. If you need real-time capabilities in Loopback, be prepared to do some additional coding to make it work.

FeathersJS, on the other hand, is much easier to get started with and has realtime support built-in. Quite recently the Auk version was released (because Feathers is so modular, they use bird names for version names) which introduced a vast number of changes and improvements in a number of areas. According to a post they published on their blog, they are now the 4th most popular real-time web framework. It has excellent documentation and they have covered pretty much any area we can think of on building a real-time API.

What makes Feathers amazing is its simplicity. The entire framework is modular and we only need to install the features we need. Feathers itself is a thin wrapper built on top of express where they've added new features namely services and hooks. Feathers also allows us to effortlessly send and receive data over web sockets.

Prerequisites

Before you get started with the tutorial, you'll need to have a solid foundation in the following topics:

On your machine, you will need to have installed recent versions of:

  • NodeJS 6+
  • Mongodb 3.4+
  • Yarn package manager (optional)
  • Chrome browser

If you have never written a database API in JavaScript before, I would recommend first taking a look at this tutorial on creating RESTful APIs.

Scaffold the App

We are going to build a CRUD contact manager application using React, Redux, Feathers and MongoDB. You can take a look at the completed project here.

In this tutorial, I'll show you how to build the application from the bottom up. We'll kick-start our project using the create-react-app tool.

# scaffold a new react project
create-react-app react-contact-manager
cd react-contact-manager

# delete unnecessary files
rm src/logo.svg src/App.css

Use your favorite code editor and remove all the content in index.css. Open App.js and rewrite the code like this:

import React, { Component } from 'react';

class App extends Component {
  render() {
    return (
      <div>
        <h1>Contact Manager</h1>
      </div>
    );
  }
}

export default App;

Make sure to run yarn start to ensure the project is running as expected. Check the console tab to ensure that our project is running cleanly with no warnings or errors. If everything is running smoothly, use Ctrl+C to stop the server.

Build the API Server with Feathers

Let's proceed with generating the back-end API for our CRUD project using the feathers-cli tool.

# Install Feathers command-line tool
npm install -g feathers-cli

# Create directory for the back-end code
mkdir backend
cd backend

# Generate a feathers back-end API server
feathers generate app

? Project name | backend
? Description | contacts API server
? What folder should the source files live in? | src
? Which package manager are you using (has to be installed globally)? | Yarn
? What type of API are you making? | REST, Realtime via Socket.io

# Generate RESTful routes for Contact Model
feathers generate service

? What kind of service is it? | Mongoose
? What is the name of the service? | contact
? Which path should the service be registered on? | /contacts
? What is the database connection string? | mongodb://localhost:27017/backend


# Install email field type
yarn add mongoose-type-email

# Install the nodemon package
yarn add nodemon --dev

Open backend/package.json and update the start script to use nodemon so that the API server will restart automatically whenever we make changes.

// backend/package.json

....
"scripts": {
    ...
    "start": "nodemon src/",
    ...
  },
...

Let's open backend/config/default.json. This is where we can configure MongoDB connection parameters and other settings. I've also increased the default paginate value to 50, since in this tutorial we won't write front-end logic to deal with pagination.

{
  "host": "localhost",
  "port": 3030,
  "public": "../public/",
  "paginate": {
    "default": 50,
    "max": 50
  },
  "mongodb": "mongodb://localhost:27017/backend"
}

Open backend/src/models/contact.model.js and update the code as follows:

// backend/src/models/contact.model.js

require('mongoose-type-email');

module.exports = function (app) {
  const mongooseClient = app.get('mongooseClient');
  const contact = new mongooseClient.Schema({
    name : {
      first: {
        type: String,
        required: [true, 'First Name is required']
      },
      last: {
        type: String,
        required: false
      }
    },
    email : {
      type: mongooseClient.SchemaTypes.Email,
      required: [true, 'Email is required']
    },
    phone : {
      type: String,
      required: [true, 'Phone is required'],
      validate: {
        validator: function(v) {
          return /^\+(?:[0-9] ?){6,14}[0-9]$/.test(v);
        },
        message: '{VALUE} is not a valid international phone number!'
      }
    },
    createdAt: { type: Date, 'default': Date.now },
    updatedAt: { type: Date, 'default': Date.now }
  });

  return mongooseClient.model('contact', contact);
};

In addition to generating the contact service, Feathers has also generated a test case for us. We need to fix the service name first for it to pass:

// backend/test/services/contact.test.js

const assert = require('assert');
const app = require('../../src/app');

describe('\'contact\' service', () => {
  it('registered the service', () => {
    const service = app.service('contacts'); // change contact to contacts

    assert.ok(service, 'Registered the service');
  });
});

Open a new terminal and inside the backend directory, execute yarn test. You should have all the tests running successfully. Go ahead and execute yarn start to start the backend server. Once the server has finished starting it should print the line: 'Feathers application started on localhost:3030'.

Launch your browser and access the url: http://localhost:3030/contacts. You should expect to receive the following JSON response:

{"total":0,"limit":50,"skip":0,"data":[]}

Now let's use Postman to confirm all CRUD restful routes are working. You can launch Postman using this button:

Run in Postman

If you are new to Postman, check out this tutorial. When you hit the SEND button, you should get your data back as the response along with three additional fields which are _id, createdAt and updatedAt.

Use the following JSON data to make a POST request using Postman. Paste this in the body and set content-type to application/json.

{
  "name": {
    "first": "Tony",
    "last": "Stark"
  },
  "phone": "+18138683770",
  "email": "tony@starkenterprises.com"
}

Build the UI

Let's start by installing the necessary front-end dependencies. We'll use semantic-ui css/semantic-ui react to style our pages and react-router-dom to handle route navigation.

Important: Make sure you are installing outside the backend directory

// Install semantic-ui
yarn add semantic-ui-css semantic-ui-react

// Install react-router
yarn add react-router-dom

Update the project structure by adding the following directories and files:

|-- react-contact-manager
    |-- backend
    |-- node_modules
    |-- public
    |-- src
        |-- App.js
        |-- App.test.js
        |-- index.css
        |-- index.js
        |-- components
        |   |-- contact-form.js #(new)
        |   |-- contact-list.js #(new)
        |-- pages
            |-- contact-form-page.js #(new)
            |-- contact-list-page.js #(new)

Let's quickly populate the JS files with some placeholder code.

For the component contact-list.js, we'll write it in this syntax since it will be a purely presentational component.

// src/components/contact-list.js

import React from 'react';

export default function ContactList(){
  return (
    <div>
      <p>No contacts here</p>
    </div>
  )
}

For the top-level containers, I use pages. Let's provide some code for the contact-list-page.js

// src/pages/contact-list-page.js

import React, { Component} from 'react';
import ContactList from '../components/contact-list';

class ContactListPage extends Component {
  render() {
    return (
      <div>
        <h1>List of Contacts</h1>
        <ContactList/>
      </div>
    )
  }
}

export default ContactListPage;

For the contact-form component, it needs to be smart, since it is required to manage its own state, specifically form fields. For now, we'll place this placeholder code.

// src/components/contact-form.js
import React, { Component } from 'react';

class ContactForm extends Component {
  render() {
    return (
      <div>
        <p>Form under construction</p>
      </div>
    )
  }
}

export default ContactForm;

Populate the contact-form-page with this code:

// src/pages/contact-form-page.js

import React, { Component} from 'react';
import ContactForm from '../components/contact-form';

class ContactFormPage extends Component {
  render() {
    return (
      <div>
        <ContactForm/>
      </div>
    )
  }
}

export default ContactFormPage;

Now, let's create the navigation menu and define the routes for our App. App.js is often referred to as the 'layout template' for the Single Page Application.

Continue reading %Build a CRUD App Using React, Redux and FeathersJS%

Easy AngularJS Authentication with Auth0

$
0
0

This article was updated on 11.05.2017 to reflect important changes to Auth0's API.

Authentication for single page apps can be a tricky matter. In many cases, SPA architecture involves having an isolated front-end application with a framework like AngularJS, and a separate backend that serves as a data API to feed the front-end. In these cases, traditional session-based authentication that is done in most round-trip applications falls short. Session-based authentication has a lot of issues for this kind of architecture, but probably the biggest is that it introduces state to the API, and one of the tenets of REST is that things remains stateless. Another consideration is that if you ever want to use that same data API as a backend for a mobile application, session-based authentication won't work.

JSON Web Tokens

To get around these limitations, we can use JSON Web Tokens (JWT) to add authentication to our single page apps. JWT is an open standard and provides us a way to authenticate requests from our front end AngularJS app to our backend API. JWTs are more than just a token though. One of the biggest advantages of JWTs is that they include a data payload that can have arbitrary JSON data in the form of claims that we define. Since JWTs are digitally signed with a secret that lives on the server, we can rest assured that they can't be tampered with and the data in the payload can't be changed before reaching the backend.

Authentication for Angular Apps

JWTs are a perfect solution for adding authentication to our AngularJS apps. All we need to do to access secured endpoints from our API is save the user's JWT in local storage and then send it as an Authorization header when we make HTTP requests. If the user has an invalid JWT or no JWT at all, their request to access the protected resoures will be denied, and they will get an error.

Unfortunately, this would be just the bare minimum for handling authentication in AngularJS apps. If we care at all about user experience, there are a few other things we need to do to make sure our apps behave as one would expect. We need to:

  • Conditionally show or hide certain elements depending on whether the user has a valid JWT (e.g.: Login and Logout buttons)
  • Protect certain routes that an unauthenticated user shouldn't be able to access
  • Update the user interface when user state changes if their JWT expires or when they log out

In this article, we'll implement authentication from start to finish in an AngularJS app, and we'll even create a small NodeJS server to see how to make requets to a protected resource. There are a lot of details around setting up a user database and issuing JWTs, so instead of doing it on our own, we'll use Auth0 (the company I work for) to do it for us. Auth0 provides a free plan for up to 7,000 active users, which gives us plenty of room in many real world applications. We'll also see how we can easily add a login box and even use social authentication with Auth0.

Before we start, if you'd like a refresher on AngularJS, check out Building an App with AngularJS over on SitePoint Premium.

To see all the code for this tutorial, check out the repo.

angular authentication auth0

Sign up for Auth0

The first thing you'll need for this tutorial is an Auth0 account. When signing up for an account, you will need to give your app a domain name which cannot be changed later. Since you can have multiple apps under the same account, how you name your domain will depend on your situation. In most cases, it's best to name it with something that is relevant to your organization, such as your company's name. If it makes sense, you can also use your application's name--it's up to you. Your Auth0 domain takes the pattern your-domain.auth0.com and is used when configuring the Auth0 tools that we'll see below.

Once you've signed up, you'll be asked what kind of authentication you'd like for your application. It's fine to leave the defaults in place, as you'll be able to change them later.

After you have signed up, head over to your dashboard to check things out. If you click the Clients link in the left sidebar, you'll see that your account gets created with a Default App. Click the Default App to see your credentials and other details.

Angular authentication auth0

Right off the bat we should fill in our Allowed Origins and Allowed Callback URLs. This field is used to tell Auth0 which domains are allowed to make requests to authenticate users, as well as which domains we can redirect to after authentication has taken place. We'll be using http-sever in this tutorial, which has a default origin of http://localhost:8080.

Next, since we are building a Single Page App that will talk to an API backend, let's build an API client as well. Click on the APIs link in the main menu. From here, click the Create API button and you will be presented with a dialog that will ask you to fill in some information about your API. All you'll need to provide is a Name and Identifier. Make note of the Identifier as this is the value that will be used as your audience identifier for the API. Leave the Signing Algorithm as RS256.

Create API client

With Auth0's free plan, we are able to use two social identity providers, such as Google, Twitter, Facebook and many others. All we need to do to make them work is flip a switch and this can be done in the Connections > Social link in the dashboard.

Install the Dependencies and Configure Auth0

We'll need a number of packages for this app, some of which are provided by Auth0 as open source modules. If you have forked the GitHub repo, you can simply run bower install to install all the needed dependencies. Once the dependencies have been installed, you will want to install the http-server module globally. To do so enter the following command:

# To serve the app (if not already installed)
npm install -g http-server

Finally, to get the app up and running, simply execute the http-server command from your terminal or command line interface.

Next, let's set up our app.js and index.html files to bootstrap the application. At this time we can let Angular know which modules we need access to from the dependencies we installed.

// app.js

(function () {

  'use strict';

  angular
    .module('app', ['auth0.auth0', 'angular-jwt', 'ui.router'])
    .config(config);

  config.$inject = ['$stateProvider', '$locationProvider', 'angularAuth0Provider', '$urlRouterProvider', 'jwtOptionsProvider'];

  function config($stateProvider, $locationProvider, angularAuth0Provider, $urlRouterProvider, jwtOptionsProvider) {

    $stateProvider
      .state('home', {
        url: '/home',
        controller: 'HomeController',
        templateUrl: 'components/home/home.html',
        controllerAs: 'vm'
      })

    // Initialization for the angular-auth0 library
    angularAuth0Provider.init({
      clientID: AUTH0_CLIENT_ID, // Your Default Client ID
      domain: AUTH0_DOMAIN, // Your Auth0 Domain
      responseType: 'token id_token',
      redirectUri: AUTH0_CALLBACK_URL, // Your Callback URL
      audience: AUTH0_API_AUDIENCE, // The API Identifier value you gave your API
    });

    // Configure a tokenGetter so that the isAuthenticated
    // method from angular-jwt can be used
    jwtOptionsProvider.config({
      tokenGetter: function() {
        return localStorage.getItem('id_token');
      }
    });

    $urlRouterProvider.otherwise('/home');

    // Remove the ! from the hash so that
    // auth0.js can properly parse it
    $locationProvider.hashPrefix('');

  }

})();

Here we've configured authProvider from auth0-angular with our credentials from the dashboard. Of course, you'll want to replace the values in the sample with your own credentials. Let's also create an app.run.js file and paste the following code:

// app.run.js
(function () {

  'use strict';

  angular
    .module('app')
    .run(function ($rootScope, authService) {

      // Put the authService on $rootScope so its methods
      // can be accessed from the nav bar
      $rootScope.auth = authService;

      // Process the auth token if it exists and fetch the profile
      authService.handleParseHash();
    });

})();

What this piece of functionality will do is parse the hash to extract the access_token and id_token returned with the callback once a user has successfully authenticated. In a real-world application you may have a specific route to handle this such as /callback but for our simple demo will just have this run anytime the app is refreshed.

Continue reading %Easy AngularJS Authentication with Auth0%

A Guide to Testing and Debugging Node Applications

$
0
0

A Guide to Testing and Debugging Node Applications — is an excerpt from Manning's Testing Node Applications. Thoroughly revised in its second edition, this book guides you through all the features, techniques, and concepts you'll need to build production-quality Node applications.

Functional Testing Node Applications

In most web development projects, functional tests work by driving the browser, then checking for various DOM transformations against a list of user-specific requirements. Imagine you’re building a content management system. A functional test for the image library upload feature uploads an image, checks that it gets added, and then checks that it’s added to a corresponding list of images.

The choice of tools for functional testing Node applications is bewildering. From a high level they fall into two broad groups: headless and browser-based tests. Headless tests typically use something like PhantomJS to provide a terminal-friendly browser environment, but lighter solutions use libraries such as Cheerio and JSDOM. Browser-based tests use a browser automation tool such as Selenium that allows you to write scripts that drive a real browser. Both approaches can use the same underlying Node test tools, and you can use Mocha, Jasmine, or even Cucumber to drive Selenium against your application.

Testing Node with browser automation

Selenium

Selenium is a popular Java-based browser automation library which can be used for testing Node applications. With the aid of a language-specific driver, you can connect to a Selenium server and run tests against a real browser. In this article, you’ll learn how to use WebdriverIO, a Node Selenium driver.

Getting Selenium running is trickier than pure Node test libraries, because you need to install Java and download the Selenium JAR file. First, download Java for your operating system, and then go to the Selenium download site to download the JAR file. You can then run a Selenium server like this:

java -jar selenium-server-standalone-3.4.0.jar

Note that your exact Selenium version may be different. You may also have to supply a path to the browser binary. For example, in Windows 10 with Firefox set as the browserName, you can specify Firefox’s full path like this:

java -jar -Dwebdriver.firefox.driver="C:\path\to\firefox.exe" selenium-server-standalone-3.4.0.jar

Alternatively, you might need to download mozilla's Gecko driver (placing it in the same folder as the selenium executable, and start it like so:

java -jar -Dwebdriver.gecko.driver=geckodriver selenium-server-standalone-3.4.0.jar

The exact path depends on how Firefox is installed on your machine. For more about the Firefox driver, read the SeleniumHQ documentation. You can find drivers for Chrome and Microsoft Edge that are configured in similar ways.

Now, with the Selenium server running, create a new Node project and install WebdriverIO:

mkdir -p selenium/test/specs
cd selenium
npm init -y
npm install --save-dev webdriverio
npm install --save express

WebdriverIO comes with a friendly config file generator. To run it, run wdio config:

./node_modules/.bin/wdio config

Follow the questions and accept the defaults. It should look something like this:

Testing Node - running wdio config

Update the package.json file with the wdio command to allow tests to be run with npm test:

"scripts": {
  "test": "wdio wdio.conf.js"
},

Now add something to the test. A basic Express server will suffice. The example is used in the subsequent listing for testing. Save this listing as index.js.

Continue reading %A Guide to Testing and Debugging Node Applications%


A Beginner’s Guide to npm — the Node Package Manager

$
0
0

Node.js makes it possible to write applications in JavaScript on the server. It's built on the V8 JavaScript runtime and written in C++ — so it's fast. Originally, it was intended as a server environment for applications, but developers started using it to create tools to aid them in local task automation. Since then, a whole new ecosystem of Node-based tools (such as Grunt, Gulp and Webpack) has evolved to transform the face of front-end development.

This popular article was updated on 08.06.2017 to reflect the current state of npm, as well as the changes introduced by the release of version 5.

To make use of these tools (or packages) in Node.js we need to be able to install and manage them in a useful way. This is where npm, the Node package manager, comes in. It installs the packages you want to use and provides a useful interface to work with them.

In this article I'm going to look at the basics of working with npm. I will show you how to install packages in local and global mode, as well as delete, update and install a certain version of a package. I'll also show you how to work with package.json to manage a project's dependencies. If you're more of a video person, why not sign up for SitePoint Premium and watch our free screencast: What is npm and How Can I Use It?.

But before we can start using npm, we first have to install Node.js on our system. Let's do that now...

Installing Node.js

Head to the Node.js download page and grab the version you need. There are Windows and Mac installers available, as well as pre-compiled Linux binaries and source code. For Linux, you can also install Node via the package manager, as outlined here.

For this tutorial we are going to use v6.10.3 Stable. At the time of writing, this is the current Long Term Support (LTS) version of Node.

Tip: You might also consider installing Node using a version manager. This negates the permissions issue raised in the next section.

Let's see where node was installed and check the version.

$ which node
/usr/bin/node
$ node --version
v6.10.3

To verify that your installation was successful let's give Node's REPL a try.

$ node
> console.log('Node is running');
Node is running
> .help
.break Sometimes you get stuck, this gets you out
.clear Alias for .break
.exit  Exit the repl
.help  Show repl options
.load  Load JS from a file into the REPL session
.save  Save all evaluated commands in this REPL session to a file
> .exit

The Node.js installation worked, so we can now focus our attention on npm, which was included in the install.

$ which npm
/usr/bin/npm
$ npm --version
3.10.10

Node Packaged Modules

npm can install packages in local or global mode. In local mode it installs the package in a node_modules folder in your parent working directory. This location is owned by the current user. Global packages are installed in {prefix}/lib/node_modules/ which is owned by root (where {prefix} is usually /usr/ or /usr/local). This means you would have to use sudo to install packages globally, which could cause permission errors when resolving third-party dependencies, as well as being a security concern. Lets change that:

Parcel delivery company
Time to manage those packages

Changing the Location of Global Packages

Let's see what output npm config gives us.

$ npm config list
; cli configs
user-agent = "npm/3.10.10 node/v6.10.3 linux x64"

; userconfig /home/sitepoint/.npmrc
prefix = "/home/sitepoint/.node_modules_global"

; node bin location = /usr/bin/nodejs
; cwd = /home/sitepoint
; HOME = /home/sitepoint
; "npm config ls -l" to show all defaults.

This gives us information about our install. For now it's important to get the current global location.

$ npm config get prefix
/usr

This is the prefix we want to change, so as to install global packages in our home directory. To do that create a new directory in your home folder.

$ cd ~ && mkdir .node_modules_global
$ npm config set prefix=$HOME/.node_modules_global

With this simple configuration change, we have altered the location to which global Node packages are installed. This also creates a .npmrc file in our home directory.

$ npm config get prefix
/home/sitepoint/.node_modules_global
$ cat .npmrc
prefix=/home/sitepoint/.node_modules_global

We still have npm installed in a location owned by root. But because we changed our global package location we can take advantage of that. We need to install npm again, but this time in the new user-owned location. This will also install the latest version of npm.

$ npm install npm --global
└─┬ npm@5.0.2
  ├── abbrev@1.1.0
  ├── ansi-regex@2.1.1
....
├── wrappy@1.0.2
└── write-file-atomic@2.1.0

Finally, we need to add .node_modules_global/bin to our $PATH environment variable, so that we can run global packages from the command line. Do this by appending the following line to your .profile, .bash_profileor .bashrc and restarting your terminal.

export PATH="$HOME/.node_modules_global/bin:$PATH"

Now our .node_modules_global/bin will be found first and the correct version of npm will be used.

$ which npm
/home/sitepoint/.node_modules_global/bin/npm
$ npm --version
5.0.2

Continue reading %A Beginner’s Guide to npm — the Node Package Manager%

How I Designed & Built a Fullstack JavaScript Trello Clone

$
0
0

A few weeks ago, I came across a developer sharing one of his side projects on GitHub: a Trello clone. Built with React, Redux, Express, and MongoDB, the project seemed to have plenty of scope for working on fullstack JS skills.

I asked the developer, Moustapha Diouf, if he'd be interested in writing about his process for choosing, designing, and building the project and happily, he agreed. I hope you'll find it as interesting as I did, and that it inspires you to work on ambitious projects of your own!

Nilson Jacques, Editor


In this article, I'll walk you through the approach I take, combined with a couple of guidelines that I use to build web applications. The beauty of these techniques is that they can be applied to any programming language. I personally use them at work on a Java/JavaScript stack and it has made me very productive.

Before moving on to the approach, I'll take some time to discuss how:

  • I defined my goals before starting the project.
  • I decided on the tech stack to use.
  • I setup the app.

Keep in mind that since the entire project is on GitHub (madClones), I'll focus on design and architecture rather than actual code. You can check out a live demo of the current code: you can log in with the credentials Test/Test.

Screenshot of fullstack Trello clone

If you're interested in taking your JavaScript skills to the next level, sign up for SitePoint Premium and check out our latest book, Modern JavaScript

Defining the Goals

I started by taking a couple of hours a day to think about my goals and what I wanted to achieve by building an app. A to-do list was out of the question, because it was not complex enough. I wanted to dedicate myself to at least 4 months of serious work (it's been 8 months now). After a week of thinking, I came up with the idea to clone applications that I like to use on a daily basis. That is how the Trello clone became a side project.

In summary, I wanted to:

  • Build a full stack JavaScript application. Come out of my comfort zone and use a different server technology.
  • Increase my ability to architect, design, develop, deploy and maintain an application from scratch.
  • Practice TDD (test driven development) and BDD (behavior driven development). TDD is a software practice that requires the developer to write test, watch them fail, then write the minimum code to make the test pass and refactor (red, green, refactor). BDD, on the other hand, puts an emphasis on developing with features and scenario. Its main goal is to be closer to the business and write a language they can easily understand.
  • Learn the latest and the hottest frameworks. At my job, I use angular 1.4 and node 0.10.32 (which is very sad I know) so I needed to be close to the hot stuff.
  • Write code that follows the principle of the 3R's: readability, refactorability, and reusability.
  • Have fun. This is the most important one. I wanted to have fun and experiment a lot since I was (and still am) the one in charge of the project.

Choosing the Stack

I wanted to build a Node.js server with Express and use a Mongo database. Every view needed to be represented by a document so that one request could get all the necessary data. The main battle was for the front-end tech choice because I was hesitating a lot between Angular and React.

I am very picky when it comes to choosing a framework because only testability, debuggability and scalability really matter to me. Unfortunately, discovering if a framework is scalable only comes with practice and experience.

I started with two proof-of-concepts (POCs): one in Angular 2 and another one in React. Whether you consider one as a library and the other one as a framework doesn't matter, the end goal is the same: build an app. It's not a matter of what they are, but what they do. I had a huge preference for React, so I decided to move forward with it.

Getting Started

I start by creating a main folder for the app named TrelloClone. Then I create a server folder that will contain my Express app. For the React app, I bootstrap it with Create React App.

I use the structure below on the client and on the server so that I do not get lost between apps. Having folders with the same responsibility helps me get what I am looking for faster:

  • src: code to make the app work
  • src/config: everything related to configuration (database, URLs, application)
  • src/utils: utility modules that help me do specific tasks. A middleware for example
  • test: configuration that I only want when testing
  • src/static: contains images for example
  • index.js: entry point of the app

Setting up the Client

I use create-react-app since it automates a lot of configuration out of the box. "Everything is preconfigured and hidden so that you can focus on code", says the repo.

Here is how I structure the app:

  • A view/component is represented by a folder.
  • Components used to build that view live inside the component folder.
  • Routes define the different route options the user has when he/she is on the view.
  • Modules (ducks structure) are functionalities of my view and/or components.

Setting up the Server

Here is how I structure the app with a folder per domain represented by:

  • Routes based on the HTTP request
  • A validation middleware that tests request params
  • A controller that receives a request and returns a result at the end

If I have a lot of business logic, I will add a service file. I do not try to predict anything, I just adapt to my app's evolution.

Choosing Dependencies

When choosing dependencies I am only concerned by what I will gain by adding them: if it doesn't add much value, then I skip. Starting with a POC is usually safe because it helps you "fail fast".

If you work in an agile development you might know the process and you might also dislike it. The point here is that the faster you fail, the faster you iterate and the faster you produce something that works in a predictable way. It is a loop between feedback and failure until success.

Client

Here is a list of dependencies that I always install on any React app:

Continue reading %How I Designed & Built a Fullstack JavaScript Trello Clone%

Introduction to FuseBox — a Faster, Simpler Webpack Alternative

$
0
0

In today's rapidly evolving front-end landscape, it's vital to have a solid grasp of the JavaScript module system. Modules can help organize your code, make it more maintainable and increase its reusability. Unfortunately, browser support for ES modules isn't quite there yet, so you'll invariably need a module bundler to stitch them together into a single file which can be delivered to the browser.

Webpack has arguably become the de facto JavaScript module bundler, but it has a reputation for being confusing and difficult to learn. In this article I want to present a faster, simpler Webpack alternative — FuseBox.

FuseBox is a next generation ecosystem of tools that provides for all of the requirements of the development lifecycle. It enables developers to bundle any file format, it is a module loader, a transpiler, a task runner and much more.

In this article we are going to use FuseBox to walk you through the common tasks involved in developing a JavaScript application. These are as follows:

Once you've finished reading, you'll be able to drop FuseBox into your next project and benefit from its speed, simplicity and flexibility.

Bundling — A Basic Example

Disclaimer: I'm one of the core contributors to the project.

Projects are becoming larger — that's a fact. If we were to include all the files required by the page one-by-one, this would make things considerably slower, as the browser would have to make a bunch of blocking HTTP requests. Bundling solves this issue and reduces the number of files requested and FuseBox makes this process as easy as possible.

To start bundling, we need to teach FuseBox about what we want. FuseBox does not require much in the way of configuration to bundle heavy projects. In fact, ten lines of configuration are usually enough for most use cases. However, before we start getting into some real-world examples, let's create something simple.

First, create a new folder. Then, from your command line, navigate to it and enter the following: npm init -y. This will initialize your project. Then type npm install fuse-box -D, which will install FuseBox as a development dependency.

Next create a folder called src which is where all your code will go. Also, create an index.js file in your src folder and add the following content into it:

console.log('Hello world');

Next, create a fuse.js file in the root of your project. This file will contain all your FuseBox configuration.

By now, our Folder structure should look something like this:

MyProject
├── node_modules
├── src
│    └── index.js
├── fuse.js
└── package.json

Add the code below to fuse.js:

const { FuseBox } = require("fuse-box");

const fuse = FuseBox.init({
  homeDir: "src",
  output: "dist/$name.js"
});

fuse.bundle("app")
  .instructions("> index.js");

fuse.run();

Let's break this code down section by section:

First, we require FuseBox. Then we initialize a new instance of FuseBox with the init method. This is also called the Producer in FuseBox terms. It's where we define global configuration for all bundles.

The homeDir option points FuseBox to the home directory of our files. The reason for that is because FuseBox creates a virtual file structure that mimics the physical one. The output option tells FuseBox where our output bundle should reside. Notice the $name.js this is a placeholder that will be replaced with the name you provide to your bundle.

The command fuse.bundle("app") is where we tell FuseBox about our bundle. We are telling FuseBox to create a bundle with the name app.js that will reside in the dist folder in your project. The end file will be project/dist/app.js.

The instructions('>index.js') part is where we tell FuseBox what we want to bundle. The symbol > is what we call an arithmetic instruction — it's the language FuseBox uses to learn what files need to be bundled.

The command fuse.run() tells FuseBox to start the bundling process.

Now from your command line enter node fuse.js and that's it, you are done! FuseBox will now start its bundling magic and create the bundle at dist/app.js.

The full example is available here

Transpiling TypeScript and ES6

What we have done so far is nice, but this is not how many modern JavaScript projects are developed. Applications today are developed using ES6 which is the sixth major release of the ECMAScript language specification. ES6 is great — it enables new language features like classes, arrow functions and much more. The problem though, it is not fully supported by all browser or Node.js versions yet. Therefore we need to transpile our code into a more common supported version of JavaScript, ES5.

There are two major tools to achieve this: Typescript & Babel. FuseBox supports both, in fact FuseBox is built with Typescript. Thus it supports it natively.

To get started with FuseBox and Typescript, do the following:

  • Create a new project.
  • Using the command line, navigate to the root of this project and do npm init -y.
  • Create a src folder.
  • Inside src folder add index.ts.
  • Create fuse.js in the root of the project.
  • Install FuseBox and TypeScript as dependencies: npm install fuse-box typescript -D.

In index.ts add the following:

const name: string = "FuseBox";
console.log(name);

You may be wondering what :string means; this is an example of Typescript's type system, it tells the compiler that the variable name is of type string. To learn more about Typescript check the official site..

Add the following to fuse.js

const { FuseBox } = require("fuse-box");

const fuse = FuseBox.init({
  homeDir: "src",
  output: "dist/$name.js"
});

fuse.bundle("app")
  .instructions("> index.ts");

fuse.run();

Notice that things are still the same as before, the only difference is we use the .ts file format instead of .js in instructions('>index.ts'). Now that the prerequisites are in place, from your command line enter node fuse.js and FuseBox will start bundling.

The full example is available here

Note: When using ES6 syntax, FuseBox will automatically detect the module type and transpile the code seamlessly. No need for Babel. FuseBox rocks!

Module Loading

So far, we have been doing just simple console.log examples, let's take it a step further and start learning about module loading. Modules are discreet units of independent, reusable code. In JavaScript there are many ways to create modules.

FuseBox Bundles your code into the CommonJS module format. Unfortunately, this is not supported in browsers, but no need to worry, FuseBox has your back and provides a comprehensive API to make working with modules in the browser a breeze.

Building on our Typescript example let's create some modules and start using them. As we are using TypeScript, we will be using the ES6 module system.

In your src folder, next to index.ts, create hello.ts and add the following to it:

export function hello(name: string) {
  return `Hello ${name}`;
}

In index.ts add the following:

import { hello } from "./hello";

const name: string = `Mr. Mike`;
console.log(hello(name));

Now from your command line enter node fuse.js then node dist/app.js, you should see the following written out to your console:

 Hello Mr. Mike

Congratulations! You just created and loaded your first module with FuseBox, ES6 and Typescript :)

We have learned how to load local modules, but FuseBox works with external Node packages too. So let’s expand this example and show how we can include Moment.js as a module.

From the command line enter npm install moment -S. This command installs the Moment.js package as a dependency of your project. Now add the following to your index.ts:

import {hello} from "./hello";
import * as moment from "moment"

const time = moment().format('MMMM Do YYYY, h:mm:ss a');
const name: string = `Mr. Mike`;
console.log(hello(name));
console.log(time);

If you now enter node fuse.js, then node dist/index.js you should see the following written out to your console (although the date will obviously be different):

Hello Mr. Mike
June 13th 2017, 11:50:48 am

The full example is available here

Continue reading %Introduction to FuseBox — a Faster, Simpler Webpack Alternative%

Introduction to Kubernetes: How to Deploy a Node.js Docker App

$
0
0

While container technology has existed for years, Docker really took it mainstream. A lot of companies and developers now use containers to ship their apps. Docker provides an easy to use interface to work with containers.

However, for any non-trivial application, you will not be deploying "one container", but rather a group of containers on multiple hosts. In this article, we'll take a look at Kubernetes, an open-source system for automating deployment, scaling, and management of containerized applications.

Prerequisites: This article assumes some familiarity with Docker. If you need a refresher, check out Understanding Docker, Containers and Safer Software Delivery.

What Problem Does Kubernetes Solve?

With Docker, you have simple commands like docker run or docker stop to start/stop a container respectively. Unlike these simple commands that let you do operations on a single container, there is no docker deploy command to push new images to a group of hosts.

Many tools have appeared in recent times to solve this problem of "container orchestration"; popular ones being Mesos, Docker Swarm (now part of the Docker engine), Nomad, and Kubernetes. All of them come with their pros and cons but, arguably, Kubernetes has the most mileage at this point.

Kubernetes (also referred to as 'k8s') provides powerful abstractions that completely decouple application operations such as deployments and scaling from underlying infrastructure operations. So, with Kubernetes, you do not work with individual hosts or virtual machines on which to run you code, but rather Kubernetes sees the underlying infrastructure as a sea of compute on which to put containers.

Kubernetes Concepts

Kubernetes has a client/server architecture. Kubernetes server runs on your cluster (a group of hosts) on which you will deploy your application. And you typically interact with the cluster using a client, such as the kubectl CLI.

Pods

A pod is the basic unit that Kubernetes deals with, a group of containers. If there are two or more containers that always need to work together, and should be on the same machine, make them a pod. A pod is a useful abstraction and there was even a proposal to make them a first class docker object.

Node

A node is a physical or virtual machine, running Kubernetes, onto which pods can be scheduled.

Label

A label is a key/value pair that is used to identify a resource. You could label all your pods serving production traffic with "role=production", for example.

Selector

Selections let you search/filter resources by labels. Following on from the previous example, to get all production pods your selector would be "role=production".

Service

A service defines a set of pods (typically selected by a "selector") and a means by which to access them, such as single stable IP address and corresponding DNS name.

Deploy a Node.js App on GKE using Kubernetes

Now, that we are aware of basic Kubernetes concepts, let's see it in action by deploying a Node.js application on Google Container Engine (referred to as GKE). You'll need a Google Cloud Platform account for the same (Google provides a free trial with $300 credit).

1. Install Google Cloud SDK and Kubernetes Client

kubectl is the command line interface for running commands against Kubernetes clusters. You can install it as a part of Google Cloud SDK. After Google Cloud SDK installs, run the following command to install kubectl:

$ gcloud components install kubectl

or brew install kubectl if you are on Mac. To verify the installation run kubectl version.

You'll also need to setup the Google cloud SDK with credentials for your Google cloud account. Just run gcloud init and follow the instructions.

2. Create a GCP project

All Google Cloud Platform resources are created under a project, so create one from the web UI.

Set the default project ID while working with CLI by running:

gcloud config set project {PROJECT_ID}

3. Create a Docker Image of your application

Here is the application that we'll be working with: express-hello-world. You can see in the Dockerfile that we are using an existing Node.js image from dockerhub. Now, we'll build our application image by running:

$ docker build -t hello-world-image .

Run the app locally by running:

docker run --name hello-world -p 3000:3000 hello-world-image

If you visit localhost:3000 you should get the response.

4. Create a cluster

Now we'll create a cluster with three instances (virtual machines), on which we'll deploy our application. You can do it from the fairly intuitive web UI by going to container engine page or by running this command:

Continue reading %Introduction to Kubernetes: How to Deploy a Node.js Docker App%

KeystoneJS: The Best Node.js Alternative to WordPress

$
0
0

KeystoneJS is a content management system and framework to build server applications that interact with a database. It is based on the Express framework for Node.js and uses MongoDB for data storage. It represents a CMS alternative for web developers who want to build a data-driven website but don’t want to get into the PHP platform or large systems like WordPress.

Although WordPress can be set up by not so technical users, KeystoneJS offers the control needed for professional ones to develop new websites—although it is still considerably easier to work with KeystoneJS than manually building your website from scratch. It not only offers a platform to build websites; you can replace almost everything on it and develop more specialized systems like applications and APIs.

Key Features

  • Auto-generated Admin UI: When you build something with KeystoneJS, the data models that you define are also used to automatically create an admin dashboard to manage your data. You do not have to set the database models directly; you describe your data using Lists.

    KeystoneJS automatically generated admin dashboard

  • Lightweight and easy to customize: The fact that you get control over everything without having to know a huge system inside-out makes websites both lightweight and easier to customize.

  • Easily extendable: KeystoneJS can be considered a library, and you are not limited to only using the functionality it provides. You can easily integrate any package from one of the largest library ecosystems: JavaScript.

  • Start from scratch or use a template: If you want to start building something like a blog, you don’t have to spend time dealing with the logic of the system; KeystoneJS provides templates ready to use or to customize. If you have specific requirements you can start from scratch by making use of the tools provided by it, but without having to write everything by yourself.

  • Specially built for developers: Other CMSs tend to include everything in one package so non-technical users can get started as fast as possible. However, KeystoneJS is targeted at developers who want to build a CMS but don’t want the bloat or limitations of pre-built systems.

  • Compatible with third-party services: KeystoneJS offers integration with some useful third-party services like Amazon S3, Cloudinary, Mandrill out of the box. Suppose you want to store certain data on Amazon S3, it is as easy as adding { type: Types.S3File } as a field type when you define your data.

Use Cases

  • Websites for non-technical users: If you work as a web developer for clients, you might find that the task of building a website for a non-technical person is not so easy since you also have to build an administration panel to add and update data. With KeystoneJS you don’t have to worry about doing the double amount of work; an administration panel is automatically created.

  • Dynamic websites: KeystoneJS provides a useful foundation and tools to work with dynamic data on websites, useful when static websites are too little to be considered, but a traditional CMS like WordPress is too heavy or opinionated for your project.

  • Performance: There is nothing like building something just for your needs; If you need a highly specialized website and performance is key, you can use KeystoneJS to build something that fits your exact needs and exploits the performance advantages of the Node.js platform, especially for concurrent services.

  • Ecosystem: JavaScript has one of the richest ecosystems of third-party packages. Also if you are required (or just prefer) to use JavaScript on both the client and the server, KeystoneJS is an excellent tool.

  • Tight Deadline: Do you have a project with specialized features and the deadline is very close? The way KeystoneJS handles data and the fact that the administration panel is created automatically means that you can spend more time building the actual logic of your site instead of handling implementation details.

Getting Started

There are two ways to start a KeystoneJS project:

Continue reading %KeystoneJS: The Best Node.js Alternative to WordPress%

Viewing all 225 articles
Browse latest View live